This post may include affiliate links. Thank you for your support.
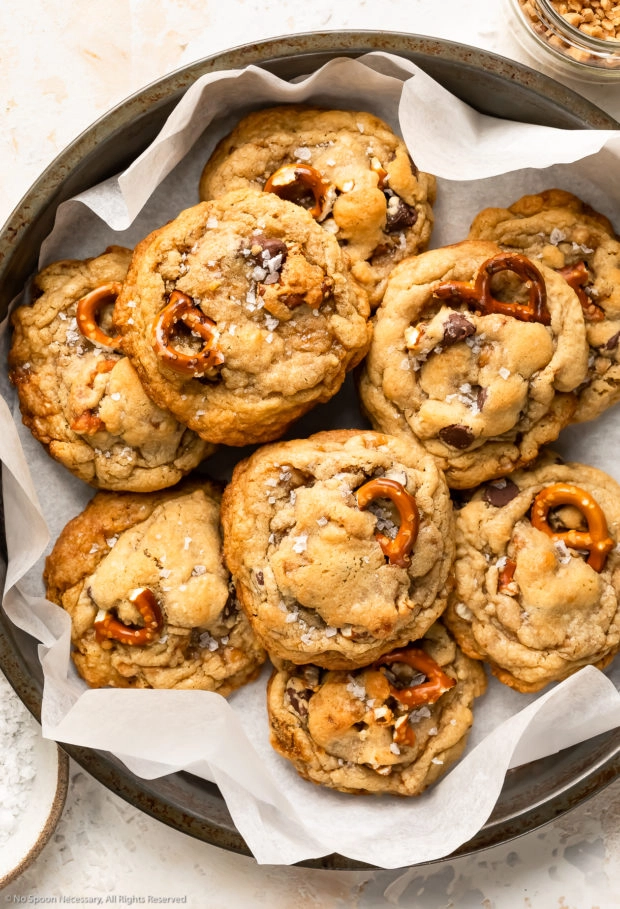
Learn how to make the best Kitchen Sink Cookies! These toffee cookies are thick, ultra-soft and slightly chewy with a meltingly tender center! And they’re overflowing with delicious, totally customizable mix-ins, such as sticky, sweet toffee; crunchy, salty pretzels, and rich chocolate chips! Plus, this toffee cookie recipe is so simple to make – requiring basic pantry ingredients and just 30 minutes to prepare! These everything cookies are the most delicious way to clean out your pantry!
You can easily customize this everything cookie recipe with your favorite mix-ins, such as white chocolate chips, caramel or butterscotch baking chips; potato chips, nuts and more! Continue to read on for comprehensive tips and tricks for preparing the best cookie dough! Plus, there are plenty of tips for making the cookies in advance, along with storing and freezing them! And don’t miss the comprehensive step-by-step photos in the middle of the post!
Hi, friends! Today I’m sharing the most delicious way to clean out your pantry – kitchen sink cookies!
Table of Contents
- Kitchen Sink Cookie: recipe overview
- What are kitchen sink cookies?
- What’s in these cookies?
- What mix-ins can I add to cookie dough?
- How to make toffee cookies?
- FAQ: For the best kitchen sink cookie
- Troubleshooting: common cookie problems and solutions
- Tips for making cookie dough in advance
- Storing and freezing cookies
- More loaded soft and chewy cookie recipes!
- Toffee Cookies (aka Kitchen Sink Cookies)
Kitchen Sink Cookie: recipe overview
Honestly, these may be the absolute best cookies I have ever had the pleasure of eating! And, I don’t write that lightly, because I have had my fair share of cookies! But, these cookies are legitimately it – there is just SO MUCH to love and they are utterly impossible to resist!
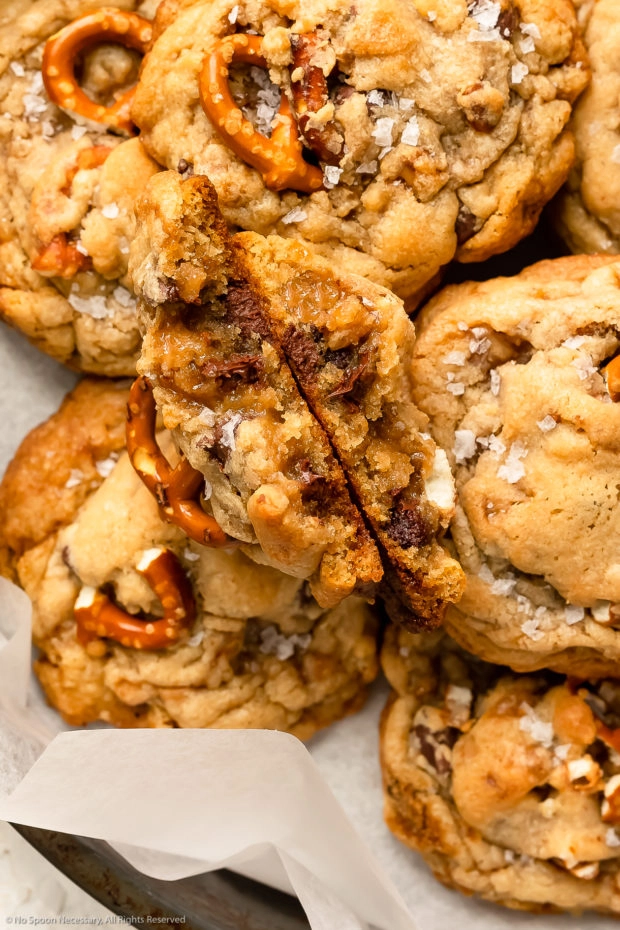
Let’s start with the texture. These cookies have that classic crisp, buttery bottom with a soft and chewy interior that gives way to a center pocket of ultra-tender, almost dough-like, melt-in-your-mouth rich deliciousness! The texture alone is swoon-worthy!
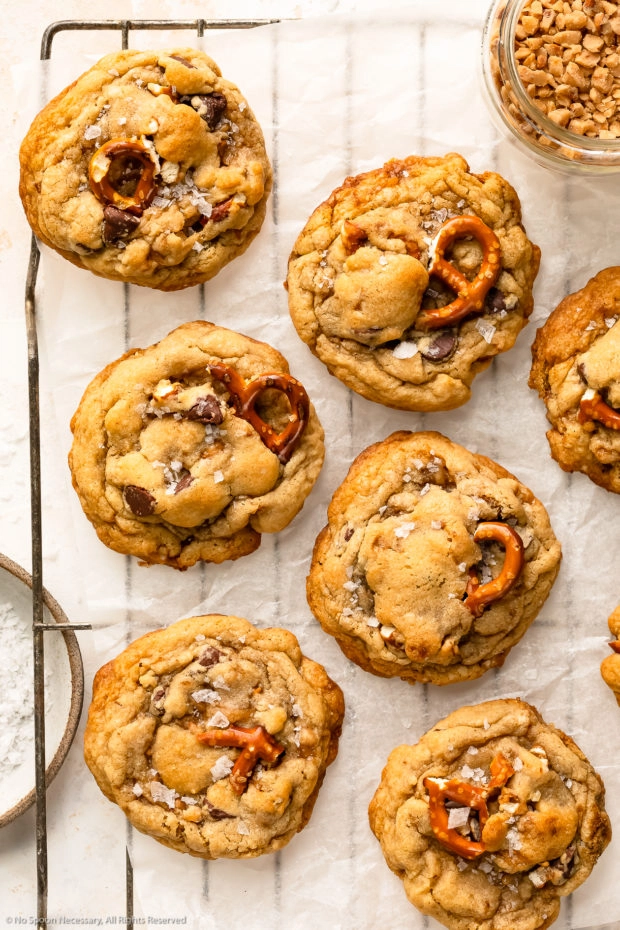
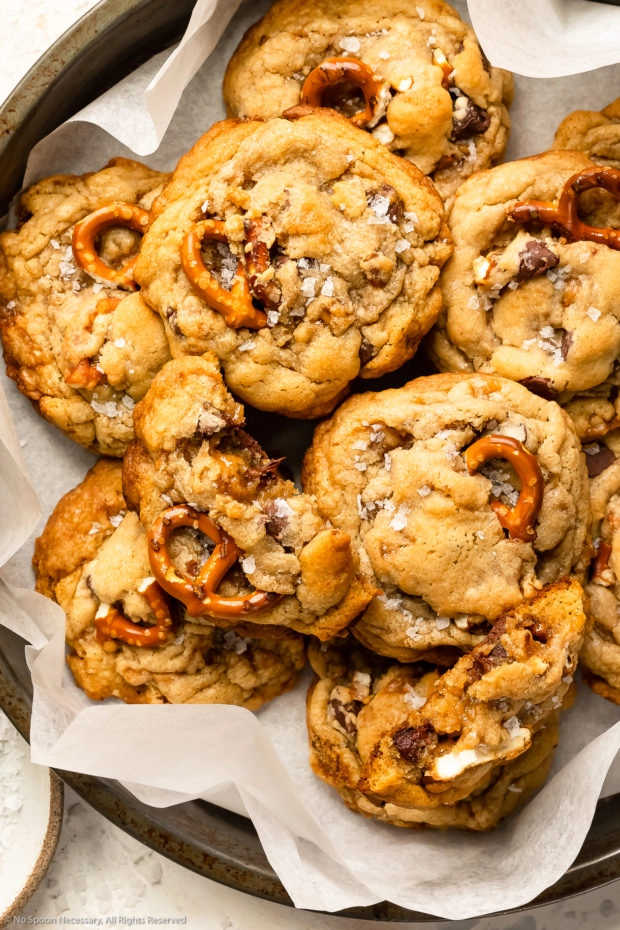
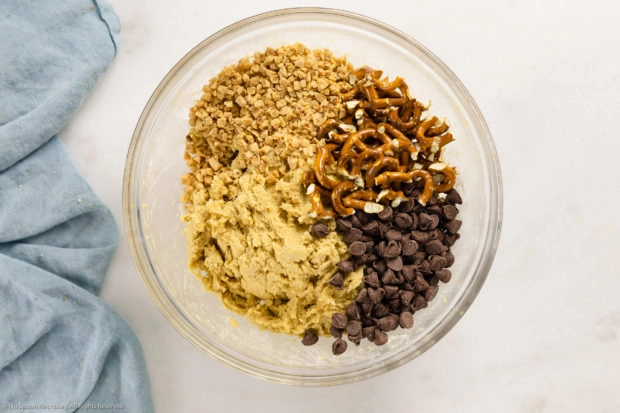
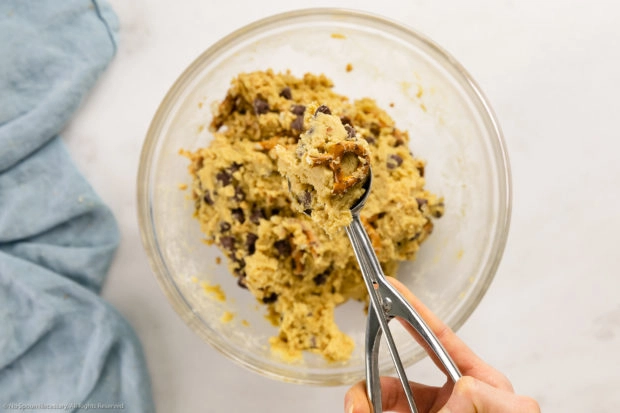
And, don’t even get me started on the mix-ins!! These cookies are positively overflowing with a variety of tasty mix-ins, so that each and every bite is slightly different from the last! Shown here is a delicious combination of rich chocolate chips; sticky, sweet toffee bits; salty, crunchy pretzels; and a generous sprinkling of fancy flaky sea salt. The combination is divine! However, another great thing about these cookies it that they are a mix and match, chose your own cookie adventure! You can use whatever combination of yummy cookie mix-ins you love! Feel free to keep things simple or switch things up by throwing in your favorite nuts, potato chips or leftover candy! The world is your oyster and these cookies are your canvas!
Oh, did I mention that these toffee cookies are made with simple, everyday ingredients and they’re incredibly easy and totally straight-forward to prepare!? Mic drop.
Why you’ll love this recipe
- The best texture! These cookies legitimately have the best texture – crisp bottom with a soft and chewy exterior that gives way to a center pocket of ultra-tender, almost dough-like goodness.
- Sweet and salty! The best part of kitchen sink cookies are all the delicious mix-in’s! The ingredients shown in the recipe – toffee, pretzels and chocolate – produce the best blend of sweet and salty flavors with a touch of richness!
- Pantry Staples! This recipe requires just 10 pantry staple ingredients, along with your mix-in(s) of choice! If you bake often, it’s more than likely you will have all the ingredients hanging out in your kitchen!
- Easy to prepare! You only need one small bowl and a stand mixer or two mixing bowls and a hand-held mixer to make these cookies!
- Customizable mix-ins! You can choose your own cookie adventure by using your favorite mix-ins! (See below for ideas!)
- Make ahead! You can easily make this cookie dough in advance and store it in the refrigerator until you’re ready to use!
- Freeze beautifully! These cookies freeze beautifully, so you can keep a batch in the freezer to satisfy your sweet tooth whenever the cookie-craving strikes!
What are kitchen sink cookies?
A kitchen sink cookie is a soft and chewy cookie made with various sweet, salty and savory mix-ins. Also known as everything cookies, these treats got their name because they contain “everything but the kitchen sink”. Typical mix-ins or additions include chocolate chips, pretzels and toffee or caramel.
The cafe-restaurant, Panera Bread, helped the Kitchen Sink Cookie gain popularity and their version contains milk chocolate chips, semi-sweet chocolate chips, caramel pieces, pretzels, and a sea salt finish. However, kitchen sink cookies are a totally customizable, build-your-own-cookie experience! You can mix and match any of your favorite cookie add-ins to create the cookie of your dreams!
What’s in these cookies?
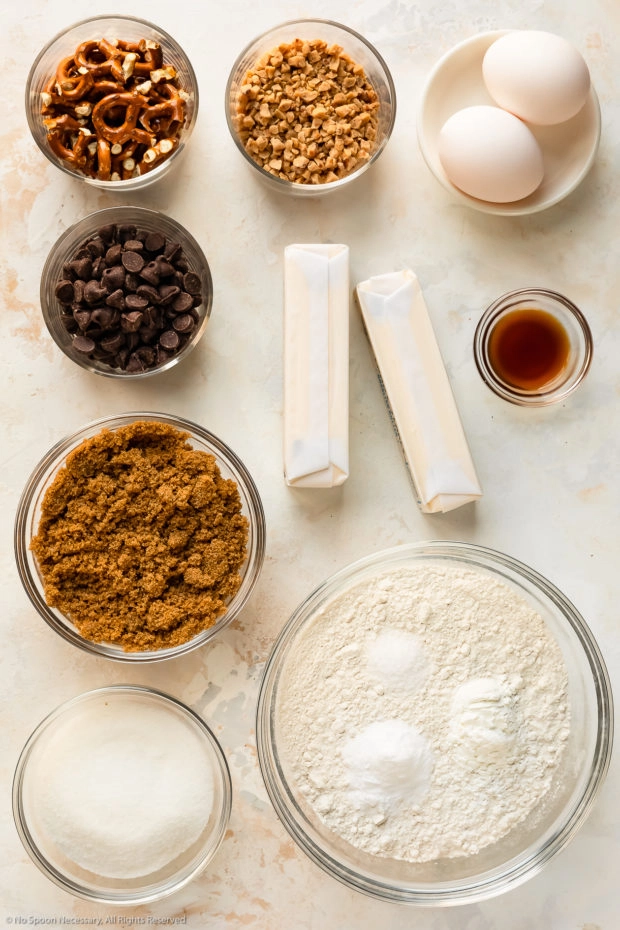
These cookies only require 10 simple ingredients (along with your mix-ins of choice!), most of which are pantry or refrigerator staples! However, don’t let the simple ingredient list fool you, these seemingly basic ingredients transform into the most delicious cookies!
Ingredients to make toffee cookies
- Flour: All-purpose flour helps the cookie dough remain sturdy and gives the cookies structure.
- Cornstarch: Cornstarch blocks the formation of tough gluten strands in the dough, which helps make these cookies deliciously tender and soft!
- Baking Soda: This chemical leavening agent provides lift and helps the cookie rise!
- Salt: Kosher salt balances and enhances all the flavors!
- Butter: Unsalted butter provides moisture and helps make cookies tender. Make sure you butter is room temperature for the best results!
- Sugars: Sugar gives the cookies their traditional sweet flavor. For ultra-rich and tender cookies, this recipe uses more light brown sugar than granulated sugar!
- Eggs: A combination of 1 whole egg along with 1 egg yolk helps bind the ingredients and produces a deliciously moist, chewy cookie interior!
- Vanilla: Pure vanilla extract adds a touch of warm flavor!
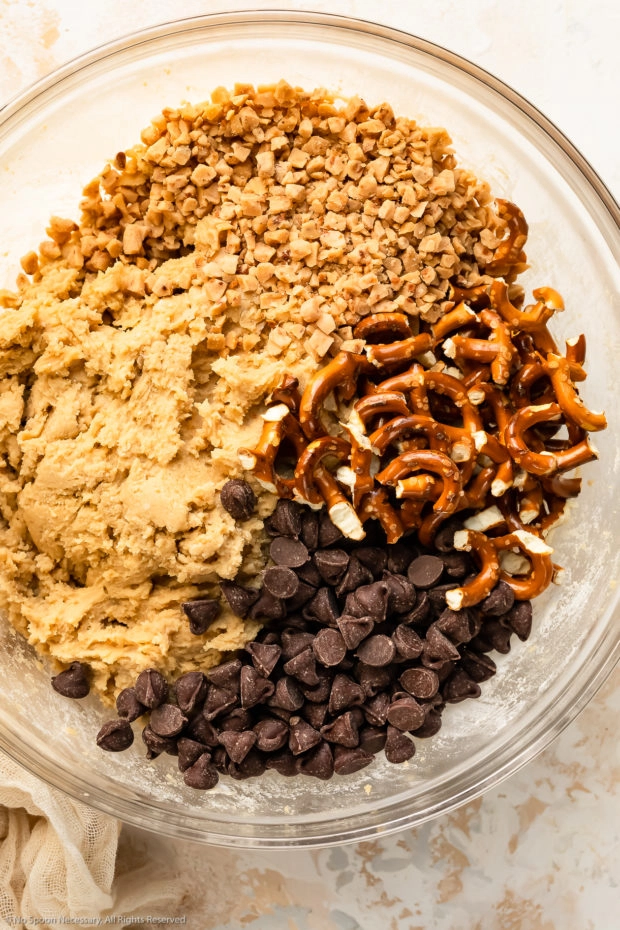
- Mix-ins: I really love the combination of sweet chocolate chips and toffee bits along with salty pretzels and flaky sea salt! However, you can use any mix-in or combination of cookie dough mix-ins you love! (Scroll down for delicious mix-in ideas and variations!)
- Flaky Sea Salt (optional): While entirely optional, I highly recommend dusting your warm cookies with a bit of flaky sea salt (Maldon)! It adds that special something that you shouldn’t miss!
Substitutions
- Gluten-Free: For gluten-free cookies, substitute the all-purpose flour with gluten-free flour – just make sure you use a brand that can be substituted in a 1:1 ratio for regular flour.
What mix-ins can I add to cookie dough?
Yummy mix-ins are the fun part of any cookie! You can keep things simple, or mix and match flavors to make your own custom cookie! I like to use a balance of both sweet and salty; and crunchy and creamy ingredients to get the most bang for my cookie buck! However, please use whatever ingredients you love or have hanging around! Below are some ideas to help get you started!
Tasty add-ins for cookies
- Baking morsels: One or any combination of your favorite chips, including – chocolate, white chocolate, butterscotch and peanut butter!
- Pretzels: Pretzels add a nice crunch and salty element to your cookies! You can crush up the pretzels into medium-size crumbs (I use a resealable bag and a mallet or rolling pin) or you can simply break them into pieces if you prefer more texture!
- Toffee: I like to use toffee bits, such as Skor or Heath; however you can also chop up a Heath bar!
- Caramels: If you prefer caramel over toffee, I recommend using chewy caramels and roughly chopping them into small pieces, versus using the caramel bits.
- Potato Chips: Your favorite variety of potato chips are another delicious salty mix-in!
- M&Ms: This classic candy is a great way to add various flavors and pops of color to your cookies!
- Candy Bar: Try chopping up your favorite candy bar(s) and adding them to your cookie dough! I advise you stay away from any candy bars that contain a lot of toffee as they tend to ooze too much.
- Sprinkles: Colorful sprinkles are a must if you are looking for a little sparkle!
- Cookies: Yes – cookies in a cookie! Crush up your favorite cookies, such as Oreos, Circus Cookies or Nutter Butters, to add a delicious crispy element to your cookies!
- Nuts: Use any nut you love, such as walnuts, pecans, macadamia, cashew and peanuts! For the best flavor, I recommend toasting your nuts prior!
- Dried fruits: If you like a bit of chewy texture, add in a few handfuls of raisins or dried cranberries!
- Mini Marshmallows: Add pockets of ooey-gooey texture by throwing in some mini marshmallows!
- Coconut: Toss in a bit of coconut flakes for an added chewy texture and a sweet, slightly tropical flavor! I recommend toasting your coconut prior to using!
- Sea Salt: IMHO, flaky sea salt is the pièce de résistance to any great cookie, especially this one!
How to make toffee cookies?
This soft and chewy cookie recipe is so easy and straightforward to prepare! You simply mix and fold the cookie dough, then shape them into balls, and bake!
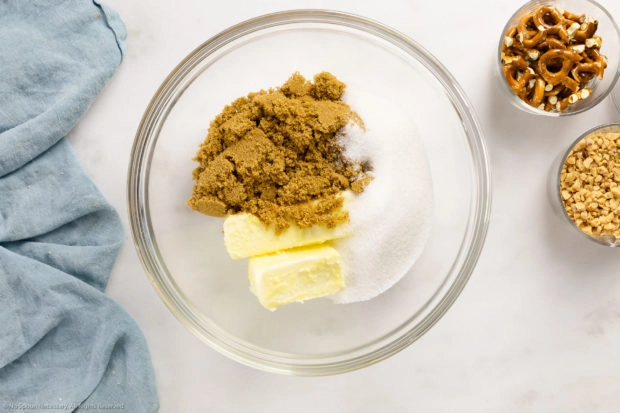
- Mix dry ingredients: In a bowl, combine the dry ingredients. Set aside.
- Cream butter + sugars: In a large bowl with a hand mixer, or a stand mixer fitted with the paddle attachment, cream together the butter with both sugars. Beat on high speed until creamy.
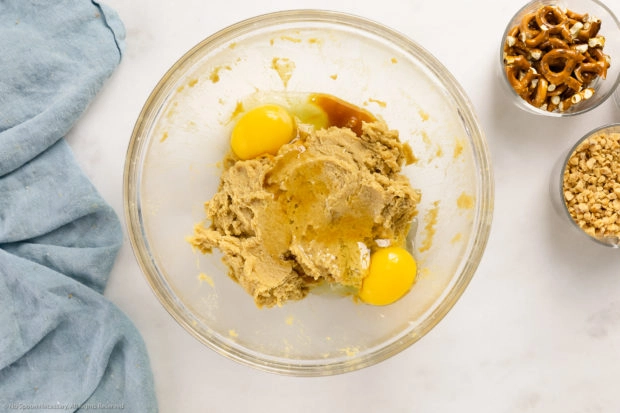
- Add eggs + vanilla: Add the eggs and vanilla extract to the bowl. Beat until well combined.
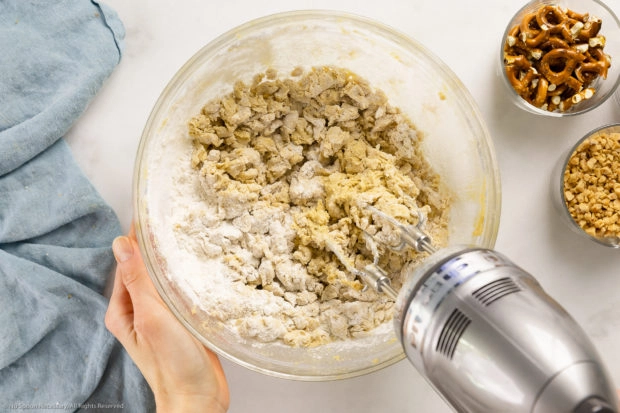
- Add dry to wet ingredients: Add the dry ingredients in two batches to the bowl of the wet ingredients. Mix until almost combined.
- Add mix-ins: Fold your choice of mix-ins into the dough.
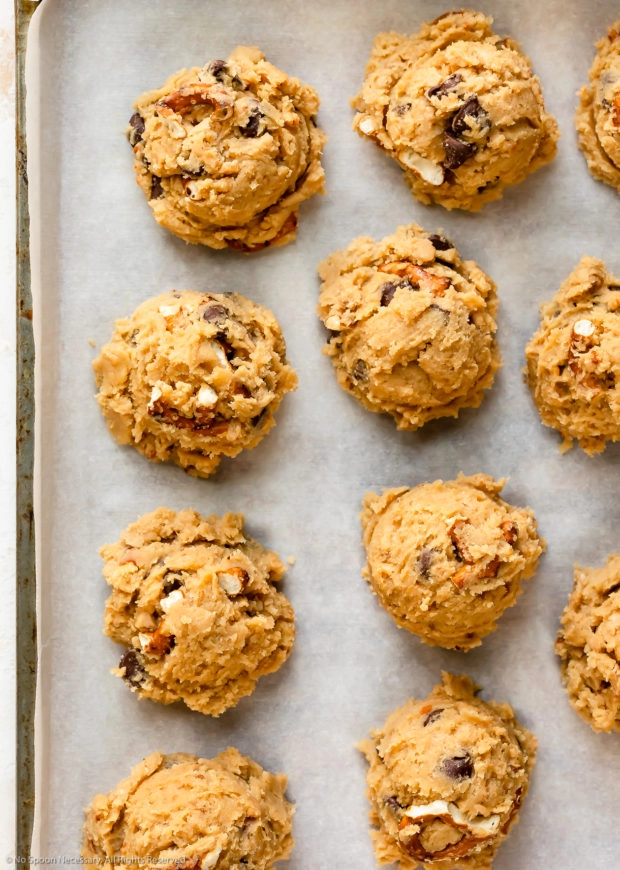
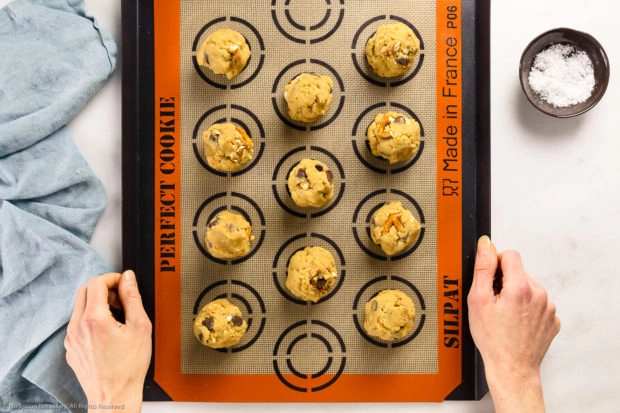
- Portion dough: Portion, scoop and roll the cookie dough into balls.
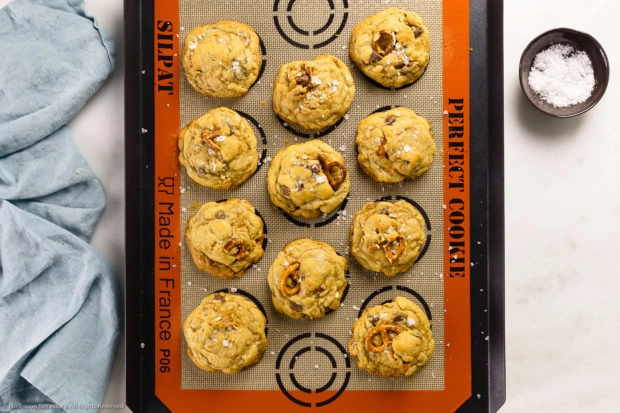
- Bake: Bake cookies in a 375-degree F oven for 9-10 minutes, or until the edges are barely golden. The cookies will be very soft and the centers will appear under-baked.
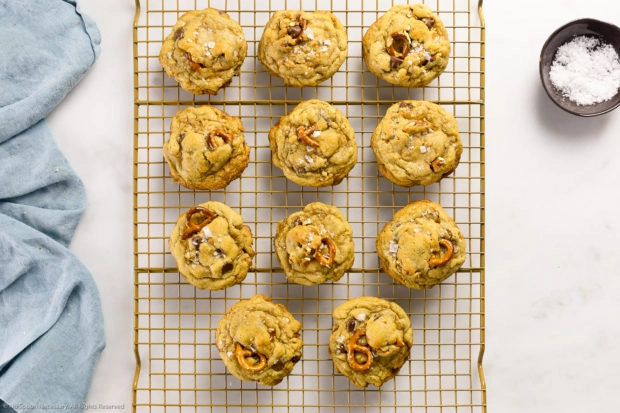
- Cool: Let the cookies cool on the baking sheet for 3 minutes. Transfer the cookies from the baking sheet to the wire rack to cool completely.
- Serve: Enjoy cookies or store them for later!
How to bake soft cookies step by step photos
(Don’t forget to scroll down for the in-depth measurements and instructions in the complete printable recipe card at the bottom of the post!)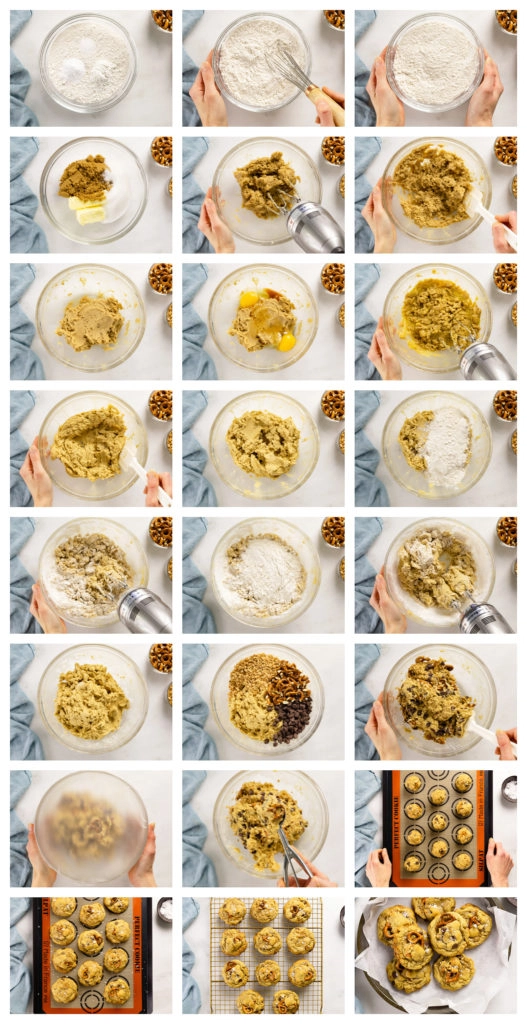
FAQ: For the best kitchen sink cookie
Tips for the best cinnamon sugar cookie
- Flour: The way you measure flour makes a big difference! If possible, use a scale to measure your flour! If not, be sure to use a true dry measuring cup, not a glass Pyrex cup! Also, be sure to fluff the flour with a fork before spooning it from the bag to the measuring cup and leveling it with a knife. Never measure flour directly from the bag!
- Room temperature ingredients: For the best results, make sure your butter and eggs are at room temperature – do not microwave the butter to soften it! Room temperature ingredients form an emulsion which traps air in the dough – this produces fluffier cookies.
- Extract: Use pure vanilla extract for the best inviting, caramel-like flavor! Artificial extract will give the cookies an off-putting, artificial taste.
- Don’t over-mix: When you stir the dry ingredients into the wet ingredients you are developing gluten, which holds the cookies together. However, too much gluten (over-mixing) leads to tough cookies!
- Roll the cookie balls tall: I recommend rolling your cookie dough balls to be taller, versus perfectly round. Shaping them like a tall building – tall and narrow – will help the cookies bake up thicker with an ultra-soft center!
- Aesthetics: If you want to showcase the tasty mix-ins, press a few extra mix-ins into the top of the cookie dough balls before baking!
- Freeze cookie dough balls! If you’re aiming for the best soft cookies, I recommend freezing the cookie dough balls for 10 minutes after you roll them in the cinnamon sugar. (I just put them on a parchment paper-lined plate and place it in the freezer.) Rolling the dough into balls warms up the dough, and remember the colder the dough, the thicker and chewier the cookie!
- Don’t over-bake: These cinnamon cookies will look and feel very underdone when you remove them from the oven. Don’t fret as they will continue to finish baking and slightly harden as they cool on the baking sheet.
How do you know when cookies are done?
You can tell these soft and chewy cookies are done baking by their color – while the cookie will look soft and underdone, the edges will be ever-so-slightly golden and appear set. If you are having doubts, just remember it’s always better to under-bake your cookies than to over-bake them!
Troubleshooting: common cookie problems and solutions
Troubleshoot common triple chocolate cookie problems and see their simple solutions!
Why did my soft and chewy cookies turn out flat and crisp?
Don’t let your perfectly delicious cookies turn out flat, thin and sad! See the below simple tips for baking up thicker cookies every single time!
Seven tips to prevent your soft cookies from turning out flat
- Don’t microwave your butter: Let your butter come to room temperature out on the counter. Room temperature butter should give slightly if you gently press it with your finger, but still hold its shape. Never microwave the butter to soften it as it will cause your cookies to turn out flat!
- Chill your cookie dough: Cold cookie dough bakes up thicker cookies than warm cookie dough, so always chill your dough!
- Don’t over-beat the cookie dough: Only beat the cookie dough as long as the recipe indicates! Over-beating or overworking the dough will warm up the butter, which will cause your cookies to spread too much and turn flat!
- Never grease your cookie sheets: Greasing your cookie sheets will cause the cookies to spread too much and turn flat. I recommend using silicone baking mats or parchment paper instead!
- Bake one cookie sheet at a time: Baking too many sheets of cookies at once can negatively impact your cookies! Always bake just one pan of cookies at a time in the center rack of the oven!
- Allow the cookie sheet to cool: If you are baking multiple batches of cookies, you must allow the cookie sheet to cool! Baking cookie dough balls on a pan that’s still hot from the oven will cause your cookies to overly spread!
Tips for making cookie dough in advance
Making cookie dough in advance just makes life all the easier, especially around the holidays! Great news – this toffee cookie dough is perfect for making ahead! You can either make the dough in advance or completely bake the cookies in advance and store them for a later date!
Note: If you want to make the cookie dough in advance, I recommend you avoid crisp or crunchy mix-in’s, such as pretzels or potato chips, as they will get soggy with refrigeration. Alternatively, you could press the mix-in into the top of the cookie dough balls just before baking!
How to make dough ahead of time: refrigeration
Refrigerating cookie dough: You can prepare and store cookie dough in the refrigerator for 3 days before baking. There are two ways you can refrigerate the cinnamon cookie dough: as a whole batch or as individual cookie dough balls. If refrigerating individual cookie dough balls, refrain from rolling them in cinnamon sugar until just before baking.
Regardless of if you are refrigerating the dough as a whole or as individual balls, make sure you properly store the cookie dough by wrapping it tightly with plastic.
Bonus: Refrigerating the dough will help control the spread of your cookies during baking, which will ensure a more concentrated flavor and deliciously soft and chewy interior texture!
How to make dough ahead of time: freezing
Freezing cookie dough: If you would like to make the kitchen sink cookie dough farther in advance, freezing the dough is the way to go! Just like refrigeration, there are two ways to freeze cookie dough: as an entire batch of dough or as individual cookie dough balls. Cookie dough will keep well in the freezer for up to 3 months.
- To freeze the dough as an entire batch: Gently form your cookie dough into a cohesive ball. Wrap the dough tightly with a couple layers of plastic wrap. Transfer the dough to a zip-closure bag and remove all the excess air before sealing the bag. Removing the excess air helps keep the cookies stay fresher for longer and helps prevent freezer burn. Store the dough in the freezer until ready to use.
- To freeze dough as individual (ready to bake) cookie balls: Scoop the cookie dough and roll into balls according to the recipe instructions; however, do not roll in the cinnamon sugar mixture. Transfer the balls onto a large cookie sheet lined with parchment paper. Flash freeze the cookie dough for 1 hour, or until frozen. Remove the cookie sheet from the freezer and transfer the balls to a freezer-safe zip-closure bag. Store the cookie dough balls in the freezer until ready to use.
- How to thaw and bake frozen cookie dough: You technically do not need to thaw cookie dough before baking; however, you can thaw it in the refrigerator overnight if you desire. Alternatively, you can remove the cookie dough from the freezer and transfer the balls (arrange them 3-inches apart) to a parchment paper lined cookie sheet. Allow the cookie dough balls to sit at room temperature for roughly 20 minutes to remove harsh chill. Add 2-3 minutes to the bake time indicated in the recipe.

Storing and freezing cookies
How to store soft cookies?
After going through the effort of making, rolling, and baking cookies, you want to keep those toffee pretzel cookies as delicious as they were when they came fresh out of the oven! Below are simple, expert tips for keeping your homemade cookies as fresh as possible!
Tips for keeping soft cookies soft!
- Cool: Before storing your cookies, make sure you let them cool completely!
- Airtight container: Just like storing crisp cookies, make sure you store soft and chewy cookies in an airtight container or resealable bag to help them retain moisture.
- Add moisture: Adding a little moisture to your storage container will help keep your cookies soft and chewy! When storing your cookies, add a slice of bread to your storage container or resealable bag before gently pressing out all the excess air and sealing! The extra moisture in the bread helps slow down the moisture loss from the cookies. Alternately, you can also use flour tortillas if you are storing or shipping your cookies in a round cookie tin!
- Store at room temperature: Once your cookies are in their zip-closure bag, make sure you store them at room temperature in a cool, dark place away from direct sunlight.
How long will kitchen sink cookies keep?
Everything but the kitchen sink cookies will stay fresh at room temperature – in a resealable bag or airtight container – for up to 5 days.
To extend the shelf life of your cookies, try storing them in the freezer! (See below for tips on freezing cookies!)
How to warm up and refresh pretzel cookies?
Everyone loves their cookies warm, fresh from the oven! Luckily, it is incredibly easy to restore your meltingly soft, perfectly chewy cookies back to their fresh-from-the-oven glory!
To reheat, place your kitchen sink cookies on a baking sheet and re-crisp them in a 400°F oven for 3-5 minutes. Remove the cookies and let them cool on the cookie sheet for 2 minutes minutes before serving warm!
Can I freeze toffee cookies after baking?
If you are looking for long-term storage so you can enjoy your sweet and salty cookies at a later date, freezing cookies is the way to go! Thankfully, these cookies freeze beautifully!
How to freeze toffee cookies
- Make the cookies: Prepare the cookie dough, roll and bake according to recipe instructions.
- Cool completely: Transfer the cookies to a cooling rack to cool completely.
- Flash Freeze: Line a cookie sheet with parchment paper and add the cookies on top. Place the cookies in the freezer and flash freezer for an hour, or until frozen.
- Store: Transfer the frozen cookies to a freezer-safe resealable bag or storage container. Freeze for up to 3 months.
- To enjoy: Thaw the cookies in the bag or container at room temperature. Warm the cookies up in the oven (please see above) or serve as is and enjoy!
Tip: If you are planning on freezing your cookie dough, I recommend you avoid crisp or crunchy mix-in’s, such as pretzels or potato chips, as they will get soggy after freezing. Alternatively, you could press the mix-in into the top of the cookie dough balls just before baking!
Craving MORE? Follow all the deliciousness on Facebook, Pinterest and Instagram!
More loaded soft and chewy cookie recipes!
If you love these soft and chewy cookies with toffee and pretzels, try one of these delicious recipes next!
- Sprinkle Cookies
- Triple Chocolate Cookies
- Maple Pecan Cookies
- Cinnamon Cookies
- Cookie Bars from Cake Mix
- White Chocolate Macadamia Nut Cookies
- Raisin Oatmeal Cookies
Grab a glass of milk and watch as everyone goes crazy for these everything but the kitchen sink cookies!
The best kitchen sink cookies recipe👇

Toffee Cookies (aka Kitchen Sink Cookies)
Equipment
- 1 Stand Mixer or Mixing Bowl + Hand-held Mixer
- 1 Mixing Bowl
- 1 Cookie Sheet
Ingredients
- 2 ¼ Cups All-Purpose Flour – spooned & leveled (270 grams)
- 2 tsp Cornstarch
- 1 ¼ tsp Baking Soda
- ½ tsp Kosher Salt
- ¾ Cup Unsalted Butter – softened to room temperature (1.5 sticks)
- ¾ Cup Dark Brown Sugar – packed (150 grams)
- ½ Cup Granulated Sugar (100 grams)
- 1 Large Egg + 1 Egg Yolk – at room temperature
- 2 tsp Pure Vanilla Extract
- ½ heaping Cup Pretzel Pieces – (30 grams), plus more for top of cookies, optional
- ½ Cup Semi-Sweet Chocolate Chips (90) grams
- ½ Cup Toffee Bits (75) grams
- Flaky Sea Salt (Maldon) – for sprinkling tops of cookies
Instructions
- Dry ingredients: In a medium bowl, whisk together the flour, cornstarch, baking soda and salt. Set aside.

- Cream butter + sugar: In a large bowl using a hand-held mixer or a stand mixer fitted with the paddle attachment, beat the butter and both sugars together on medium speed until thick and well combined, about 2-3 minutes.
- Add eggs + vanilla: Add the eggs and vanilla to the bowl. Continue to beat on medium speed until creamy and combined, about 2 minutes – Stopping to scrape down the sides and bottom of the bowl as necessary.
- Add dry ingredients: Add ½ the dry ingredients to the bowl. Mix once on low. Add the remaining dry ingredients and mix on low until just combined.
- Add mix-ins: Add the pretzel pieces, chocolate chips and toffee bits to the bowl. Use a rubber spatula to fold until just combined.
- Chill: Cover the bowl tightly with plastic wrap and chill in the refrigerator for at least 2 hours, or up to 4-5 days.
- Preheat oven: Preheat oven to 375-degrees F. Line a baking sheet with parchment paper or a silicone baking mat. Set aside.
- Portion dough: Scoop and roll the dough into balls, about 2 heaping tablespoons each (48-49 grams/each). Arrange the cookie dough balls 3 inches apart on the prepared baking sheet.
- Bake: Bake in the oven for approximately 9-10 minutes, or until they are barely golden in color around the edges of the cookies – the centers should still look very under-baked.
- Cool on pan: Transfer the baking sheet to a wire rack and sprinkle with flaky sea salt. Let the cookies cool for 3 minutes on the baking sheet. Optional: While the cookies are still warm, press additional pretzel pieces or toffee bits into the top of the cookie. Shaping: Due to the toffee and abundance of mix-ins, some of your cookies may turn out slightly irregular in shape (instead of perfectly round). If you want a perfect cookie, use two spoons to gently press the edges inwards and shape the cookies into circles while they are still warm.
- Cool on rack: Transfer the cookies to the wire rack to cool completely. (If your cookies stick – toffee tends to do that – use a spatula to gently scoop beneath the cookie and gently wiggle them off the pan.
- Enjoy: Serve and enjoy the cookies. Or store them on the counter, in the refrigerator or freezer to enjoy later.


Notes
- Flour: The way you measure flour makes a big difference! If possible, use a scale to measure your flour, if not, be sure to use a true dry measuring cup, not a glass Pyrex cup! Also, be sure to fluff the flour with a fork before spooning the flour from the bag to the measuring cup and leveling it with a knife. Never scoop or measure flour directly from the bag.
- Rolling Cookies: Make sure you roll your cookie dough balls to be taller versus perfectly symmetrical! Taller cookie dough balls help the cookies bake up thicker!
- More cookie info: Please see the post above for tips on customizing this recipe (such as variations and substitutions), along with more helpful advice on making the best cookies, and info. on making this in advance + storing and freezing!
Nutrition
Did you make this recipe?
Mention @nospoonnecessary on Instagram and tag it #nospoonnecessary!
Traci Briggs
These came out great! Only thing I did different was I used leftover chopped Halloween candy (Snickers, twix, 3 musketeers, baby Ruth etc). Yum yum!!
Cheyanne
Hi Traci,
I’m honored you decided to try this recipe for kitchen sink cookies and absolutely thrilled you enjoyed them! Using leftover Halloween candy in these cookies is brilliant!! Thank you for coming back and leaving such a helpful review. Cheers and warmest wishes for a wonderful holiday season!
Best,
Cheyanne
Kirsten
My cookies turned out drier than the Sahara desert and I followed your recipe and tips/tricks to a T. Any advice on how I went wrong?
Cheyanne
Hi Kristen,
I’m so sorry to hear this cookie recipe didn’t turn out for you. It’s honestly one of my favorite cookie recipes on this site, so I’d love to be able to help you troubleshoot this!
There are several reasons why your cookies turned out very dry:
1. You used too much flour. If you are using a cup measure (versus weights) to make your cookies, make sure you are scooping the flour correctly. Use a spoon to scoop the flour out of it’s container and into the measuring cup. Then use a flat side of a butter knife or similar object to level off the cup. Never dip your measuring cup directly into the flour – this will pack the flour, giving you too much.
2. You didn’t use room temperature ingredients. The success on this recipe relies on using room temperature butter and eggs. If those ingredients were cold or you forced the room temperature by microwaving them, your cookies will suffer.
3. You over-mixed the dough. This can easily happen with an electric handheld mixer. When combining the wet and dry ingredients, mix them until they are JUST combined. I like to err on the side of caution and under-mix the dough. Then I’ll switch to a rubber spatula to fold the ingredients together. Over-mixing leads to the development of gluten, which will cause your cookies to be drier.
4. Your dough dried out in the fridge. Your refrigerator is constantly circulating air to maintain cool temperatures. If you fail to cover the dough before putting it in the fridge, it will dry out and cause your cookies to turn out dry.
5. You baked the cookies too long. The cookies should be baked until the edges are barely golden and the cookies themselves should look very soft and underdone when you remove them from the oven.
While those are the most common reasons your cookies turned out dry, there are a few other culprits:
6. You measured ingredients incorrectly. Baking is a science and therefore all ingredients must be measured with care.
7. You substituted ingredients. Again, baking is a science and the success of this recipe relies on the ingredients listed.
Again, I’m really sorry to hear your cookies didn’t turn out well – there’s nothing more frustrating or disappointing than that! However, I do hope I was able to offer some insight. Please let me know if you have any other questions, as I’m always happy to help where I can. Cheers and warmest wishes for a wonderful day.
Best,
Cheyanne
Ginny
These are AMAZING! I have made several cookies in my time but these are exceptional!
Just a words to readers…..be sure to read her tips/comments. She really does tell you things that make a difference.
This will be my new go to recipe & just add whatever mixins I want. Soooooo good!!
Cheyanne
Ginny,
YAY! I’m so thrilled you enjoy these cookies! I probably shouldn’t play favorites, but these are currently my favorite cookie too(!), so it means SO much to me that you love them as well!! Thank you so much for coming back and letting me know how everything went over! (And thank you for appreciating those tips!!) Cheers and warm wishes for a wonderful weekend!!! 🙂
Ben | Havocinthekitchen
Oooo these cookies look and sound phenomenal! So many great textures and flavours going on here. As a huge fan of sweet and savoury combinations, these are definitely right up my street!
Marissa
I am powerless against salty, sweet, buttery cookies like these, Cheyanne! Adding them to my holiday baking list!
angiesrecipes
These are some best kitchen sink cookies that I have ever seen. Love the hidden crunch from the pretzels.