This post may include affiliate links. Thank you for your support.
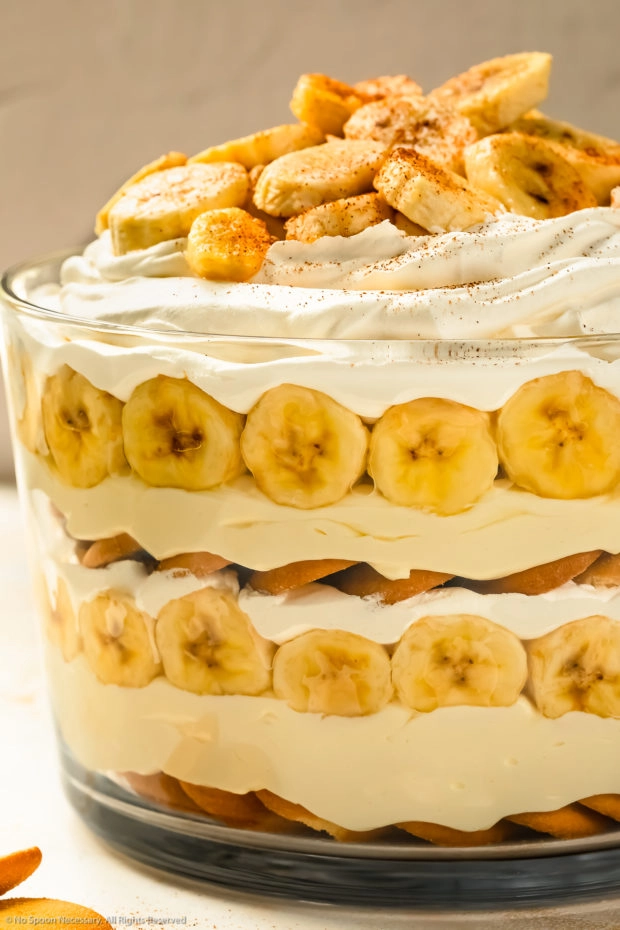
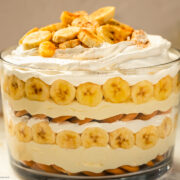
This Quick & Easy Banana Pudding Recipe only requires 10 ingredients and 15 minutes of hands on preparation! It’s no-cook (and no-bake!), incredibly simple to assemble and SO delicious! Featuring thick layers of ripe bananas, crisp Nilla Wafer cookies and luscious banana pudding flavored with sweetened condensed milk and cream cheese. This creamy, rich banana dessert is perfect for easy after dinner indulgences and sinful snacking, along with picnics, potlucks, barbecues and all your holiday entertaining!
Continue to read on for comprehensive tricks on preparing this quick Southern pudding at home! Plus, plenty of tips for making this banana trifle in advance! And, don’t miss the in-depth step by step photos in the middle of the post!
Hi, friends! Sound the alarm and round up the troops, because today I’m sharing the very best banana pudding recipe in all the land!
Table of Contents
- Easy banana pudding recipe: overview
- What is southern banana pudding?
- What is in banana pudding?
- How to make easy banana pudding?
- Expert tips for the best no-bake banana pudding
- Storing simple banana pudding
- Nutrition and Dietary FAQ
- More sweet treats using bananas!
- Easy Banana Pudding Recipe (No-Bake Banana Pudding)
Easy banana pudding recipe: overview
When it comes to classic American desserts, banana pudding still reigns supreme (in my humble opinion at least).
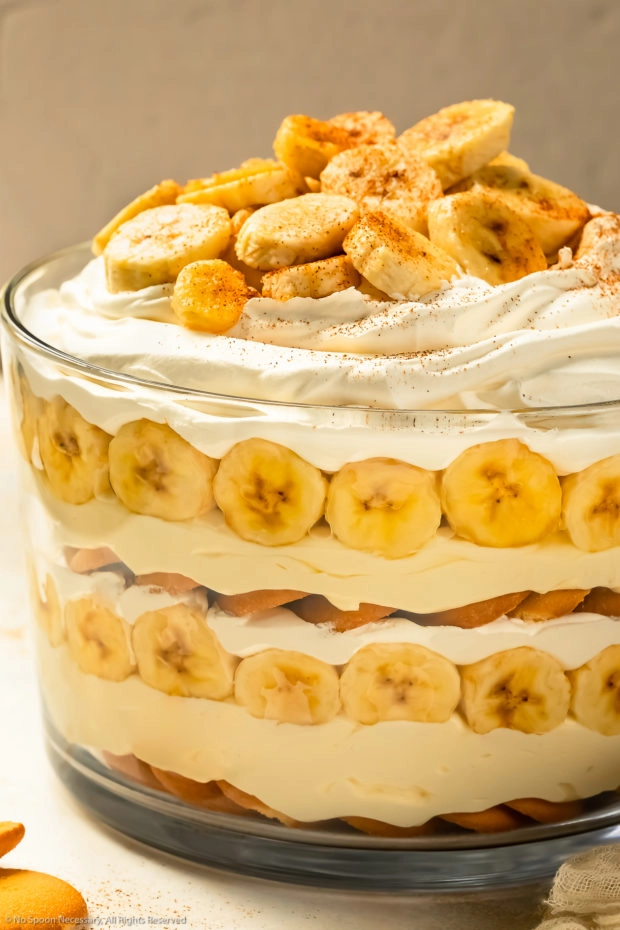
This banana dessert is overflowing with rich flavor and heavenly texture with the perfect ratio of luscious banana pudding, crisp cookies, ripe bananas and sweet whipped cream in every bite! The actual pudding portion is made with a combination of banana cream and white chocolate pudding flavored with tangy cream cheese, candy-like condensed milk and inviting vanilla. It’s thick, impossibly creamy and downright impossible to resist!
If you love simple (yet sinfully delicious) pudding desserts, you will absolutely love this recipe! It requires 10 easy-to-find ingredients along with just 10 minutes of hands-on preparation and absolutely ZERO cooking or baking! Plus, it’s so easy to assemble and can be made in advance!
This quick pudding is perfect for every occasion! Whether you serve it at picnics, potlucks, outdoor barbecues, holiday parties or as an easy weeknight dessert, everyone will LOVE this comforting classic!
If you’re looking for more no-bake desserts, try these delicious fan-favorites next: Key Lime Cheesecake Pie, Tiramisu Trifle Dessert, Pumpkin Pie Mousse, Yogurt and Fruit Cups, and Cream Cheese Cheesecake Dip .
Why you’ll love this recipe
- Intense banana flavor! Most banana puddings are made with vanilla pudding and rely on just the fresh bananas for their flavor; however, this recipe features real fresh bananas along with actual banana pudding for an unapologetically banana-y banana dessert!
- So much luscious, creamy texture! This pudding features sumptuous, thick layers of rich banana pudding, whipped cream, ripe bananas and crisp wafer cookies! You will swoon over this creamy, comforting and rich classic banana dessert!
- Simple to find ingredients! This quick pudding only requires 10 simple to find ingredients!
- Easy to prepare! You only need one large mixing bowl to prepare this simple recipe! It’s easy to make and even easier on the cleanup!
- No bake! This pudding sets up firm, without any cooking or baking, in 3 to 4 hours!
- You can make it ahead! You can easily make this no-bake pudding dessert in advance, which makes it perfect for picnics, potlucks, barbecues, holiday parties and MORE!
- Impressive and perfect for entertaining! This pudding looks impressive and beautiful in a trifle bowl or glass serving dish – your guests will never know how quick and easy it was for you to prepare!
What is southern banana pudding?
Banana pudding is a sweet Southern dessert featuring layers of sweet banana custard, vanilla wafers and slices of fresh bananas. Classic banana pudding is traditionally topped with whipped cream or a meringue topping and served in a trifle dish, Mason jars or a glass pan to showcase the beautiful layers.
Where did it originate?
Banana pudding is an iconic American dessert with strong ties to the South; however, precisely where it originates seems to be a complete mystery.
Many claim that banana pudding (as we know it) originates in the South; however, the earliest version dates back to a recipe in a Massachusetts-based Good Housekeeping periodical.
The actual invention of banana pudding seems to have roots across America, with no particular Southern identity; however, due to the widespread marketing efforts of large companies, such as Nabisco (“Nilla Wafers), General Mills (Cool Whip) and Jell-O (pudding), somewhere along the way banana pudding became synonymous with the American South.
Note: If you are looking for more thorough information on the history of banana pudding, this article from Serious Eats is an interesting read.
What is in banana pudding?
Traditionally, the ingredients in banana pudding consist of creamy custard (from a box or homemade from scratch), sponge cake, Lady Fingers, or crisp cookies (typically Vanilla Wafers) and fresh bananas; however, there are many versions of this southern dessert. Modern adaptations can include swapping the cookies for yellow cake, adding toasted coconut flakes and/or adding ground cinnamon, as well as finishing the pudding with a generous drizzle of caramel sauce.
Ingredients to make old-fashioned banana pudding?
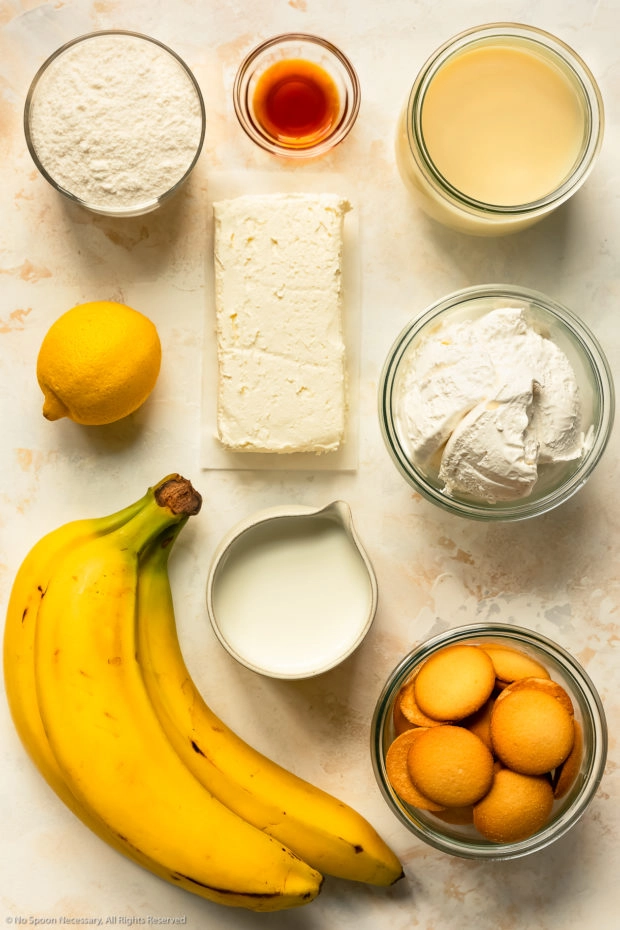
This banana pudding recipe is so easy and made with just 10 simple-to-find ingredients!
- Bananas: Bananas are without a doubt the star of this dessert, so you want to start with the best bananas! Ideally, it’s best to use fresh barely ripe (still somewhat firm) bananas, as they will soften as the pudding sits in the refrigerator.
- Cream Cheese: Okay, so cream cheese is not a traditional ingredient in banana pudding, but it gives the pudding a deliciously thick texture that is just delicious. It also provides a mild tangy flavor that really brings everything to life.
- Condensed Milk: Sweetened condensed milk is another unconventional ingredient; however, it gives the pudding a beautifully rich flavor that can’t be beat!
- Vanilla Extract: Pure vanilla extract is a secret ingredient that adds a touch of welcoming, warm flavor!
- Pudding: This banana pudding is made quick and easy with instant pudding mix. While most recipes call for Vanilla pudding mix, I highly recommend using a combination of banana cream and white chocolate pudding mixes for the best flavor! (Scroll down to ready about different flavors of pudding mix you can use in this recipe!)
- Wafers: Unfortunately, not all cookies are created equal. Normally I don’t endorse one specific brand; however, for the best texture and taste I recommend using Nabisco Nilla Wafers or the Mini Nilla Wafers if you are serving this banana pudding in individual cups or jars.
- Whipped Cream: Normally I would say homemade whipped cream is much better than store-bought. However, in this banana pudding recipe it is best to use good ‘ole Cool Whip, as it has a thicker, heftier texture that holds up well to the weight of the layers.
Substitutions
- Pudding: If you have the time and really want to take this pudding over the top, you can absolutely make your own real banana pudding! I recommend either Grand Baby Cake’s Banana Pudding or Baking A Moment’s Homemade Vanilla Pudding.
- Wafers: If you don’t like vanilla wafers, you can use shortbread cookies, butter cookies or Chessman cookies in place of the wafers.
- Whipped Cream: You can absolutely substitute homemade whipped cream for the Cool Whip. However, I recommend you skip using cream as a layer in the pudding – it doesn’t hold up as well. Instead, I recommend folding your whipped cream into the pudding and using it as a topping instead.
Banana pudding topping ideas
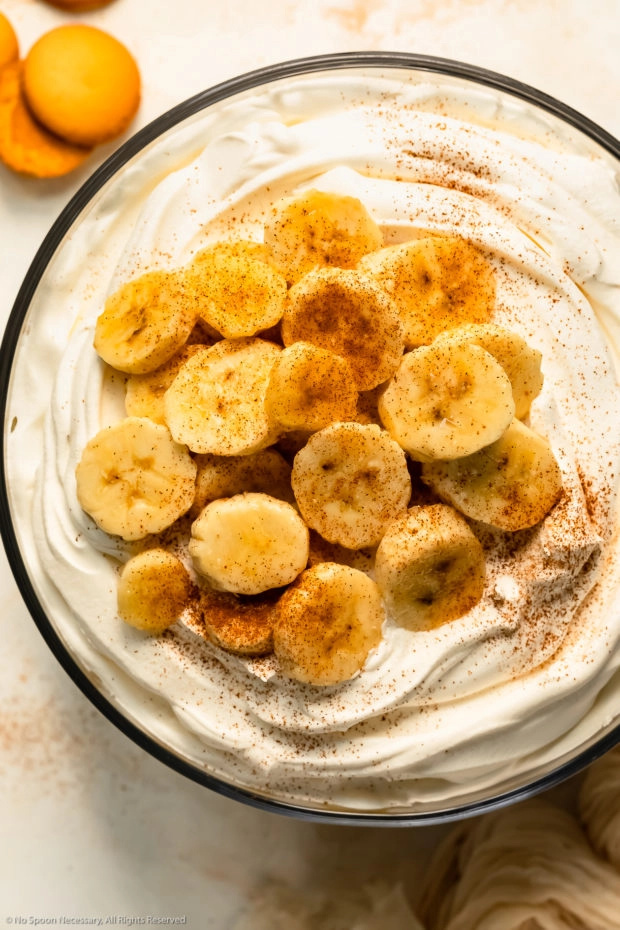
Whipped cream and slices of fresh bananas are the classic toppings of choice for banana pudding. However, toppings are a great way to get creative and add a bit of visual appeal to your pudding!
If you are entertaining a crowd, try setting up a pudding toppings bar and place various topping options in individual bowls, that way your guests can help themselves and customize their pudding to their liking! Below are a few topping ideas to help get you inspired!
The best toppings for pudding
- Wafers: When I make this layered banana dessert I always pick through the box of wafers. I use the pretty ones for layering and set the “ugly” broken ones aside to crush up and use as a topping!
- Cinnamon: I typically finish my pudding off with a generous sprinkling of ground cinnamon. The warming, woody spice is a natural companion to bananas!
- White Chocolate: If you are looking to get fancy, white chocolate curls make a beautiful pudding topping!
- Toasted Coconut: Unsweet coconut flakes add a delicious, slightly tropical flare to this pudding dessert! For the best flavor and prettiest aesthetic, make sure you lightly toast your coconut flakes!
- Caramel: If you are a salted caramel lover, a generous drizzle of sticky, sweet caramel sauce (homemade or store-bought) is a decadent way to top off this pudding!
- Sprinkles: Fancy sprinkles, edible glitter and round nonpareils are a fun way to add pop of festive flare to your pudding!
- Graham Crackers: If you don’t have any leftover wafers, crushed up graham crackers make a wonderful topping choice!
What flavor of pudding mix can I use to make Southern pudding?
You can use any flavor of instant pudding mix you love to make layered banana pudding! If you are looking for a richer flavor, try using a combination of two complementary pudding mixes! Below are the best pudding mix flavors to use when making banana pudding.
- Banana Cream pudding: Call me crazy, but I want my banana pudding to have an intense banana flavor, so I prefer to use instant banana cream pudding mix. However, some people find instant banana pudding has a slightly artificial taste, which is why I highly recommend using a combination of banana cream and white chocolate pudding (see below).
- Vanilla pudding: Most old-fashioned banana pudding recipes use instant vanilla pudding. I find that those recipes taste more like vanilla pudding with bananas than actual banana pudding. However, if you love vanilla, by all means, use instant vanilla pudding!
- Banana Cream + White Chocolate: I always use a combination of banana cream and white chocolate pudding mix, especially if I am entertaining a crowd. The white chocolate actually enhances the banana flavor and results in an out-of-this-world, ultra-decadent tasting pudding!
- Banana Cream + Vanilla: If you are a die-hard fan of using vanilla pudding in your banana pudding trifle, try using a combination of vanilla and banana instant pudding mixes to give your pudding a little more flavor.
- Banana Cream + Caramel (or Butterscotch): If you love salted caramel, this combination is no-brainer! The sweet, complex flavor of caramel pairs beautifully with bananas.
- Banana Cream + Coconut Cream: If you are a fan of coconut cream pie, you will love the combination of banana cream and coconut cream pudding mixes!

How to make easy banana pudding?
This quick pudding is incredibly easy to make! Simply mix the pudding, layer it with bananas, whipped cream and vanilla wafers and refrigerate it until ready to serve!
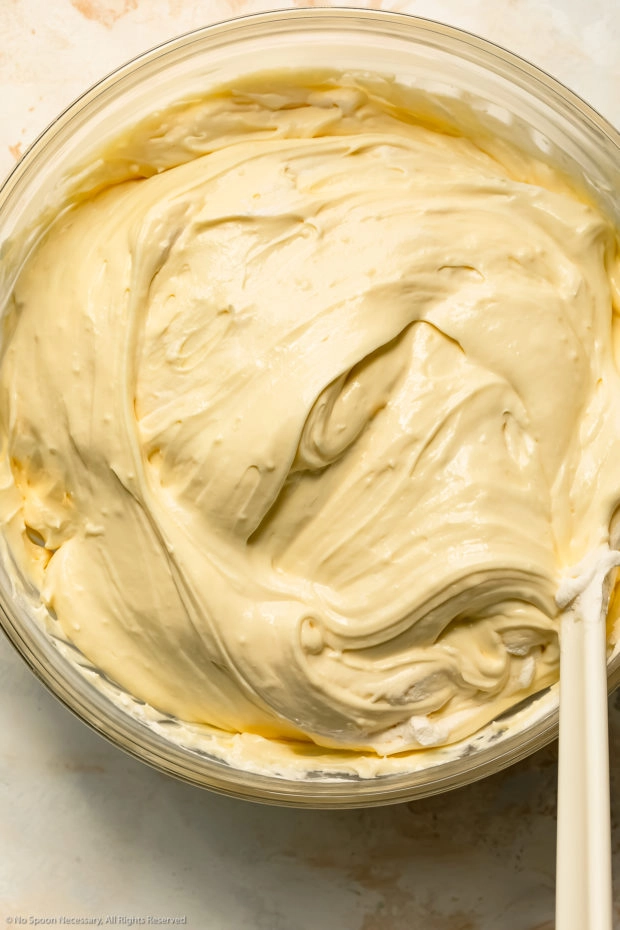
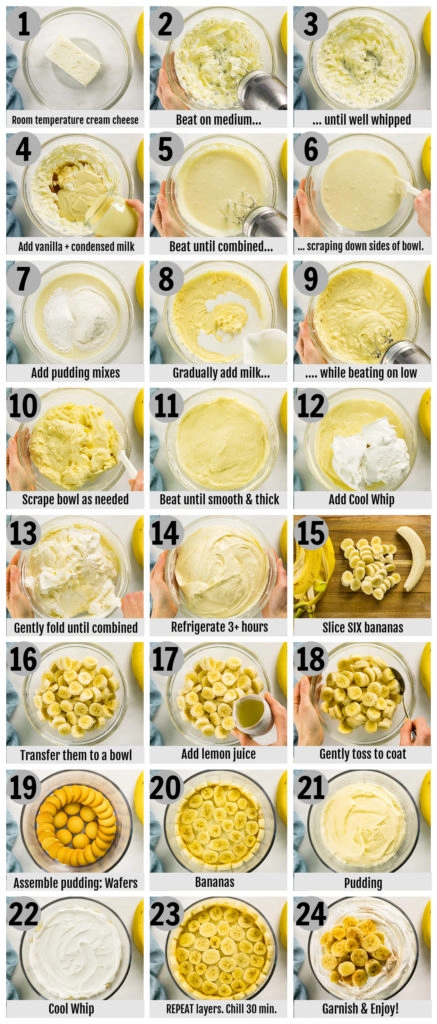
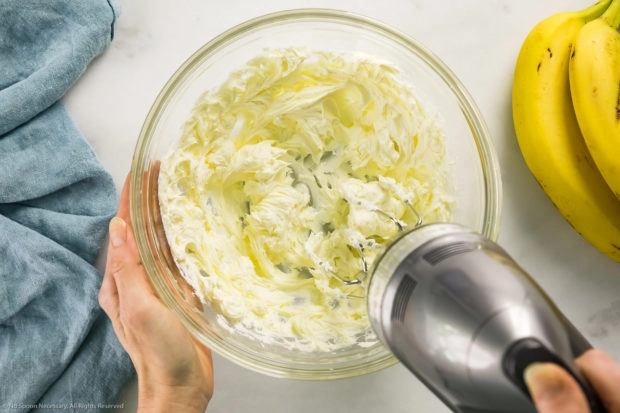
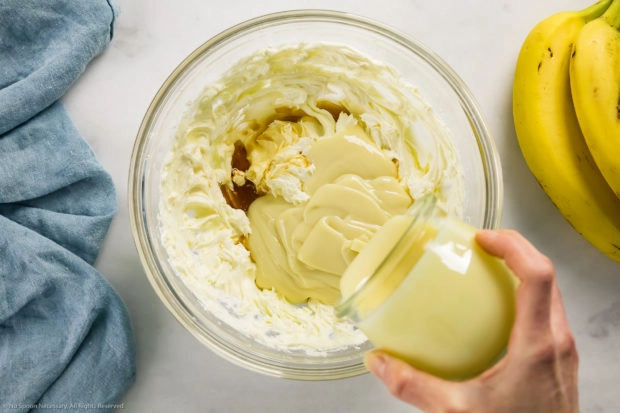
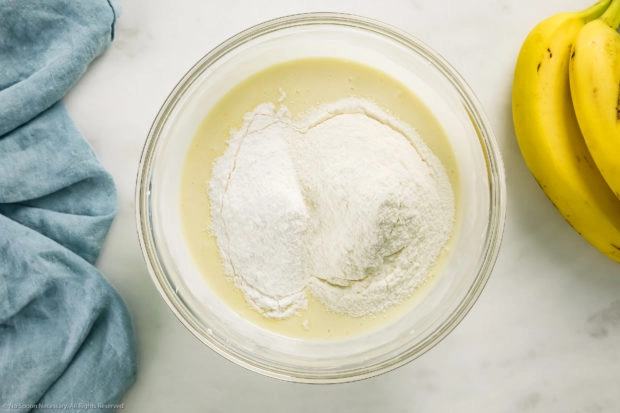
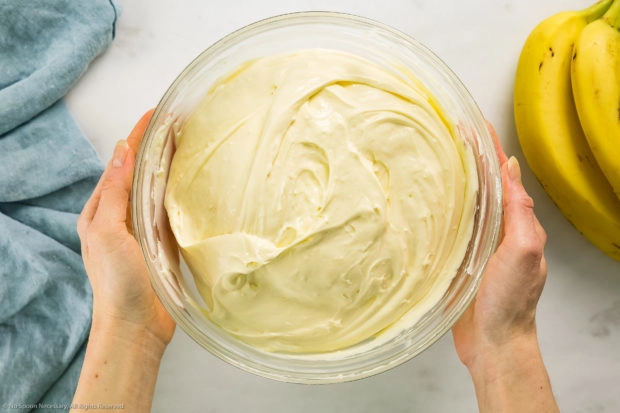
- Prepare the pudding: Beat the cream cheese with a handheld mixer or stand mixer until light and airy. Add in condensed milk and vanilla, and beat until smooth. Add the pudding mixes to the bowl. While mixing on low, gradually add the milk and beat until thick. Next, use a rubber spatula to fold in the Cool Whip.
- Chill: Cover the bowl tightly with plastic wrap and refrigerate for at least 3, or more, hours.
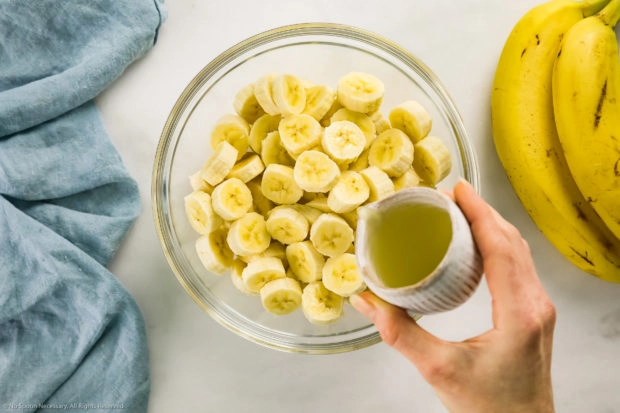
- Prepare the bananas: In a medium mixing bowl, gently toss the bananas with fresh lemon juice to prevent them from browning and set them aside.
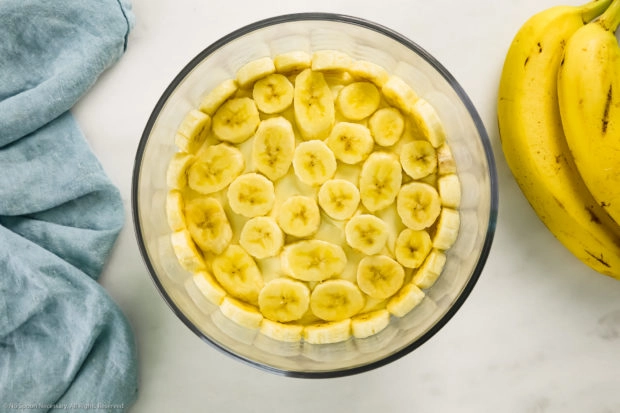
- Assemble the pudding: In a serving bowl or dish of choice, layer the wafers, pudding, slices of bananas and cool whip.
- Chill until ready to serve: Cover the bowl with plastic wrap and refrigerate for at least 30 minutes, or until ready to serve.
- Garnish and enjoy: Garnish the top of your pudding with more Cool Whip or super-stable Cool Whip Frosting and fresh slices of bananas. Serve and enjoy!
How to make the best recipe for banana pudding step by step photos
(Don’t forget to scroll down for the in-depth measurements and instructions in the complete printable recipe card at the bottom of the post!)
Expert tips for the best no-bake banana pudding
How to keep bananas from turning brown?
Unfortunately, once you peel and slice bananas it is completely normal for them to turn slightly brown. However, there are a three simple tricks to prevent bananas from turning brown once you slice them!
- Use barely ripe bananas: It’s imperative you use barely ripe bananas to layer in banana pudding! Look for bananas that are slightly green at their stems. Barely ripe bananas will keep much longer and tend not to brown as fast. Plus, slightly green bananas are less sweet, which actually works to offset the sweetness of the pudding and Cool Whip!
- Toss them with lemon juice: After peeling and slicing the bananas, toss them with a bit of fresh lemon juice. The acidic juice helps neutralize the ph of the bananas, which helps to slow down the browning process! (Note: You can also use club soda if you don’t have any fresh lemons!)
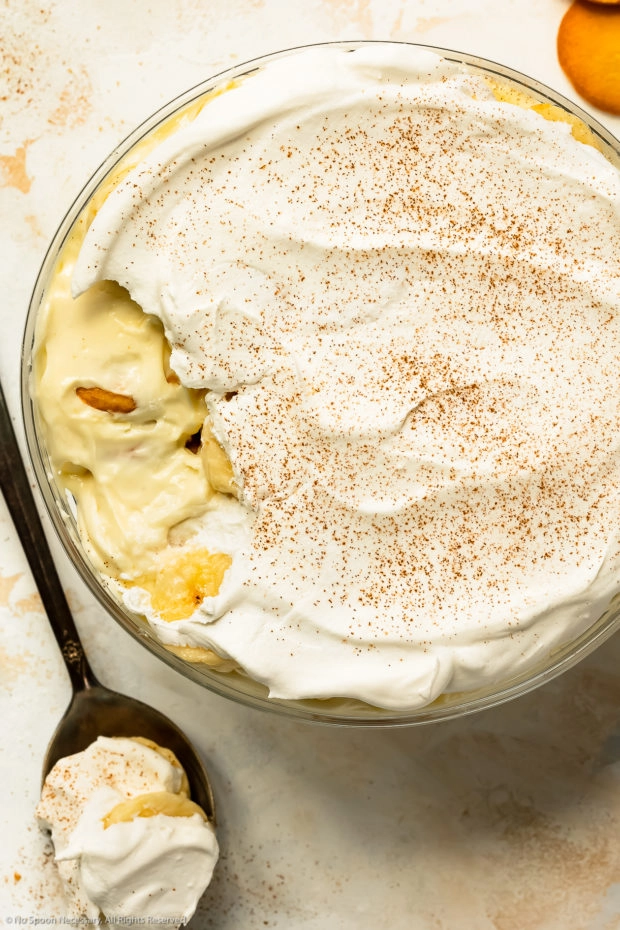
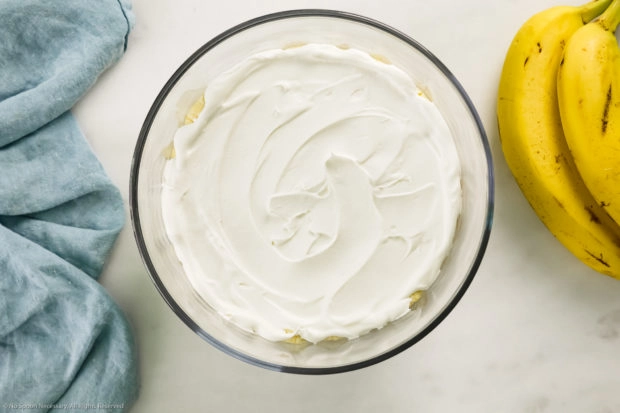
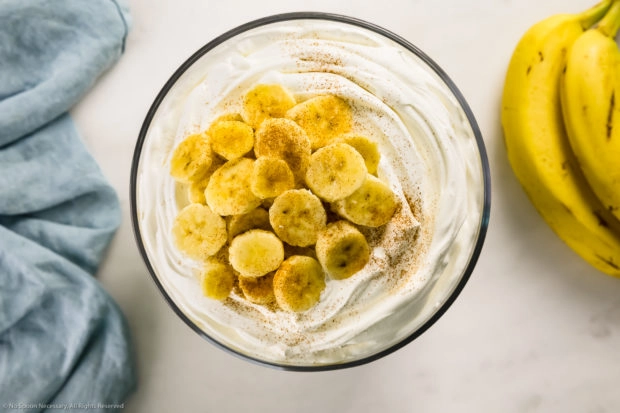
- Cover the banana layer completely: Air is what causes the bananas to turn brown. Therefore, the less contact the bananas have with air, the less brown they are likely to become. Make sure you cover the top layer of bananas completely with Cool Whip to prevent browning!
How to layer banana pudding?
There really is no “wrong” or “right” way to layer and assemble banana pudding – it all depends upon your personal preference. However, there are a few different classic ways to layer banana pudding, one of which I use.
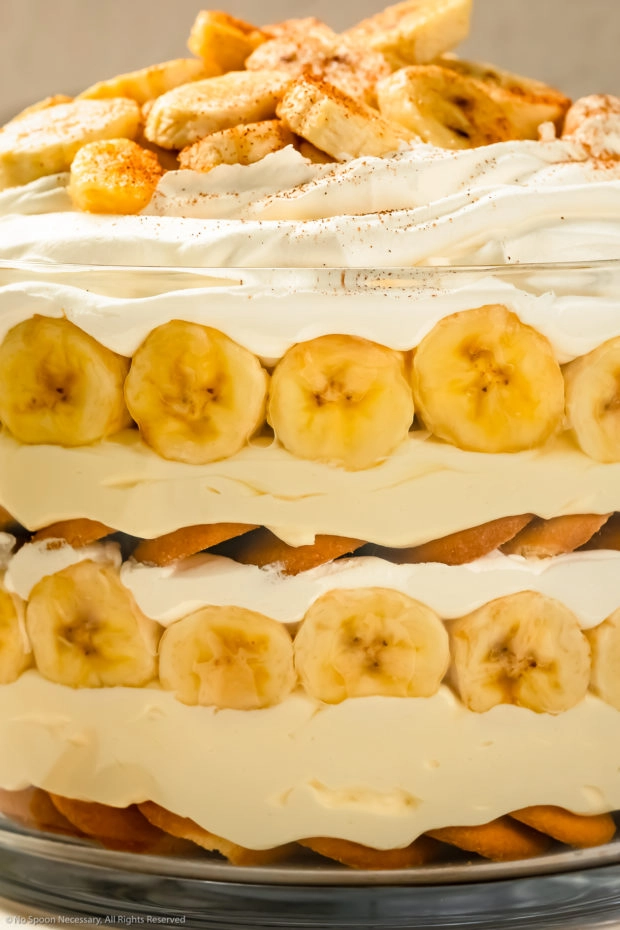
To layer pudding, start with a layer of cookies, followed by a layer of pudding, bananas and then Cool Whip. Repeat all the layers once or twice more, depending upon the depth of your serving bowl or dish. When you are ready to serve, garnish the pudding with more Cool Whip and your choice of toppings, such as crumbled cookies, slices of bananas or a sprinkling of cinnamon!
How to serve banana pudding?
You can assemble and serve this Southern pudding in any serveware you love! I recommend using a glass bowl or dish so the beautiful layers in the dessert are visible. A trifle bowl, large glass mixing bowl, casserole dish and individual jars, such as Mason jars or Weck jars all work beautifully for serving pudding!
If you are looking for a fun way to serve a large crowd, you may want to consider setting up a pudding dessert bar so your guests can help themselves! Place the pudding, wafer cookies, Cool Whip and banana slices in large individual serving bowls. And, set out a few different topping selections, such as ground cinnamon, chocolate shavings, toasted coconut shreds and crushed cookies. Place small bowls or jars and spoons at the front of the dessert bar and let your guests create their own layered banana dessert!
Storing simple banana pudding
Can banana pudding be made the day before?
Absolutely! There are a few different ways you can prepare this pudding recipe in advance!
- Preparing the entire recipe in advance: You can make and layer this banana pudding up to 48 hours (2 days) in advance! If you prepare the entire pudding (with layers of wafers and fresh bananas) any further in advance the wafers start to lose their crisp and the bananas begin to brown. Tip: If preparing the entire pudding (layers and all) in advance, make sure you cover the top layer of bananas completely with whipped cream so they are not exposed to air, which will cause oxidation (browning of your bananas).
- Preparing just the pudding in advance: You can prepare just the pudding portion of this recipe up to 4 days in advance! I actually recommend preparing the pudding at least 3-4 hours in advance so the flavors have a chance to develop.
Can banana pudding be left out?
Homemade banana pudding should not sit out at room temperature for more than 2 hours maximum!
Make sure you keep the banana trifle cold (in a cooler or something similar) if you are transporting it or bringing it to a party. If you are serving this pudding at an outdoor event, such as a picnic or barbecue, I recommend keeping the pudding refrigerated, on ice or in a cooler until you are ready to serve. Likewise, you may want to consider placing the pudding in a shady spot while serving!
How to store pudding?
To keep the assembled pudding trifle tasting fresh and at its best, you should cover it tightly with plastic wrap or transfer any leftovers to an airtight container and store it in the refrigerator.
How long does banana pudding last?
Properly stored, banana pudding will keep for up to 4 days in the refrigerator.
Expert Tip: Upon storage, the vanilla wafers inside the pudding will start to lose their crisp and become softer. I actually love the texture as I find the wafers texture to be almost cake-like. However, if you prefer super crisp and crunchy vanilla wafers, you may want to consider eating the assembled pudding within 2 days.
Can I freeze banana pudding?
One you assemble and layer the pudding I don’t recommend freezing it as the wafers and bananas texture will be altered upon thawing.
However, you can freeze just the pudding component itself for 4-6 weeks. To freeze, transfer the pudding into a freezer-safe storage container. Press a piece of plastic wrap to the top of the surface of pudding before sealing the container with an air-tight lid. To thaw, place the frozen pudding in the refrigerator and allow it to thaw naturally overnight.
Nutrition and Dietary FAQ
Does banana pudding have dairy?
Unfortunately, this recipe is not dairy-free as it is made with Cool Whip which contains sodium caseinate, a milk derivative.
Gluten-free?
This recipe as written is not gluten-free as it uses Vanilla Wafers which contain gluten. However, you can easily use Gluten-Free Vanilla Wafers to make this a gluten-free recipe!
Note: If you are adhering to a dietary restriction, always make sure you check all labels to ensure the products you are using are in fact gluten-free before consuming.
Vegan?
Unfortunately, this pudding is not vegan-friendly as it contains animal products, such as cream cheese and condensed milk.
Craving MORE? Follow all the deliciousness on Facebook, Pinterest and Instagram!
More sweet treats using bananas!
If you love this easy banana dessert, try one of these delicious recipes next:
How to make the Best Banana Pudding recipe👇
Easy Banana Pudding Recipe (No-Bake Banana Pudding)
Equipment
- Large Mixing Bowl
- Hand-Held Mixer or Stand Mixer
- Serving Bowl or Dish
Ingredients
- 1 (8-ounce) Block Cream Cheese – at room temperature
- 1 (14-ounce) Can Sweetened Condensed Milk
- 1 ½ tsp Pure Vanilla Extract
- 1 (3.4-ounce) Package Instant Banana Cream Pudding Mix (SEE NOTES)
- 1 (3.4-ounce) Package Instant White Chocolate or French Vanilla Pudding Mix (SEE NOTES)
- 2 ¾ Cup COLD Whole Milk or Half-and-Half
- 1 (8-ounce) Tubs Cool Whip Topping – thawed & DIVIDED (SEE NOTES)
- 7 medium barely ripe Bananas – DIVIDED (SEE NOTES)
- 3 TBS Freshly Squeezed Lemon Juice
- 1 (12-ounce) Box Vanilla Wafers
- Optional for topping: Vanilla Sugar, Cinnamon Sugar or White Chocolate Curls
Instructions
- Prepare Pudding – beat cream cheese: In large mixing bowl with a handheld mixer or stand mixer, beat the cream cheese on medium speed until well whipped, about 2 minutes.

- Add condensed milk + vanilla: Add the condensed milk and vanilla to the bowl. Beat on medium for 1 minute. Stop and scrape down the sides and bottom of the bows with rubber spatula. Continue to beat on medium for an additional minute, or until smooth and well combined.
- Add pudding mixes + milk: Add the pudding mixes to the bowl. Gradually add the milk, beating on low speed until combined. Increase speed to medium and beat until smooth and thick, about 3-4 additional minutes – scrape down the sides and bottom of the bowl as necessary!
- Fold in cool whip: With a rubber spatula, gently fold in 1 (8 ounce) tub of the cool whip topping.
- Refrigerate: Cover the bowl tightly with plastic wrap and refrigerate for at least 3, but preferably 4 or more hours.
- When ready to assemble – prep bananas: Peel and slice SIX of the bananas into ¼-inch thick coins. Add them to a medium size mixing bowl and add the lemon juice. Gently stir to coat the bananas with the lemon juice to prevent them from turning brown.
- Assemble pudding: You can use a 9x13-inch baking dish, a 4 to 5-quart trifle bowl or 16 (6 ounce) jars to assemble your pudding. TIP: Figure out how many layers you want to do so you know how much of each component to use. I used a trifle dish and was able to get 3 layers. SEE NOTES!Layer One: Line the bottom of your dish with a layer of vanilla wafers.Layer Two: Top with some of the pudding. (For 2 layers use ½ the pudding, for 3 use 1/3 of the pudding.)Layer Three: Cover the pudding with a layer of banana slices.Layer Four: Top with a thin layer of cool whip. (For 2 layers use a little less than 1/2 the cool whip, for 3 use less than 1/3 of the cool whip – you want to have more Cool Whip to use on the top layer as a garnish.)Repeat layering wafers-pudding-bananas until you have filled your dish or bowl.For the top: Dollop or pipe the remaining cool whip on top of the dish. Make sure the top layer of bananas are COMPLETELY covered will cool whip to prevent them from browning.
- Chill: Chill the pudding for 30 minutes before serving.
- Garnish and serve: Peel and freshly slice your remaining banana. Garnish the top of your pudding with the banana slices. Sprinkle the pudding with Vanilla Sugar, Cinnamon Sugar, White Chocolate Shavings and/or crumbled wafer cookies. Serve and enjoy!

Notes
- Pudding Mixes: This recipe uses INSTANT pudding mix. You can stick to just one flavor of pudding mix if you like! I have found that the combination of Banana Cream + White Chocolate is absolutely DELICIOUS. I have used Sugar-Free Instant Pudding Mix before and the taste was fine! The Cool Whip is plenty sweet, so if you want to use Sugar-Free Pudding Mix – Go for it!! (Note: Please see the post for a full list of different flavors and flavor combinations you can use to make this layered dessert!)
- Cool Whip: You can use one 16-ounce tub of cool whip; however, I found it’s easier to use two 8-ounce tubs so I don’t have to use a scale to measure and fuss about.
- Bananas: Make sure you use barely ripe bananas in this recipe! Barely ripe bananas will keep much longer; plus, they are also less sweet, which makes them a better match for the sweet cool whip!
- Assembling layered pudding: The number of layers will depend directly upon the depth of your serving dish or bowl.
- For individual jars: You will probably only be able to get one layer of each component – wafers, pudding, bananas & cool whip.
- For a 9x13-inch dish: You will probably only be able to get two layers of each component.
- For a 4-to-5-quart trifle dish: You will be able to get two three layers of each component, depending upon how thick you want each layer.
Nutrition
Did you make this recipe?
Mention @nospoonnecessary on Instagram and tag it #nospoonnecessary!
©No Spoon Necessary. All images and content are under copyright protection. Please do not use any images without prior permission. Kindly do not publish this recipe without prior consent. If you want to reference this recipe, please do so by linking directly to this post.
Rate and Comment!
Did you make this recipe? WONDERFUL! Please rate the recipe below!
2pots2cook
The first time I’ve heard about this beauty was when I started food blogging and it opened new horizon to us both ! Thank you for all the details and options since it is so precious and so tasty ……
MaryAnn | The Beach House Kitchen
Definitely the best banana dessert in all the land Chey!! This would be perfect for all our summer gatherings here at the beach. I love trifles like this. So easy to put together and always a crowd pleaser! Can’t beat a no bake summer dessert! Gotta try your recipe!
Jennifer @ Seasons and Suppers
You mentioned you had never tried Butter Tarts. Well, I have never tried banana pudding! I know I’m missing out on much deliciousness though, so I am putting this one on my menu asap 🙂
Ben | Havocinthekitchen
I’ve only recently learned about this Southern Banana Pudding, and I already love it (Even though I haven’t tried it yet haha) But what not to love about this sumptuous and luscious dessert with an almost intoxicating banana aroma? I love the addition of cream cheese, and you mentioned caramel as a possible topping…so yes, I want this with a dulce de leche drizzle!
Marissa
What a spectacular dessert! Looks absolutely luscious. I love the idea of the wide eyes of friends and family when this gets served!!
angiesrecipes
That’s a show stopper, Chey. I need to look out for some banana cream pudding to try this..I adore the presentation too.