Roasting Garlic in the Oven: Culinary Tutorial

Learn how to roast garlic with this simple method and three basic ingredients. This easy tutorial for roasted garlic is your secret weapon to making everything - from zest salad dressings and veggie side dishes to creamy mashed potatoes and succulent meats - EXTRA flavorful and tasty, plus it's make ahead friendly! With just 5 minutes of prep and a short spell in the oven you can transform ordinary garlic blossoms into a luscious, caramelized treasure.
Equipment
- 1 Chef's Knife
- 1 Cutting Bard
- 1 Baking Sheet or Muffin Pan
- 1 Aluminum Foil
Ingredients
- 2 bulbs Garlic
- 3 TBS Neutral Oil - such as canola or vegetable
- 4 whole sprigs Fresh Thyme - OPTIONAL
Instructions
- Preheat oven: Arrange oven rack to middle position and preheat the oven to 325-degrees Fahrenheit. (Why? Slow roasting the garlic at a lower temperature - 325 versus 400 degrees – ensures the garlic cloves caramelize and cook through evenly, lending the best flavor and soft, spreadable texture.) (In a rush? With all that said, if you are in a hurry, you can roast your garlic cloves at 350-degrees, 375-degrees, or 400-degrees, depending upon your time constraints. Roasting a garlic bulb at 400-degrees will take approximately 40-45 minutes.)
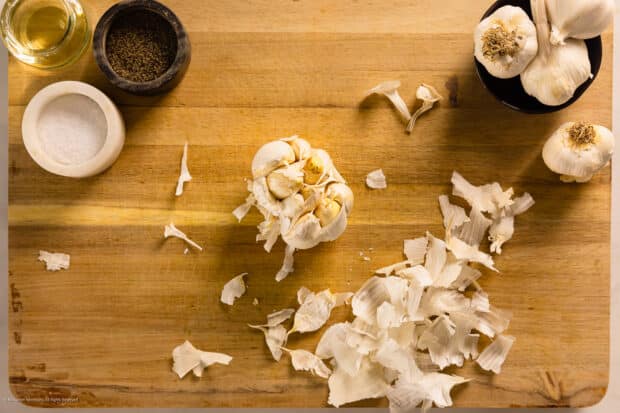
- Prep garlic: Place the whole heads of garlic on a clean work surface. Starting at the stem, use your fingers to pull off and discard the loose papery skin from around the heads of garlic. (Why? Removing the outer layer of papery skin allows you to see where each clove of garlic is located within the bulb. However, you don’t want to completely peel the garlic.)
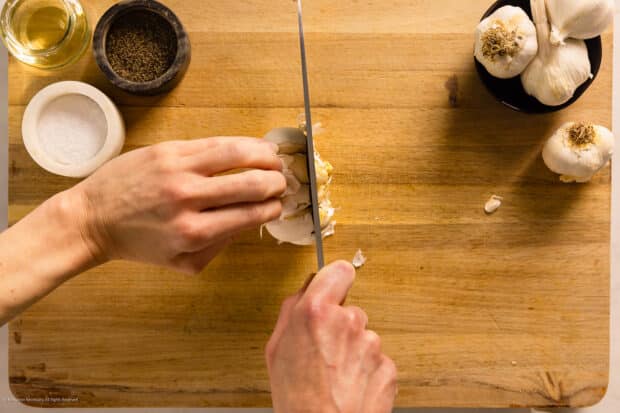
- Remove top of garlic bulb: Using a sharp knife, slice off ¼ to ½-inch of the top (stem end) of the garlic bulbs and discard – make sure you keep the head of garlic intact at the root; you just want to trim off a small portion of the top to reveal the cloves slightly. However, you do want some portion of the ALL the cloves exposed.
- Season garlic before roasting: Drizzle 1 ½ tablespoons of oil over the top of each bulb, making sure to coat each evenly. Use your fingers to massage the oil onto the exposed portion of the garlic’s surface. Then, season the top generously with salt and pepper. Next, arrange two sprigs of thyme on top of each bulb (if using).
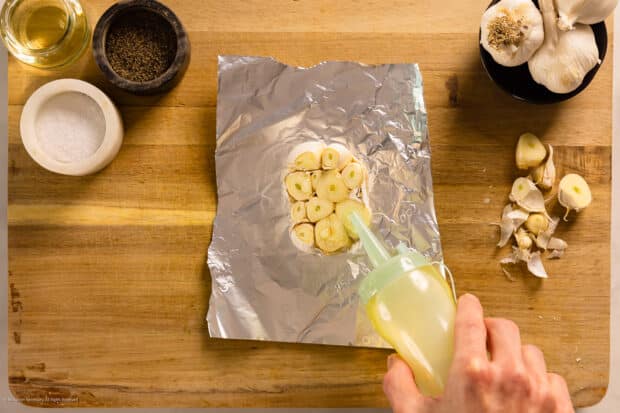
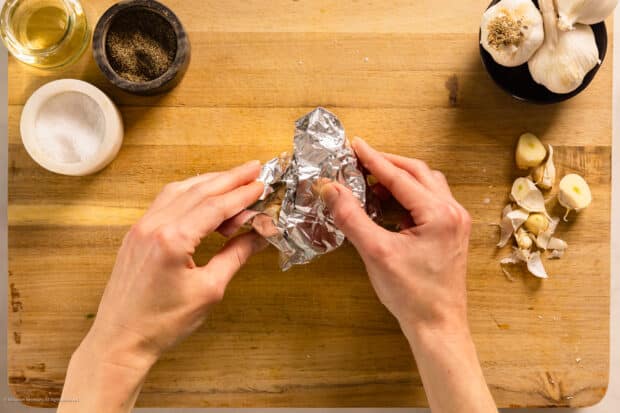
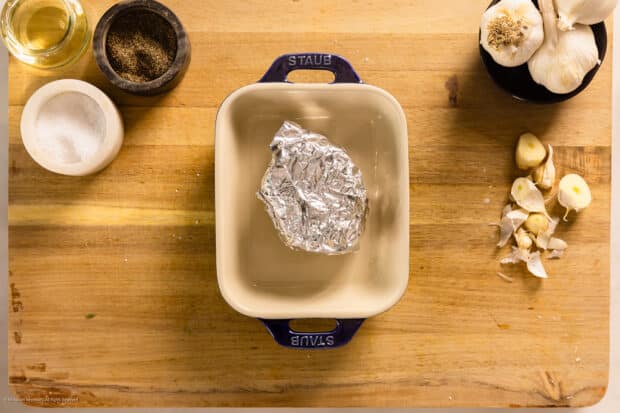
- Cover Garlic: You’ll need to wrap and cover the garlic before roasting. You can do this one of two ways:Option 1 - Aluminum Foil: Rip two sheets of aluminum foil large enough to wrap one garlic bulb. Then place one bulb, exposed-side-up, on top of each separate piece of foil. Next, wrap the bulbs loosely in the aluminum foil and place the foil packets of garlic onto a baking sheet. (Why? Wrap the aluminum tightly around the garlic bulb increases the chances of your garlic sticking to the aluminum. Use a light touch and wrap it loosely to prevent sticking.)Option 2 - Muffin Pan: Place each garlic bulb into the tins of a muffin pan. Cover the garlic with another muffin tin (upside down) or aluminum foil.
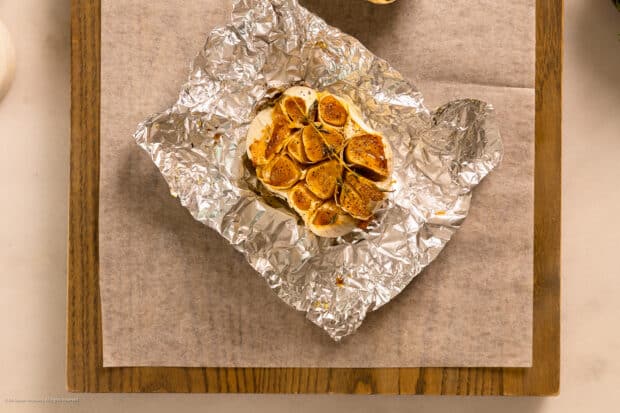
- Roast garlic: Transfer the heads of garlic to the preheated oven. Bake the garlic in the oven until the cloves are nicely caramelized, golden in color, and very soft to the touch, about 1 hour and 15 minutes at 325-degrees Fahrenheit.If roasting at 350-degrees, cook the garlic for 1 hour. Remove from the oven and check the cloves. If they aren’t soft, continue to roast in 15-minute increments until very soft to the touch and caramelized in color.If roasting at 400-degrees, cook the garlic for 45 minutes. Remove from the oven and check they cloves. If they aren’t soft, continue to roast in 5-minute increments until very soft to the touch and caramelized in color.
- Cool slightly: Remove the bulbs from the oven and unwrap the foil packets. Remove and discard the thyme sprigs. Set the garlic aside until it’s cool enough to handle. (Tip: The garlic cloves are easiest to squeeze out of their skins while they are still warm. So, don’t let them cool completely!)
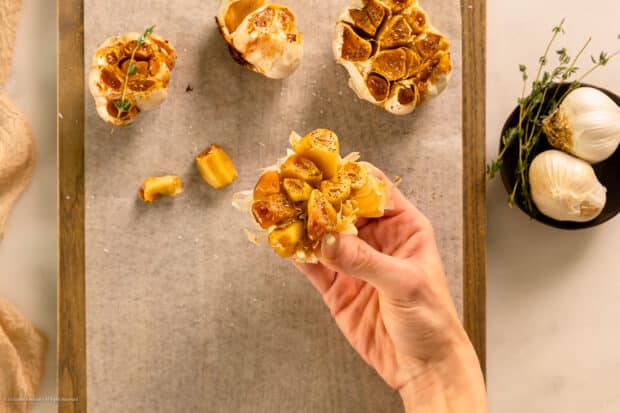
- Squeeze to remove cloves from papery skin: Once the garlic is cool enough to handle, use your fingers to squeeze the cloves out of their skins. Alternatively, you can use the tins of a fork to carefully lift the clove out of its skin.
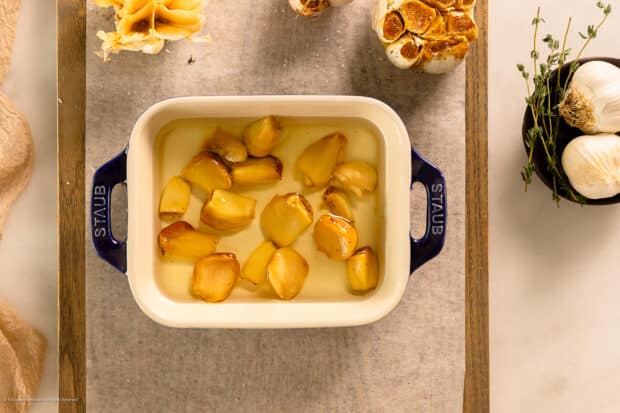
- Use or store: Use the roasted garlic cloves in your favorite recipes or store them for later according to the directions in the notes section below.
Notes
- Garlic: This recipe works for one bulb, or as many heads of garlic as you need.
- Oil: Do not use extra virgin olive oil for roasting – this oil does not hold up well to heat. I recommend a neutral oil, such as canola or vegetable oil; however, you may use regular olive oil.
- Storing roasted garlic: Once you roast garlic, I recommend removing the cloves from the bulb. There are a few different storing options, depending upon your preferences and needs:
- Oil and Airtight Container (recommended): Transfer the roasted cloves of garlic to a canning jar or airtight container. Add enough olive oil to cover and submerge all the cloves. Cover and store in the fridge for up to 2 weeks.
- Airtight Container: Add the roasted garlic cloves to a canning jar or airtight container. Cover and store in the fridge for up to 5 days.
- Foil: Place the coves of roasted garlic onto a large sheet of aluminum foil. Wrap the cloves tightly and store in the fridge for up to 5 days.
- Freezer Option 1 – whole roasted cloves: Place the roasted garlic cloves onto a wax-paper-lined baking sheet. Flash freeze until frozen. Then, transfer the frozen roasted cloves of garlic to a freezer safe storage bag, remove all the air, seal, and store in the freezer for up to 3 months.
- Freezer Option 2 – mashed roasted garlic: Mash all the individual cloves of garlic and divide the garlic into 1 teaspoon or 1 tablespoon blobs. Transfer the mashed garlic to the tins of an ice cube tray and cover. Store in the freezer for up to 3 months.
Nutrition
Calories: 189kcal Carbohydrates: 1g Protein: 0.2g Fat: 21g Saturated Fat: 2g Polyunsaturated Fat: 6g Monounsaturated Fat: 13g Trans Fat: 0.1g Sodium: 0.3mg Potassium: 16mg Fiber: 0.3g Sugar: 0.01g Vitamin A: 95IU Vitamin C: 4mg Calcium: 10mg Iron: 0.4mg