This post may include affiliate links. Thank you for your support.
In this comprehensive guide, I’m going to reveal the quickest and most effortless methods for How to Cut Garlic that I learned from my restaurant days. From peeling to slicing, crushing to grating, chopping to mincing, and even transforming garlic cloves into an aromatic paste, I’ve got you covered. Say goodbye to those pricey pre-peeled and pre-minced cloves and hello to the art of prepping garlic like a pro!
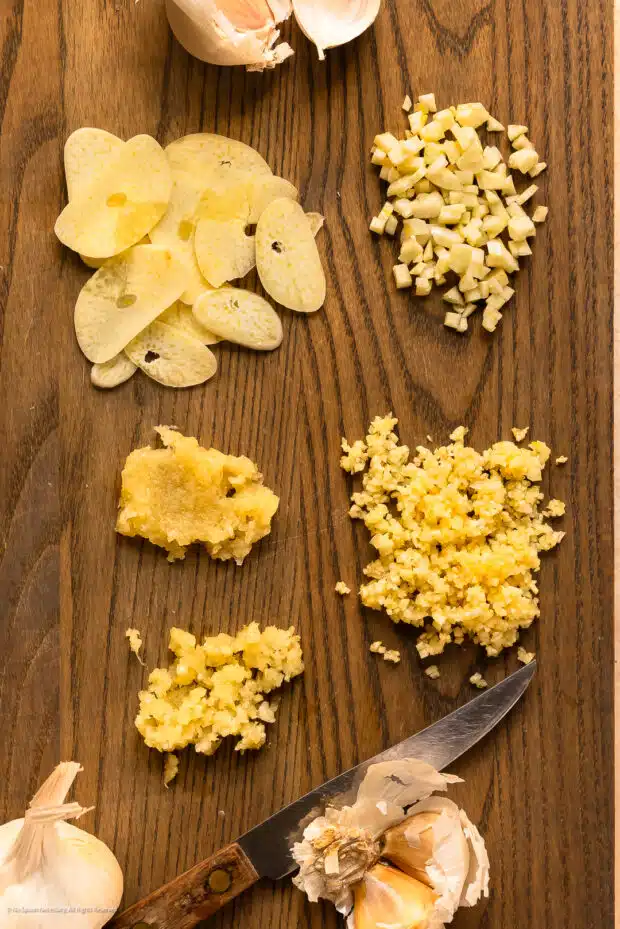
Table of Contents
- Why learn how to prepare garlic?
- How to prep garlic
- How to crush a clove of garlic
- How to grate garlic cloves
- How to slice a clove of garlic
- How to chop garlic clove
- How to mince garlic
- How to make garlic paste
- Expert tips for cutting garlic
- FAQs: frequently asked questions
- How to store cut or minced garlic
- Recipes using cut garlic
- More culinary knife skill tutorials!
- How to Cut Garlic
Why learn how to prepare garlic?
This guide is for anyone who’s ever wondered how to get the most goodness out of a garlic bulb, without any fuss! I’m here to demystify the entire garlic preparation process and make you a garlic pro.
I’ll start from scratch, literally, by showing you how to take a whole head of garlic and break it down into lovely, fragrant cloves. Then, I’ll dive into some super speedy ways of peeling garlic with such ease that you’ll wonder why you ever bought those pricey pre-peeled bags in the first place. But that’s just the beginning!
I’m going to cover ALL the garlicky bases. From mastering the art of crushing and grating garlic for those sauces and marinades, to precision slicing and chopping for stir-fries and rib roasts or beef roasts, and finally, achieving that delicate mince for your salads and salad dressings. I’ll even show you the secret to transforming garlic into a luxurious, velvety paste that will take your favorite Asian recipes to the next level.
Ready, set, go – let’s learn how to cut garlic cloves like a BOSS!
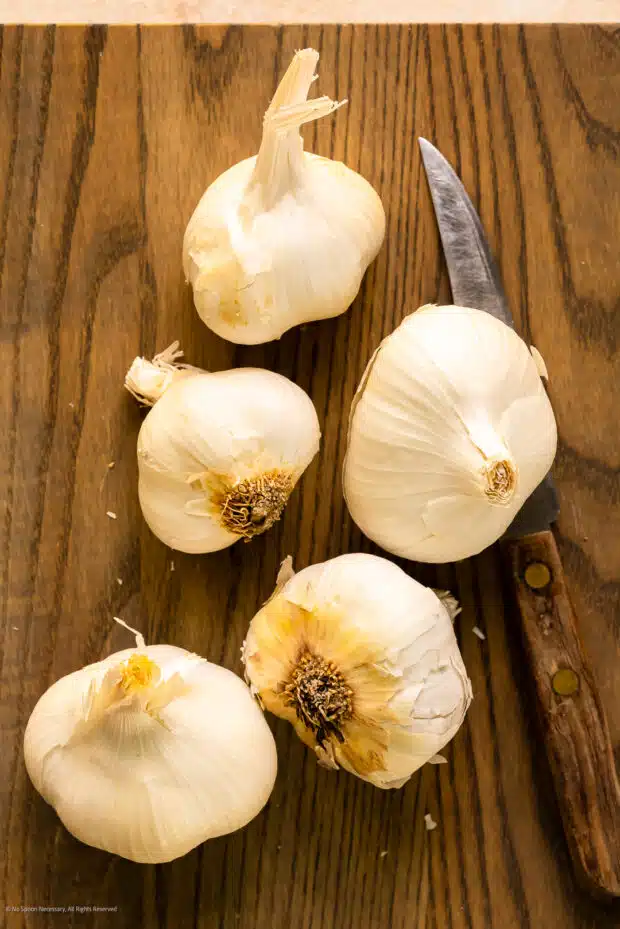
What you’ll need to cut garlic
You’ll need the following ingredients for this knife skills tutorial:
- A sharp Chef’s knife
- Clean cutting board
- Whole bulb of garlic or whole individual cloves
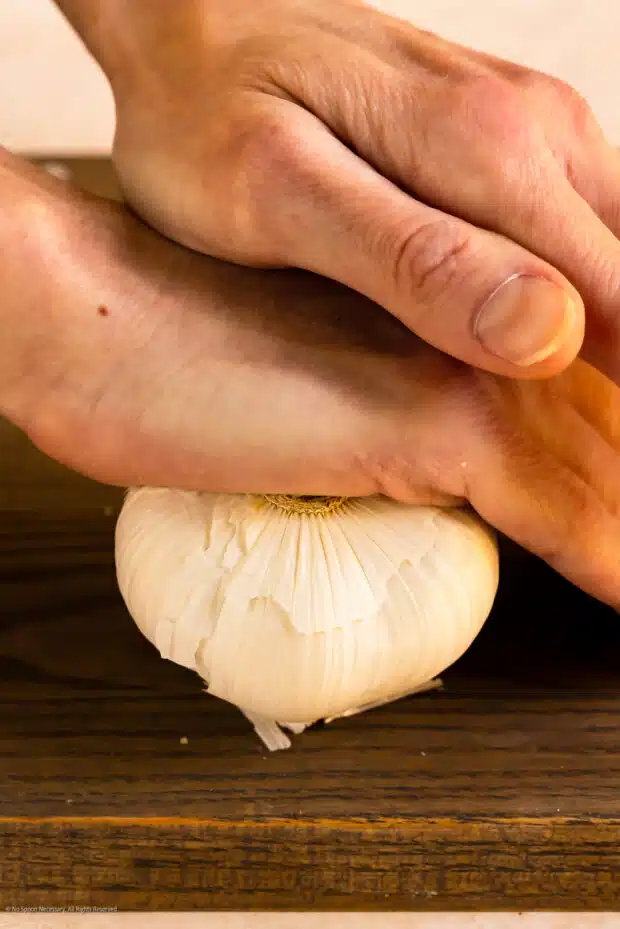
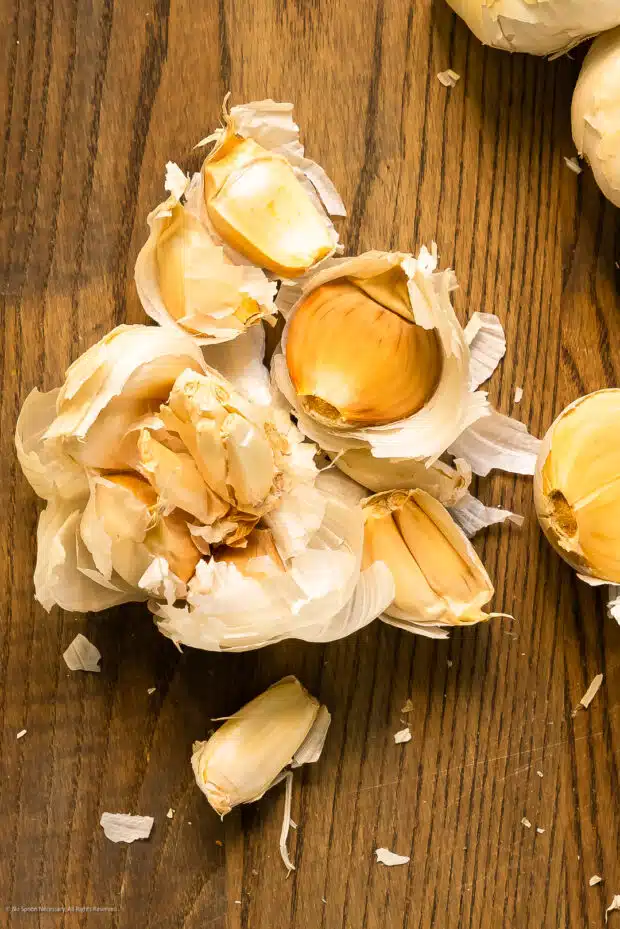
How to prep garlic
To begin on your journey to garlic goodness, you need to remove those little pungent little nuggets from the binds of their papery skin. Here’s how:
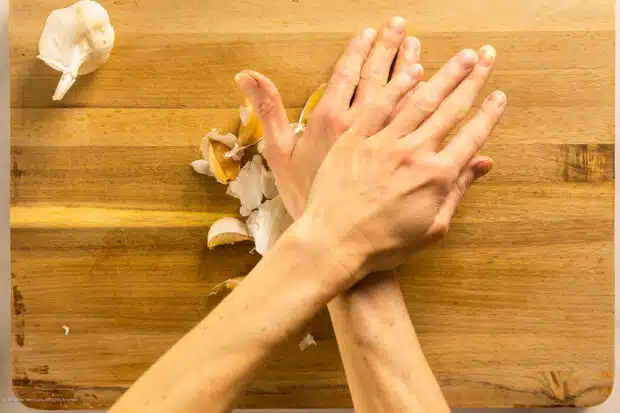
Step 1: Separate bulb into cloves. To separate the garlic cloves, place the whole garlic bulb onto a cutting board upside down, with the stem side down on the board. Place the palm of your hand on top of the bulb and press down to separate the cloves from the root end. (Tip: Wrap the entire head of garlic in a kitchen towel prior to separating the bulb – the towel will keep the papery skin from flying around your work area.)
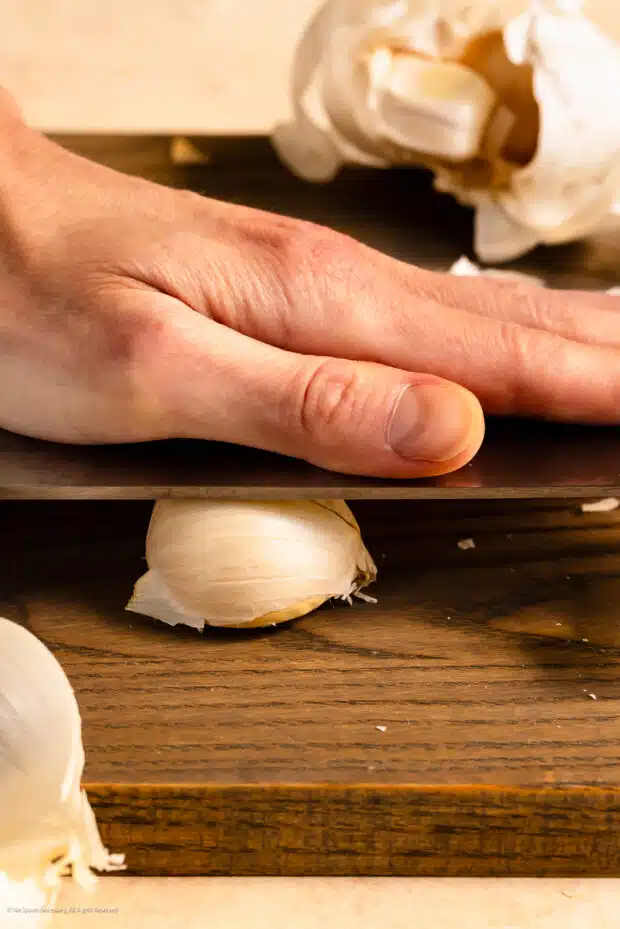
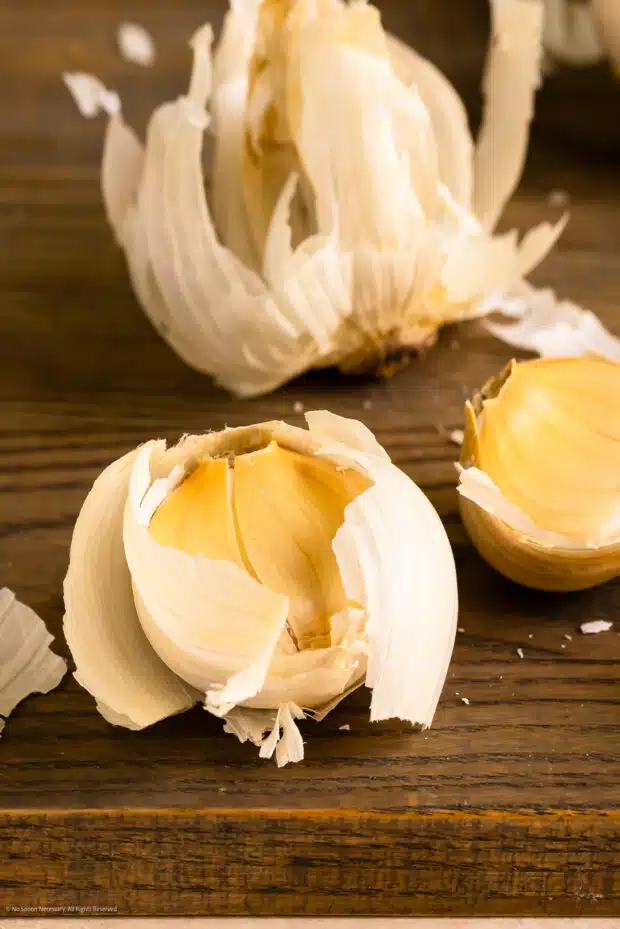
Peeling garlic
Step 2: Peel cloves of garlic. There are two different ways you can peel garlic, depending upon your preference. Peel the cloves of garlic using one of the two methods listed below:
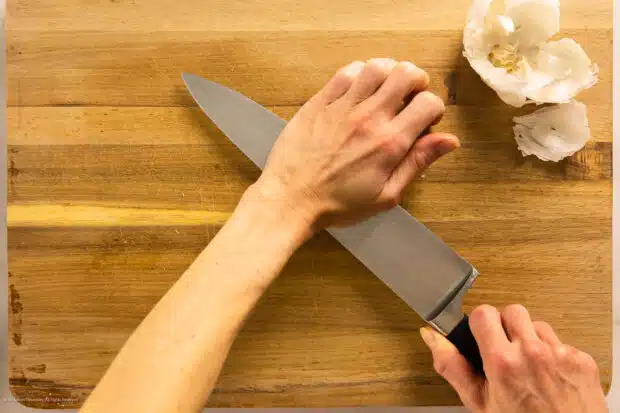
- Option 1: Board and Knife (best for small number of cloves): Working with one clove of garlic at a time, lay it flat on your board. Use your knife to cut off and discard the tip (stem). Then place the flat side of your knife on top of the clove and lightly press down, barely crushing the clove and releasing it from its papery skin. Use your fingers to peel the skin away from the clove of garlic and discard the skin. Repeat the process with the remaining cloves of garlic until completely peeled.
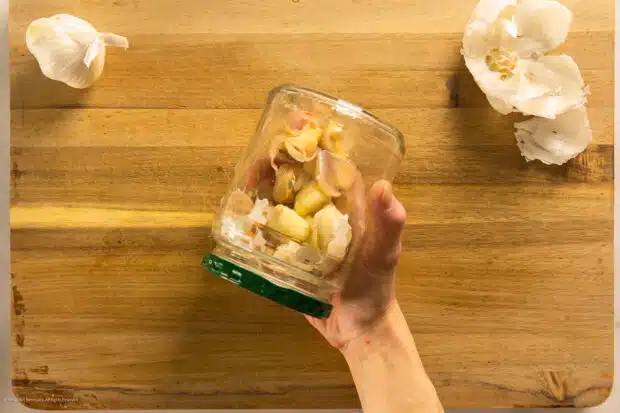
- Option 2: Sealed Jar or Two Lipped Bowls (best for larger number of cloves): Add all the cloves of garlic to a large jar or a metal lipped bowl. Cover the jar with a lid and seal or grab a second metal lipped bowl, flip it over and use it as a top, pinching the two lipped bowls together. If using bowls, make sure you keep the bowls clamped shut. Shake the jar or bowls vigorously for 20-30 seconds, or until the garlic peels loosen and fall away from the cloves. Discard all the loose papery skin and use your fingers to remove any stuck-on garlic peels. (Note: I personally think the jar is a much more effective and easier method.)
How to crush a clove of garlic
Crushing a garlic clove unlocks an allium flavor explosion! When you crush garlic, you release its potent oils and juices, intensifying its pungent aroma and creating a concentrated burst of garlicky goodness. Plus, it’s so simple to do!
No matter how you’re using garlic (even if you plan on mincing it to bits or using whole cloves), I always suggest starting by crushing them slightly. Here’s how:
Step 1: Crush Garlic. Peel the garlic according to the instructions above. Working with one clove of garlic at a time, arrange it so that the clove is flat on your cutting board. Then place the flat side of your knife on top of the clove. Place the heel of your palm on the flat side of the knife and firmly press down to crush the clove of garlic. Repeat the process with the remaining cloves of garlic until completely crushed.
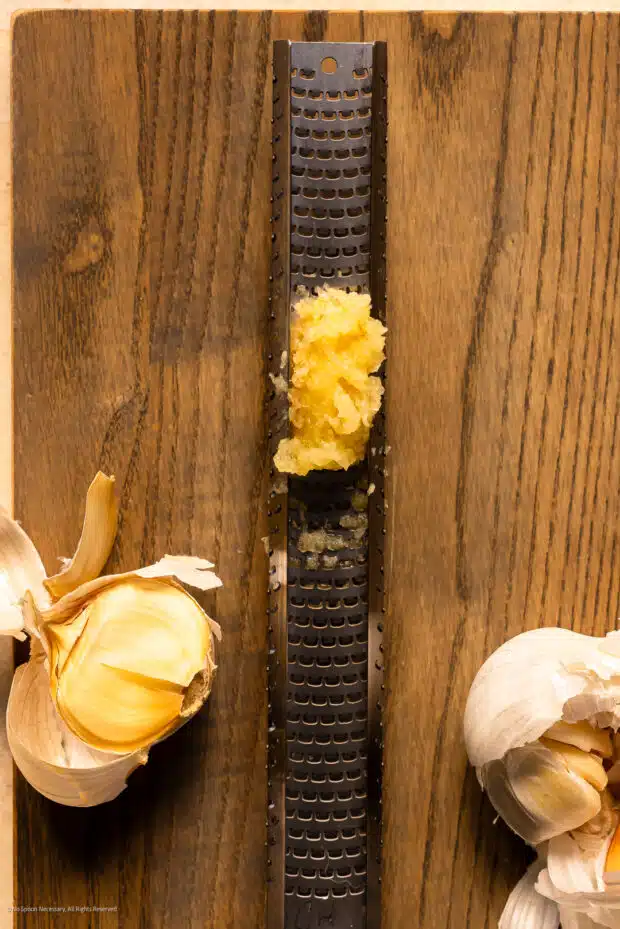
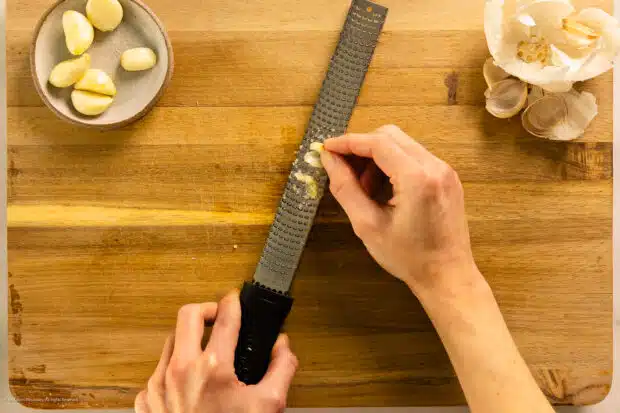
How to grate garlic cloves
Grating garlic is like turning it into flavor-packed confetti! Remember, the more you damage the cell walls (e.g. by cutting or crushing), the more of the garlicky goodness you release.
When you grate a garlic clove, you create tiny garlic bits that distribute evenly through your dish. It’s fantastic for recipes where you want big garlic flavor to blend seamlessly into the dish, like in soups and casseroles.
Step 1: Grate Garlic. Peel the garlic according to the instructions above. Working with either a microplane or rasp grater and one clove of garlic at time, firmly grip the clove by the root end. Press the stem end onto the microplane or grater and grate the clove just like you would a very small piece of cheese, using a firm, back-and-forth motion across the grater. Stop grating once you reach the root of the garlic clove, discarding the root. Repeat the process with the remaining cloves of garlic until completely crushed.
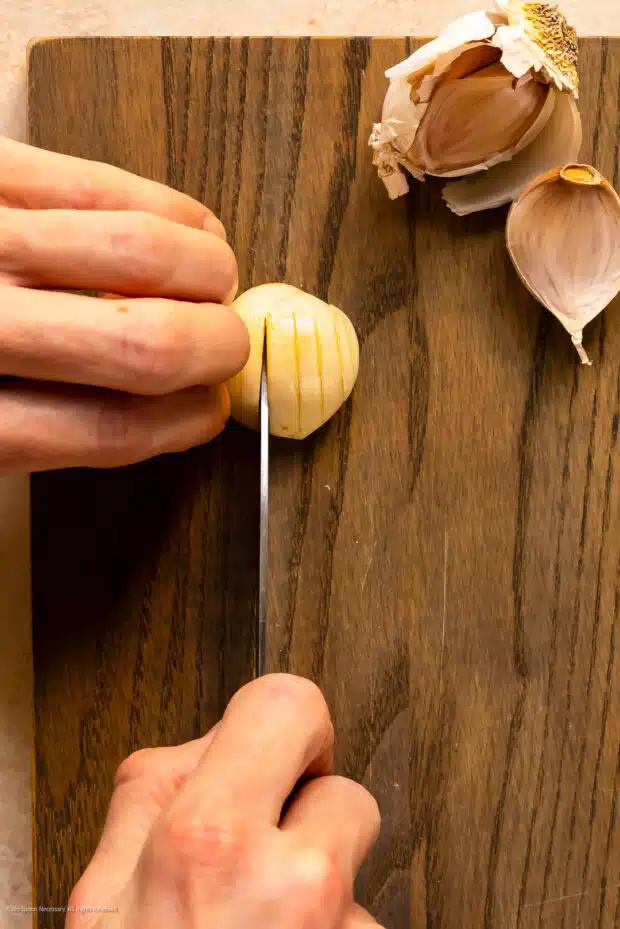
How to slice a clove of garlic
Slicing garlic is all about adding a touch of elegance and gentle garlic flavor to your dishes. When you slice garlic, you create thin, delicate rounds that look beautiful and taste milder compared to minced or crushed garlic. It’s perfect for recipes where you want a subtle garlic presence, like sautéed peppers and onions, pasta dishes, or seafood.
Step 1: Slice Garlic: Peel the garlic according to the instructions above. Working with one clove at a time, arrange the garlic so that the clove is flat on your cutting board with the root end closest to your non-dominant hand and the stem closest to your knife. Working left to right, use your sharp knife to make vertical cuts through the clove of garlic – slicing as thin or thick as you prefer. Continue to slice the clove, stopping once you get to the root, and discarding the root. Repeat the process with the remaining cloves until completely sliced.
Tip: Try to vertically cut the garlic as evenly as possible.

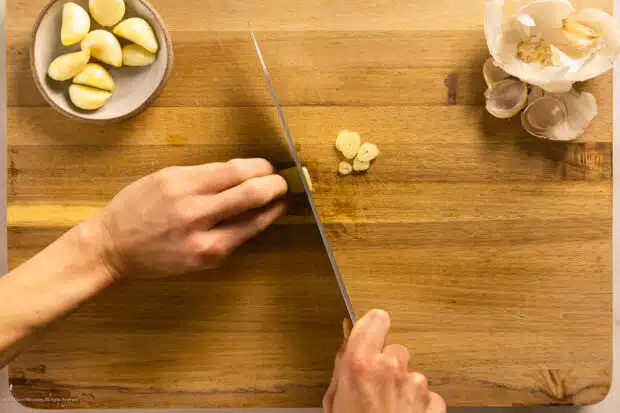
How to chop garlic clove
Chopped garlic adds a burst of bold, garlicky flavor to your dishes. When you chop garlic, you create small, irregular pieces that release their full flavor potential.
This is ideal for recipes where you want a strong garlic presence, like stir-fries, hearty chilis and stews, or roasted vegetables. So, when your recipe calls for garlic with attitude, grab that knife and start chopping for a dish bursting with flavor!
Step 1: Slice Garlic. Peel the garlic according to the instructions above. Working with one clove at a time, arrange the garlic so that the flat side is down on the board. Then, arrange is so that the root is farthest away from you and the tip of your knife points towards the root. Working left to right and starting at the stem, use your sharp knife to make thin, vertical cuts through the clove of garlic, up to the root but not through it.
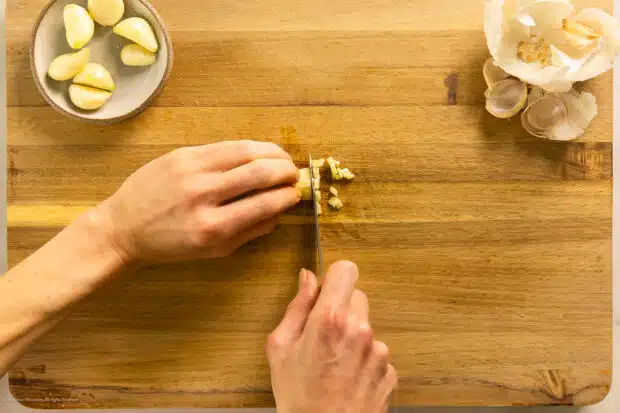
Step 2: Rotate the clove 90-degrees so that the root end is closest to your non-dominant hand and the stem closest to your knife hand. Use your knife to make thin cuts that run crosswise (or through) your first cuts. Once all the thin cuts are made, cut off and discard the root. Repeat the process with the remaining cloves of garlic until all are chopped.
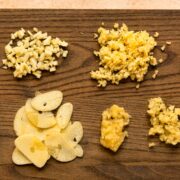
Note: Chopped garlic is about the same size as short-grain rice. Minced garlic is cut so fine that it’s unrecognizable – however, it’s not a paste.
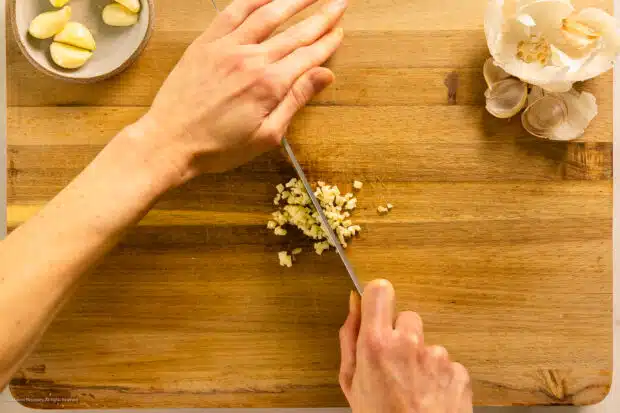
How to mince garlic
Mincing garlic turns it into teeny-tiny flavor powerhouses! When you mince garlic, you finely chop it into itsy-bitsy bits, which means you get plenty of garlicky goodness in every bite.
This is fantastic for recipes where you want garlic evenly distributed, like in salsas, dressings, or when you’re making classic Italian pasta sauces. Mincing garlic releases its robust flavor without any chunky surprises, so you get that perfect balance in your dishes.
Step 1: Chop. Peel and chop the garlic according to the instructions above. Once you’ve chopped all the garlic and discarded all the roots, use the heel of your knife to gather the garlic into a small pile on your cutting board.
Step 2: Mince. Next, arrange the knife so that it fits comfortably in your hand. Place your free hand on top of the knife and then use a back and forth rocking motion to cut the garlic until its barely recognizable. Repeat the process with the remaining cloves until completely minced.
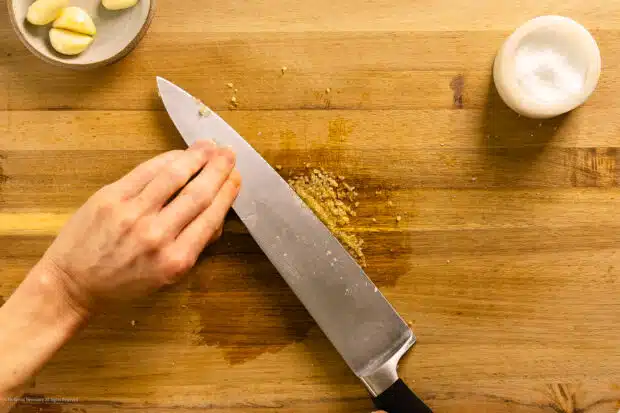
How to make garlic paste
Turning whole cloves of garlic into a paste is like wielding a flavor-packed magic wand in your cooking! Garlic paste is a concentrated burst of garlic goodness that’s perfect when you want to infuse your dishes with a rich, garlicky flavor without any chunky bits.
It’s particularly popular in Southeast Asian curries, but can be used whenever you want a serious punch of allium flavor. Oh, and it’s a time-saver too! No need to meticulously mince garlic—just a quick grind with a pinch of salt, and you’ve got garlic paste ready to rock.
Step 1: Mince. Peel and mince garlic according to the instructions above. Use the heel of your knife to gather the minced garlic into a small pile.
Step 2: Salt. Sprinkle a bit of kosher salt evenly over the garlic.
Step 3: Smash. Next, arrange the knife if your hand so that it fits comfortably and use your free hand to gently hold the blunt side of the blade. Then press and scrape the sharp side of the knife against the pile of garlic, working at a slight angle to help flatten and smash the pieces of garlic. Repeat pressing and scraping until you have a smooth garlic paste.
Note: During the process, stop occasionally and use the heel of your knife to gather the garlic back into a neat pile.
Expert tips for cutting garlic
Here are some of my best tips for handling fresh garlic and cutting garlic cloves like a pro:
- Choose Quality Garlic: Start with fresh, firm garlic bulbs. Look for ones with plump cloves and no signs of sprouting or softness. The fresher the garlic, the better the flavor.
- Mind the Green Sprout: If you find a green sprout inside the garlic clove, consider removing it. While it’s edible, it can have a slightly bitter taste. Just slice the clove in half lengthwise, and you can easily pop out the green sprout.
- Use a Garlic Press Sparingly: Garlic presses are convenient, but they can produce a stronger, more pungent garlic flavor compared to other methods. Reserve their use for recipes where you want a powerful garlic presence.
- Save Time with a Food Processor: If you’re prepping a large quantity of garlic, a food processor can save you time. Just pulse the peeled cloves until you achieve the desired consistency.
- Storing Peeled Cloves: If you want to prep garlic in advance, you can peel the cloves and store them in an airtight container in the refrigerator. However, fresh garlic is best used within a week.
- Sticky Fingers: Garlic can leave a strong odor on your hands that lingers. To minimize this, you can rub your fingers on stainless steel (like your sink) or wash your hands with lemon juice or vinegar.
- Experiment: Don’t be afraid to experiment with different garlic preparations in your recipes. Whether you’re crushing, grating, slicing, mincing, or turning it into paste, each method brings a unique flavor and texture to your dishes.
- Scale as Needed: This garlic cutting tutorial works for any size, variety, and number of garlic bulbs.
- Stay Fresh: For the best flavor use prepared garlic immediately, or within an hour of cutting.
FAQs: frequently asked questions
What is mincing?
Mincing is the process of finely chopping garlic cloves into small, uniform pieces.
Why should I mince garlic?
You should mince garlic when you want to evenly distribute its robust flavor throughout your dishes. It’s perfect for recipes where you desire a distinct garlic presence, like in salsas or when sautéing vegetables or meat.
How much garlic should I use?
When it comes to garlic, how much you use is all about personal preference and the dish you’re whipping up. Take, for instance, guacamole—it won’t need as much garlic as a 40-clove garlic chicken dish, right? It’s a flavor game, and you’re the chef!
So, here’s a simple rule of thumb to help you find your garlic groove:
- For a Hint of Garlic: If you want just a gentle whisper of garlic in your dish, start with 1 to 2 cloves for a recipe that serves 4 people. It’ll add a subtle background note that won’t steal the show.
- For a Garlicky Embrace: Craving a bit more garlic love? Go for 3 to 4 cloves for the same serving size. This will give your recipe a friendly garlic hug, noticeable but not overwhelming.
- For True Garlic Enthusiasts: Now, if you’re part of the garlic fan club or making a dish where garlic is the superstar, don’t hold back! You can roll with 5 or more cloves for every 4 servings, and that’s where the bold garlic magic happens.
Here’s a golden cooking tip: Start with a tad less garlic than you think you’ll need. Taste your creation, and if you’re yearning for more garlic goodness, go ahead and add more. Remember, garlic can be a bit of a chameleon, with its strength varying from clove to clove, so it’s easier to build up the flavor than to dial it down if things get too garlicky.
Also, think about how you’re prepping your garlic – whether it’s crushed, minced, sliced, grated, or in that velvety paste form, and whether it’s going into your dish raw or getting cooked. These factors can make your garlic’s flavor more or less intense, so be the garlic maestro you want to be!
How do I prevent garlic from sticking to my knife?
Keeping that pesky garlic from sticking to your knife can be a bit of a culinary challenge, but here are some great tricks:
- Befriend a Sharp Knife: You know that trusty, sharp knife you have? It’s your garlic’s best friend. A dull knife can mash up the garlic and make it stickier, so keep that blade in tip-top shape.
- Slice or Mince First: If you’re starting with chopping, consider slicing or mincing the garlic first. It’s less likely to glue itself to your knife when it’s in smaller pieces.
- Sprinkle a Pinch of Salt: Before you go all ninja on that garlic, sprinkle a wee bit of salt on it. The salt can help soak up some of the moisture, making the garlic less sticky.
- Grease It Up: A little kitchen secret – lightly coat your knife blade with a touch of cooking oil. It acts like a slippery shield between the garlic and your knife.
- Garlic Press or Grater Magic: When the sticking struggle gets real, switch to a garlic press or grater. These gadgets can make your life easier by managing the stickiness for you.
- Chill Out: Sometimes, chilling out in the fridge is a good idea – for the garlic, that is! (Not to say I didn’t escape to the walk-in often back in my restaurant days… 😂) Pop the cloves in there for a brief chill before cutting to make it less clingy.
- Dry the Blade: Keep your knife blade dry before you dive into that garlic. Moisture is the enemy of non-stick garlic chopping.
- Rock and Roll: Here’s a handy technique – use a rocking motion when chopping garlic. Rock that knife back and forth while keeping the tip anchored on the cutting board to keep things from sticking.
How much is one clove of garlic, minced?
While it will depend on the actual clove you’re working with, a rough rule to keep in mind is: 1 medium clove of garlic = ½ to ¾ teaspoon minced garlic, and 1 Tablespoon of minced garlic = 4-6 medium cloves.
What’s the difference between minced garlic and garlic that has been through a garlic press?
Mincing produces small chopped bits of garlic, while using a garlic press creates a smoother garlic paste. The choice between the two methods of cutting garlic depends on your recipe and personal preference. If you want a more uniform garlic distribution with a smoother texture, a garlic press can be handy. If you’re okay with small bits of garlic and prefer a bit of texture, mincing with a knife is the way to go.
How to store cut or minced garlic
Freshly cut garlic is best served fresh, before any of those flavorful sulfurous compounds can evaporate. That said, you’re welcome to store any leftover chopped garlic in an airtight container in the fridge for up to 5 days. You can also freeze it for up to a month.
Recipes using cut garlic
Now that you know how to cut a garlic clove, put your culinary knife skills to good use. Most of my recipes utilize cloves of garlic, but here are a few of my favorites to get you started:
- How to Make Garlic Butter (10 Flavor Variations + Uses!)
- Mojo Marinade Recipe
- Crostinis Recipe
- Tomato and Cannellini Bean Soup
- Mini Roasted Potatoes with Garlic
- Cuban Style Black Beans
- Garlic Honey Shrimp Recipe
- Gremolata Pork Chops
- Greek Shrimp Saganaki with Tomatoes and Feta
- Garlic Rosemary Chicken Skewers
- Cumin Chicken
- Black Beans for Tacos, Burritos, and More!

With these garlic-prepping superpowers in your culinary toolbox, you’re all set to “gar-lick” the competition and add that unmistakable garlic charm to your dishes. Happy cooking and may your dishes always be stinkin’ delicious! 🧄🍳😄
Cheyanne
Craving MORE? Follow all the deliciousness on Facebook, Pinterest and Instagram!
If you’re looking to step up your garlic knowledge, check out this recipe for roasting garlic in the oven next!
More culinary knife skill tutorials!
Step up your cheffing skills with these straightforward kitchen tutorials:
- Cutting an Onion: Knife Tutorial
- How to Cut Broccoli
- Knife Handling and Knife Cuts
- How to Make Broccoli Rice
How to prepare a head of garlic and how to cut a garlic clove👇
How to Cut Garlic
Equipment
- 1 Sharp Kitchen Knife
- 1 Clean Cutting Board
Ingredients
- 1 bulb Garlic
Instructions
- Separate bulb into cloves: To separate the head of garlic, place the whole garlic bulb onto a cutting board upside down, with the stem side down on the board. Place the heel of your hand on top of the bulb and press down to separate the cloves from the root end. (Tip: Wrap the entire head of garlic in a kitchen towel prior to separating the bulb – the towel will keep the papery skin from flying around your work area.)

Peel cloves of garlic using one of the methods below
- Board and Knife (best for peeling a small number of cloves): Working with one clove of garlic at a time, lay it flat on your board. Use your knife to cut off and discard the tip (stem). Then place the flat side of your knife on top of the clove and lightly press down, barely crushing the clove and releasing it from its papery skin. Use your fingers to peel the skin away from the clove of garlic and discard the skin. Repeat the process with the remaining cloves of garlic until completely peeled.
- Sealed Jar or Two Lipped Bowls (best for peeling larger number of cloves): Add all the cloves of garlic to a large jar or a metal lipped bowl. Cover the jar with a lid and seal or grab a second metal lipped bowl, flip it over and use it as a top, pinching the two lipped bowls together. If using bowls, make sure you keep the bowls clamped shut. Shake the jar or bowls vigorously for 20-30 seconds, or until the garlic peels loosen and fall away from the cloves. Discard all the loose papery skin and use your fingers remove any stuck-on garlic peels. (Note: I personally think the jar is a much more effective and easier method than the board and knife method.)
To crush garlic
- Peel the garlic using one of the methods above. Working with one clove of garlic at a time, arrange it so that the clove is flat on your cutting board. Then place the flat side of your knife on top of the clove. Place the heel of your palm on the flat side of the knife and firmly press down to crush the clove of garlic. Repeat the process with the remaining cloves of garlic until completely crushed.
To grate garlic
- Peel the garlic using one of the methods above. Working with either a microplane or rasp grater and one clove of garlic at time, firmly grip the clove by the root end. Press the stem end onto the microplane or grater and grate the clove just like you would a very small piece of cheese, using a firm, back-and-forth motion across the grater. Stop grating once you reach the root of the garlic clove, discarding the root. Repeat the process with the remaining cloves of garlic until completely crushed.
To slice garlic
- Peel the garlic using one of the methods above. Working with one clove at a time, arrange the garlic so that the clove is flat on your cutting board with the root end closest to your non-dominant hand and the stem closest to your knife. Working left to right, use your sharp knife to make vertical cuts through the clove of garlic – slicing as thin or thick as you prefer. Continue to slice the clove, stopping once you get to the root, and discarding the root. Repeat the process with the remaining cloves until completely sliced. (Tip: Try to vertically cut the garlic as evenly as possible.)
To chop garlic
- Peel the garlic using one of the methods above. Working with one clove at a time, arrange the garlic so that the flat side is down on the board. Then, arrange is so that the root is farthest away from you and the tip of your knife points towards the root. Working left to right and starting at the stem, use your sharp knife to make thin, vertical cuts through the clove of garlic, up to the root but not through it. Rotate the clove 90-degrees so that the root end is closest to your non-dominant hand and the stem closest to your knife hand. Use your knife to make thin cuts that run crosswise (or through) your first cuts. Once all the thin cuts are made, cut off and discard the root. Repeat the process with the remaining cloves of garlic until all are chopped. (Note: Chopped garlic is about the same size as short-grain rice. Minced garlic is cut so fine that it's unrecognizable – however, it’s not a paste.)
To mince garlic
- Peel and chop the garlic according to the instructions above. Once you’ve chopped all the garlic and discarded all the roots, use the heel of your knife to gather the garlic into a small pile on your cutting board. Next, arrange the knife so that it fits comfortably in your hand. Place your free hand on top of the knife and then use a back and forth rocking motion to cut the garlic until its barely recognizable. Repeat the process with the remaining cloves until completely minced.
To make garlic paste
- Peel and mince garlic according to the instructions above. Use the heel of your knife to gather the minced garlic into a small pile. Sprinkle a bit of kosher salt evenly over the garlic. Next, arrange the knife if your hand so that it fits comfortably and use your free hand to gently hold the blunt side of the blade. Then press and scrape the sharp side of the knife against the pile of garlic, working at a slight angle to help flatten and smash the pieces of garlic. Repeat pressing and scraping until you have a smooth garlic paste. (Note: During the process, stop occasionally and use the heel of your knife to gather the garlic back into a neat pile.)
Notes
- Garlic: This garlic cutting tutorial works for any size, variety, and number of garlic bulbs.
- Best Flavor: For the best flavor use prepared garlic immediately, or within an hour of cutting.
- Storage: Store any leftover chopped garlic in an airtight container in the fridge for up to 5 days.
- Kitchen Conversion: 1 bulb of garlic will yield roughly 10-2o cloves.
- Kitchen Conversion: 1 medium clove of garlic = ½ to ¾ tsp minced garlic. 1 TBS minced garlic = 4-6 medium cloves.
Nutrition
Did you make this recipe?
Mention @nospoonnecessary on Instagram and tag it #nospoonnecessary!
©No Spoon Necessary. All images and content are under copyright protection. Please do not use any images without prior permission. Kindly do not republish this recipe without prior consent. If you want to reference this recipe, please do so by linking directly to this post.
Article references
- Gisslen, W., Griffin, M. E., & Bleu, L. C. (2006). Professional Cooking for Canadian Chefs. John Wiley & Sons.
- America, C. I. O. (2011). The professional chef. John Wiley & Sons.