This post may include affiliate links. Thank you for your support.
Embrace kitchen mastery with my complimentary Bakers Measurement Conversion Chart – the ultimate tool to ensure your favorite baked recipes turn out flawlessly every time. This easy-to-use, printable converter cheat sheet for precision baking is your key to culinary success, no matter if your recipe is in cups or weights, like grams, or ounces!
Table of Contents
Why you’ll love this baker’s conversion chart
Here’s the scenario: you’ve stumbled upon a mouthwatering recipe for a delectable dessert or a savory treat that’s simply too tempting to resist. You gather your ingredients, preheat your oven, and start measuring. But wait – the recipe uses cups, and you measuring your ingredients by weight. Or maybe the recipe lists teaspoons, and you prefer ounces. The baking conversion dilemma strikes!
Welcome to the ultimate baking companion: my free printable bakers converter chart. This isn’t just any ordinary cheat sheet; it’s your golden ticket to baking triumphs. So whether you’re a novice or seasoned baker, this freebie conversion chart is your secret weapon to ensuring that all your muffins, confections, and every single dessert emerges from your oven as a masterpiece.
Are you looking for common cooking measurements? Check out my Kitchen Conversion Chart for a quick reference on basic cooking measurements and to convert savory recipes, like soups, stir-fries, roasts, and side dishes. It covers common measurement abbreviations and common dry ingredient conversions, as well as measuring spoons (tsp, TBSP), liquid ingredients, liquid conversions (ml, pint, liters, gallon), US standard imperial to metric system conversions, and one cup size. Cooking Conversions for Simple Home Cooking.
(Don’t forget to use the “jump” button or simply scroll to the bottom of the page for your free printable conversion chart for baking.)
How to convert between fahrenheit and celsius
Baking is a global delight, but sometimes recipes use different temperature scales, leaving us in a measurement muddle. Fear not! Mastering the oven conversion between Fahrenheit and Celsius is as simple as pie. Here’s how you can effortlessly convert oven temperatures:
Fahrenheit to Celsius:
To convert a Fahrenheit temperature to Celsius, start by subtracting 32 from the Fahrenheit reading.
Next, multiply the result by 5/9 (or approximately 0.5556).
Formula: °C = (°F – 32) × 5/9
For example, if a recipe calls for a baking temperature of 350°F:
°C = (350 – 32) × 5/9
°C ≈ 176.67°C
So, you’d set your oven to approximately 177°C.
Celsius to Fahrenheit:
Conversely, when you need to convert a Celsius temperature to Fahrenheit, start by multiplying the Celsius reading by 9/5 (or approximately 1.8).
Then, add 32 to the result.
Formula: °F = (°C × 9/5) + 32
For example, if a recipe suggests a baking temperature of 180°C:
°F = (180 × 9/5) + 32
°F ≈ 356°F
You’d set your oven to around 356°F.
With these simple formulas in your arsenal, you can confidently navigate recipes from around the world, ensuring that your baking endeavors are always at the perfect temperature, no matter which scale the recipe uses.
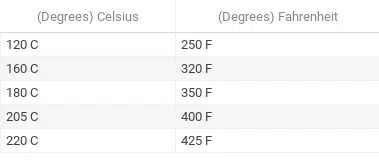
Below is a bakery conversion chart for converting oven temperatures:
What’s the difference between a conventional oven and a convection oven?
In a conventional oven, the heat comes from either the top or the bottom (or both) heating elements. These elements get hot and surround your baking dish with warmth. The air inside doesn’t move around much on its own, which can lead to slightly uneven cooking.
Convection ovens also have heating elements, but they come with a twist—the addition of a fan. This fan circulates the hot air evenly around your food. Thanks to that trusty fan, the hot air dances around inside a convection oven, giving your dishes an even bake from all angles. Say goodbye to hot spots and unevenly baked goods!
Conventional ovens are fantastic for most baking tasks. Cakes, cookies, casseroles—they can handle it all. You’ll likely use them for most of your recipes without even thinking twice. Convection ovens are your go-to for recipes where consistency matters most. They’re perfect for roasting, baking multiple trays of cookies at once, and anything that needs that golden, crispy finish.
And, if you’re reading a recipe that’s built for a conventional oven (assume it is, unless it tells you to use convection), just remember to reduce the heat by about 25°F/4°C. Or simply use the bakers converter chart below.
Baking pan conversions
Every come across a delicious cake recipe only to find out you don’t have the right baking pan? Regardless if you need a square pan or 9-inch cake pan, it’s super irritating, right? Well, no more worries! All you need to do is measure the cake or dessert batter, use the baking converter chart below, and find the baking pan that works for you. Hooray! Cake for all!
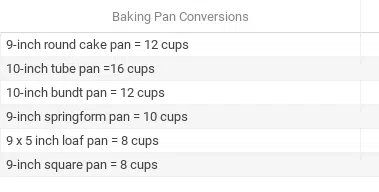
Below is a baking conversion chart for pans:
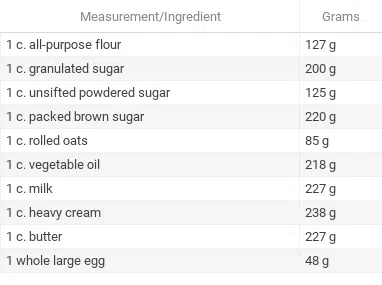
How many grams per cup?
Ah, the age-old question: How many grams fit into a cup? Well, here’s the deliciously confusing part: it depends on what you’re measuring! Different ingredients have different weights, so that’s where this weight and measure conversion or a bakers converter chart comes into play.
- Flour: A cup of all-purpose flour weighs approximately 128 grams. But wait, it gets tricky! Whole wheat flour? That’s about 130-135 grams per cup. Gluten-free flour, oat flour, rye flour, and chickpea flour will all have their own weights, too.
- Sugar: A cup of granulated sugar is roughly 201 grams. Brown sugar, on the other hand, is a bit denser so it weighs around 220 grams.
- Butter: A cup of butter is about 227 grams (1 cup butter = 227 grams)
- Milk: When it comes to liquids like milk, a cup of milk is usually about 240 milliliters or 8 fl oz (which is pretty much the same as grams since milk’s density is close to water). But remember, this rule isn’t universal for all liquids.
- Nuts, Chocolate Chips, and More: Nuts, chocolate chips, and other chunky ingredients like to keep us guessing.
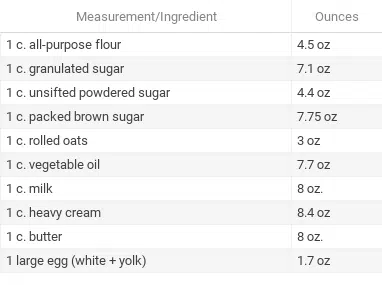
Below is a baking weight converter chart for common bakery ingredients in ounces:
Most common baking measurements
As you can see, converting between ounces (weight) and fluid ounces isn’t always a straightforward process.
While 8 fluid ounces (volume) of a liquid will often equal 1 cup, 8 ounces (weight) of a dry ingredient, like all purpose flour, pastry flour, cake flour, bread flour, oats, cocoa powder, or white sugar, will very rarely equal one cup. I wouldn’t say it’s necessary to commit these measurements or a bakers conversion chart to memory; however, it is helpful to have them handy somewhere. (Don’t worry, they’re on the free bakers converter chart printout and PDF located at the bottom of this article!)
Below is a baking conversion chart for common bakery ingredients by weight in grams:
FAQs: frequently asked questions
How much baking powder do I need to use if my recipe calls for baking soda?
When you see a recipe using baking soda (or bicarbonate of soda), it usually means there’s an acid party going on in there. Baking soda teams up with acidic ingredients like buttermilk, yogurt, vinegar, or citrus juice to create a fizzy reaction. This magical chemistry produces carbon dioxide gas, which gives your baked goodies that perfect rise.
If you want to use baking powder instead of baking soda, here’s a simple rule: For every 1/4 teaspoon of baking soda in your recipe, use 1 teaspoon of baking powder instead. For instance, if your recipe calls for 1 teaspoon of baking soda, you’d switch it up with 4 teaspoons of baking powder.
This bakers substitution provides the lift you need without requiring an extra acidic ingredient. But keep in mind that it might subtly change the taste and texture of your final creation. So, while this swap can work in a pinch, it’s usually best to stick to the original ingredients for the most authentic results.
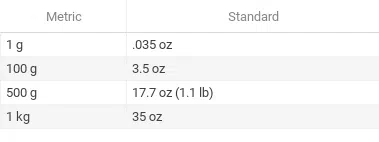
How do I convert between ounces and grams?
To convert from ounces to grams, you can use a simple rule of thumb. There are approximately 28.35 grams in an ounce. So, to make the conversion, you just multiply the number of ounces by 28.35.
To go from grams to ounces, you guessed it, we reverse the process. Divide the number of grams by 28.35 to get the equivalent in ounces.
Below is a bakers weight converter chart for converting between grams and ounces:
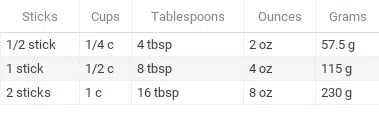
How do I convert between sticks and grams?
In the United States, a standard stick of butter weighs 4 ounces, which is equivalent to 113.4 grams (approximately 28.35 grams per ounce). So, to convert sticks of butter to grams, simply multiply the number of sticks by 113.4.
Below is a bakery conversion chart for converting butter:
How much unsweetened chocolate do I need if the recipe calls for sweetened?
So, you’ve got a recipe that’s craving sweetened chocolate, but all you have is the unsweetened kind? No problem-o! You can still make your baking dreams come true with just a little tweak. Sweetened chocolate and unsweetened chocolate may have their differences (like sugar content), but we’re here to bridge the gap.
For every 1 ounce of sweetened chocolate that your recipe calls for, you can use 1 ounce of unsweetened chocolate. But, and here’s the friendly twist, add 1 tablespoon of sugar to the mix.
Why the sugar, you ask? Well, sweetened chocolate has sugar built right in, so we’re ensuring your recipe stays as sweet as can be.
Can I substitute one type of sugar for another?
You can absolutely swap one sugar for another in your recipes, but keep in mind that different sugars bring unique flavors and textures to the table. Here’s a quick guide to converting and swapping sugars:
- Granulated Sugar: Your everyday, all-purpose sweetener. Swap it 1:1 with other granulated sugars like caster or superfine sugar. In a pinch, brown sugar can work but brings a different flavor and moisture level.
- Brown Sugar: Adds a lovely molasses taste and moisture. Substitute it 1:1 with white sugar but note the flavor change. Out of brown sugar? Create your own by mixing white sugar with molasses.
- Powdered Sugar: Ideal for frostings and dusting desserts. Don’t directly swap it with granulated sugar; instead, make your own by blending granulated sugar until fine. Be ready for potential texture changes due to cornstarch in commercial powdered sugar.
- Caster Sugar: Dissolves faster with finer crystals. Easily sub it 1:1 with granulated sugar for smoother textures in delicate treats like meringues and custards.
- Liquid Sweeteners (Maple Syrup, Honey, Agave): Can replace granulated sugar with adjustments. Use less liquid sweetener, around 3/4 to 1 cup for every 1 cup of sugar, and reduce other liquids in your recipe.
- Stevia and Artificial Sweeteners: Great for reducing sugar or dietary needs. Follow manufacturer’s instructions for conversions, as it varies.
Remember, when swapping sugar as a baking ingredient, consider the impact on flavor, texture, and moisture. Experiment converting in small batches or smaller quantities first, especially in delicate recipes.
Now that we’ve stirred up some sweet wisdom and a handy-dandy bakers conversion chart, it’s time to embark on your culinary baking adventures. May your kitchen be forever filled with laughter, love, and the delightful aroma of your bakery creations.
Until our next delicious encounter, happy baking, and may your baking conversions be as smooth as buttercream!
Cheyanne
Craving MORE? Follow all the deliciousness on Facebook, Pinterest and Instagram!
More free kitchen and culinary resources!
- Varieties of Fresh Herbs and How to Cook with Them
- How to Properly Store Fresh Herbs So They Last Longer
- Tips for Stocking Your Kitchen (how I stock my pantry for easy home cooking)
- Chart of Meat Temperatures (doneness temps for all types of meats)
- Cutting Recipes in Half
- Ingredient Substitutions
- Cooking for a Crowd
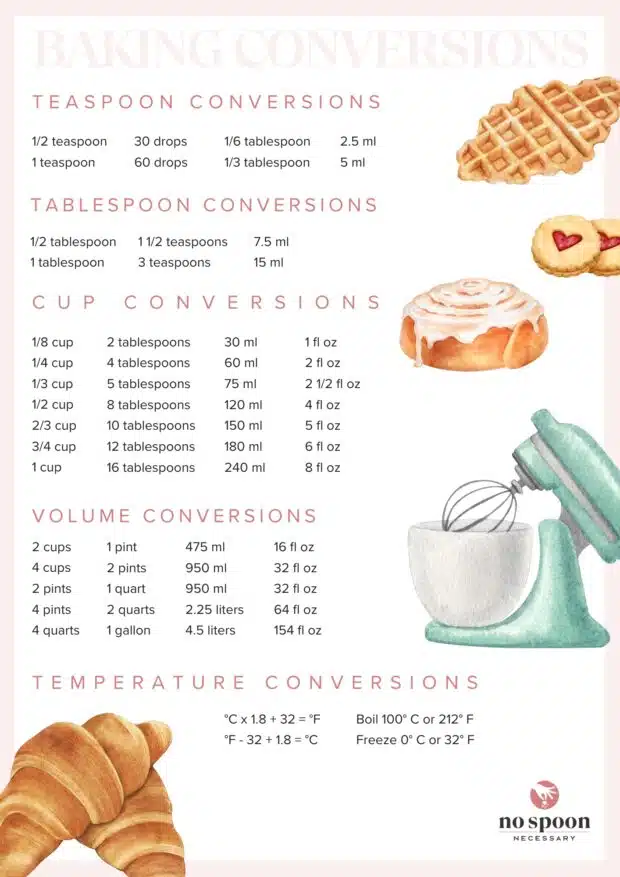
Free bakery conversion chart
Here’s your handy-dandy bakers conversion chart for you to print or download at your convenience:
Get your free printable weight bakers converter chart here: Baking Conversions
Article references
- Gisslen, W., Griffin, M. E., & Bleu, L. C. (2006). Professional Cooking for Canadian Chefs. John Wiley & Sons.
- America, C. I. O. (2011). The professional chef. John Wiley & Sons.