This post may include affiliate links. Thank you for your support.
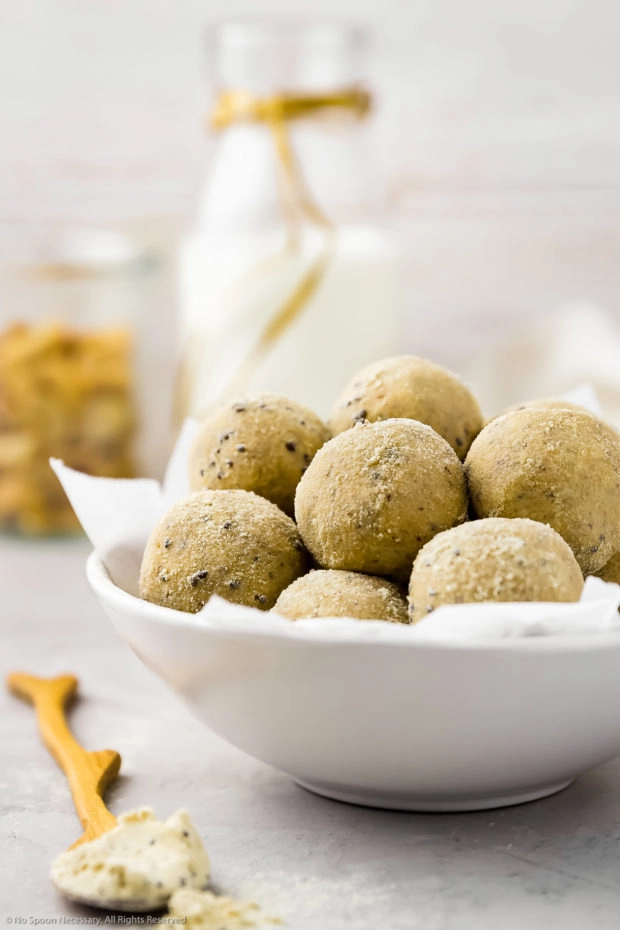
These Vanilla Peanut Butter Bliss Balls only require 6 ingredients and are so easy to make! They are soft, chewy and deliciously packed with protein, fiber and nutrients! These no-bake energy protein balls are customizable and perfect for snacking on the go, as a post-workout nibble, or a healthy dessert!
Update: This recipe was originally published in June 2017. I edited the photos and updated the post below to include more information about these protein balls. Plus, I added a recipe video to show you how easy these vanilla energy bites are to make!
Hey, friends! T-minus nine days until the official start of summer! And, you know what that means: bathing suit season. I’m not sure if that deserves a ‘woot-woot’ or a ‘womp-womp’. I’ll be brazen and say it deserves a little bit of both.
I mean, so much yes to lounging poolside, frolicking by the ocean and soaking up the summer sun! But, yikes to the actual bathing suits.
Unfortunately, you just can’t have summer without itsy-bitsy, teenie-weenie, yellow polka-dot bikinis. And, I don’t know about you, but I’m also going to need all the snacks. Pool, ocean or lakeside, it doesn’t matter. I need all the snacks when I’m lounging about!
So, today we are going to bust out some homemade bites perfect for both the season and your waistline! High Five!
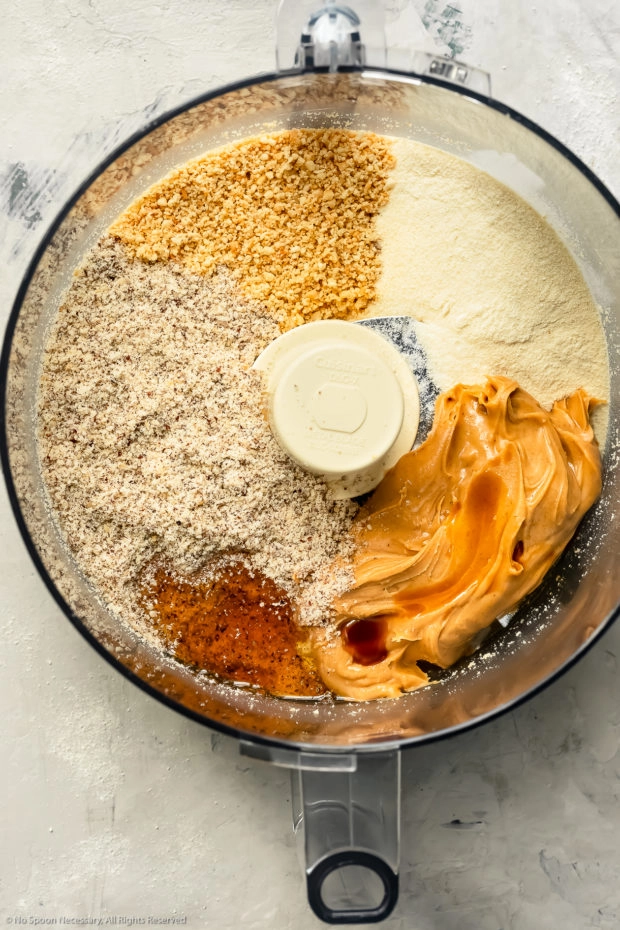
Table of Contents
About these vanilla peanut butter bliss balls
I really wanted to name these easy homemade honey nut vanilla peanut butter no bake protein energy blissfully delicious bites. But, that felt just a tad long-winded. So, I decided to keep the title small and sweet – just like these bites of heavenly bliss.
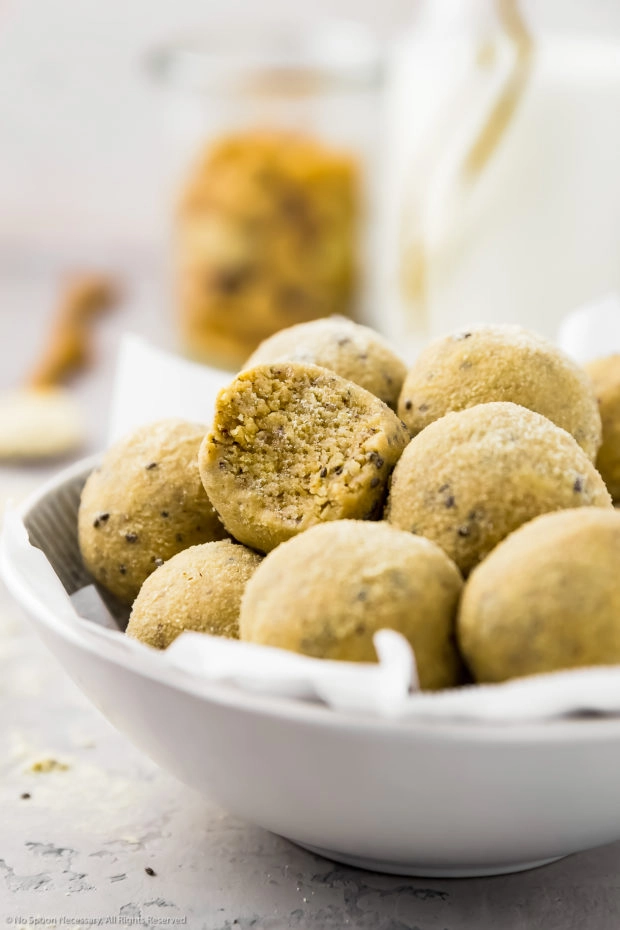
These bodacious bites are soft, yet dense and chewy with a marvelous melt in your mouth feel.
Plus, they are loaded with flavor, think: smooth vanilla, salty nuts, creamy peanut butter and subtly sweet honey! And, they are jam packed with protein, fiber and healthy fats, which makes these bites perfect for when hunger strikes. Because, being hangry is never a good look.
But, best of all, these little balls of bliss are chock full of good for you, nutrient rich ingredients, so you can keep up with those lofty beach body goals! 💪
Did I mention that these bites are packed with protein? I’m talking, jam-up-jelly-tight PACKED with PROTEIN. Not only do you get a healthy dose of plant-based protein from the nuts, but you also get a huge BOOST from the protein powder!
And, if all of the aforementioned deliciousness wasn’t enough, these vanilla energy bites are also a total breeze to prepare! NO baking, NO whisking, and absolutely NO stand-mixing! Just you, a food processor (or a bowl!), 6 ingredients and some good ole fashioned rolling with your hands.
What are bliss balls?
Bliss balls, also referred to as energy bites or protein balls, are a nutrient-rich, healthy snack. They are typically made with energy-boosting ingredients and ‘super foods’ to provide both protein and sustained energy.
There are many versions and flavors of protein balls, ranging from paleo and vegan friendly, to tropical coconut and rich chocolate! However, all of them are usually made with a combination of complex carbs, plant-based protein, dietary fiber and healthy fats.
Chewy in texture, deliciously sweet and blissfully delicious, bliss balls are the perfect energy-filled snack! They are made without any refined sugars and make a wonderful, guilt-free pre- and post-workout nibble, mid-day treat or no-bake dessert!
Ingredients in vanilla protein balls?
These bites are made with six simple ingredients:
- Nuts: For these protein balls, I used cashews. However, you can use any nut you would like or have on hand! They provide a bit of moisture along with nutty flavor, plant-based protein and healthy fats!
- Hazelnut Meal: Also known as hazelnut flour, it is made from whole raw hazelnuts and a good source of fiber and vitamin E. It is a delicious low carbohydrate and naturally gluten-free alternative to flour. Along with the nuts (listed above), it serves as a base ingredient. It provides delectable texture and wonderful flavor to the bites.
- Nut Butter: You can use any variety of nut butter you would like, such as peanut butter or almond butter. The butter helps bind the balls and adds healthy fats. One tip if you are mixing the bites with a spoon versus a food processor. Look for a nut butter that is runny or drippy versus solid. If you use a solid or dry nut butter it will be harder to mix the bliss balls together.
- Protein Powder: While I use vanilla whey protein powder, you can use any flavor you like! The powder increases the protein content of the bites. Plus, it’s a fun way to experiment with different flavors!
- Honey: Honey adds a touch of natural sweetness and also helps bind the balls together. If you would like a vegan option, you can substitute maple syrup.
- Vanilla Extract (optional): Vanilla extract is totally optional. However, it enhances all the flavors in the protein balls!
Energy balls recipe variations
This bliss ball recipe is flexible and can easily be adapted! I encourage you to make these your own, and use whatever ingredients you have on hand or your family loves!
- Nuts: If you aren’t a fan of cashews, you can substitute any nut you would like. Hazelnuts, almonds, or peanuts are all delicious.
- Hazelnut Meal: While the recipe calls for hazelnut meal, I have used almond meal or almond flour before and it is just as delicious! It can be used as a 1:1 substitution.
- Nut Butter: You can substitute any variety of nut butter for the peanut butter. Almond, cashew or a blend of nut butters work well! Just make sure it is creamy in texture and the no-stir variety.
- Protein Powder: Use your favorite protein powder flavor, or mix things up! Banana, coconut or birthday cake would be amazing!!
- Sweetener: You can swap out the honey for a different liquid sweetener! Maple syrup, date syrup or rice malt syrup are all fantastic options!
How to make no bake bliss balls
Energy bites are incredibly easy and only require 10 minutes of hands on preparation!
(Scroll down for the detailed measurements and instructions in the printable recipe card at the bottom of the page.)
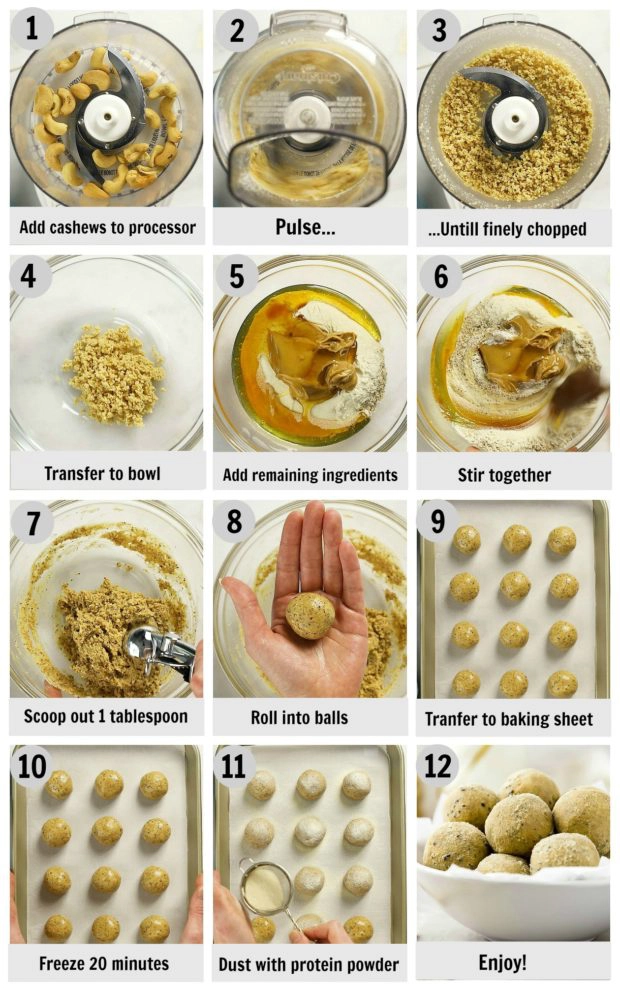
- Pulse cashews: Place cashews in the bowl of a food processor. Pulse until they resemble coarse sand.
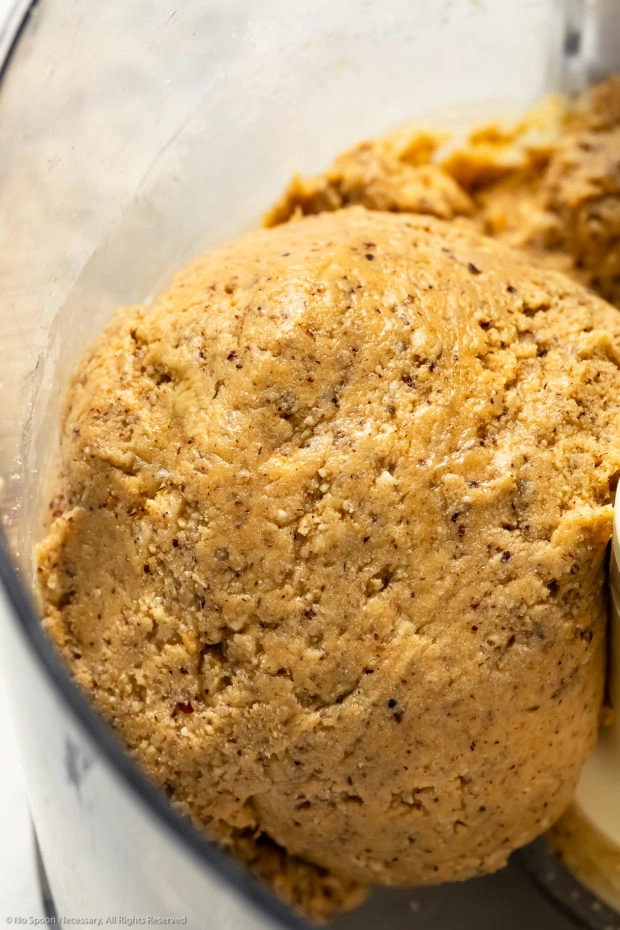
- Add remaining ingredients and pulse: Add the remaining ingredients. Pulse the mixture until it is thoroughly combined and comes together. The mixture should resemble a dough-like paste.
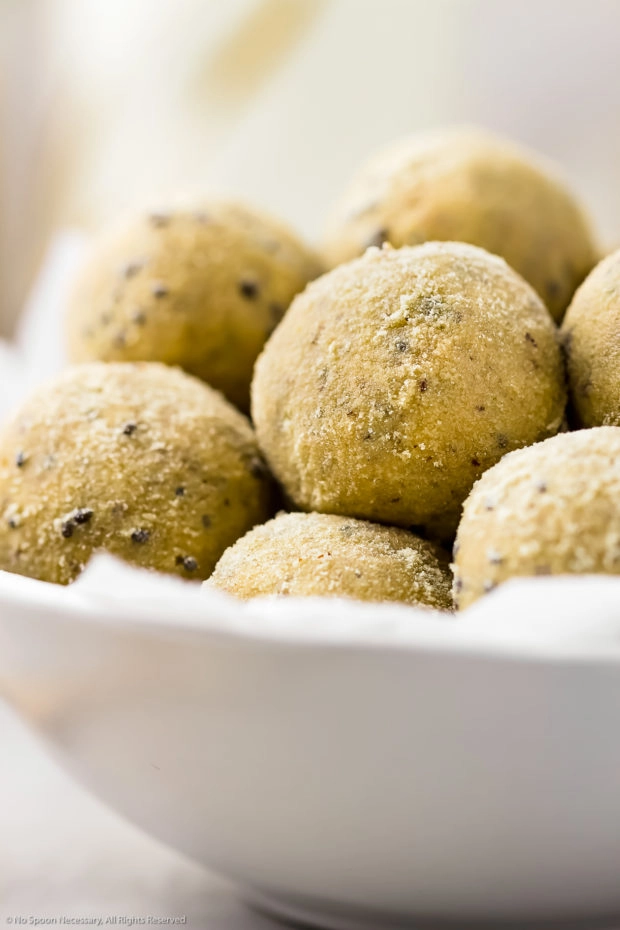
- Roll into balls: Use your hands to scoop out 1 tablespoon of mixture. Roll the mixture into 1-inch balls. Transfer balls to a parchment paper lined baking pan.
- Freeze: Transfer pan to the freezer. Freeze for 20 minutes.
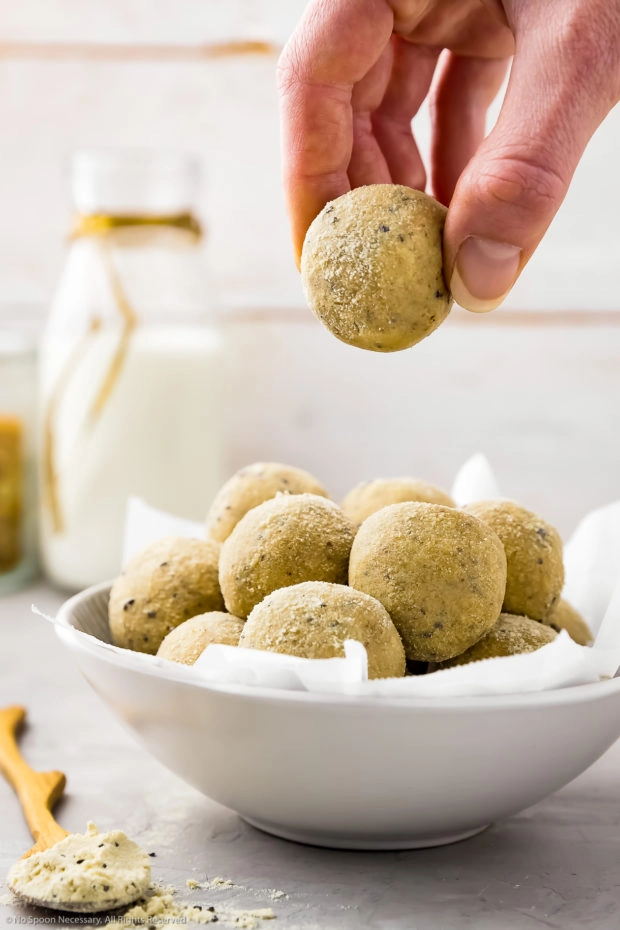
- Serve: Sprinkle the bliss balls with protein powder if desired. Enjoy!
Step by step photos: making protein bites at home
FAQs: frequently asked questions
How to make bliss energy bites without a food processor?
No food processor? No problem! These bliss balls are incredibly easy to make without any special equipment or the aid of a food processor!
To make bliss balls without a food processor:
- Crush the nuts: Place the nuts in a heavy-duty resealable bag. Place the bag on a hard, flat surface and smooth the nuts out into an even layer. Use a rolling pin, the flat-side of a meat mallet, or another similar object to crush them. It’ll take multiple whacks, but use this as an opportunity to get out any pent up aggression. Continue to crush the nuts until they are ground and resemble coarse flour.
- Mix ingredients: Transfer crushed nuts to a medium-sized mixing bowl. Add the hazelnut meal, peanut butter and protein powder. Stir together. Add in the vanilla and honey. Stir again. If mixture is hard to stir, use your hands to mix well.
- Proceed with recipe as directed – rolling mixture into balls and freezing.
Are bliss balls healthy?
Energy protein bites are made with good-for-you ingredients and packed with nutritional benefits!
Protein ball health benefits:
- Protein: Bliss balls are are an excellent source of natural protein! These bites are full of both plant-based protein from nuts and complete protein from the whey protein powder. Protein helps improve muscle protein synthesis and promotes the growth of lean muscle mass.
- Fiber: Both the nuts and hazelnut meal provide a good amount of fiber. Fiber helps keep you feeling fuller for longer and also promotes a healthy gut!
- Healthy Fats: These bliss balls contain a good amount of healthy fats from the nuts and nut butter. Healthy fats provide fuel for your body and help you absorb nutrients, such as fat-soluble vitamins (vitamins A, D, E and K) and antioxidants.
- Antioxidants: Hazelnut meal and ‘high-quality’ honey combined provide a significant amount of antioxidants. Antioxidants help limit damage caused by free radicals and protect the body from oxidative stress.
- Carbohydrates: Each protein ball contains approximately 5 grams of carbohydrates. Carbs are your body’s primary source of energy, which makes these bites perfect when you need a midday pick me up or pre-workout snack!
How many calories?
Serving vanilla protein bites
Vanilla bliss bites make the perfect grab-and-go snack; however, you can also serve them as a part of a breakfast, brunch, or dessert spread.
- Dip in chocolate: For a classic and indulgent treat, dip your vanilla bites in melted chocolate sauce. You can use dark chocolate, milk chocolate, or white chocolate, and you can even add a sprinkle of sea salt for extra flavor.
- Drizzle with caramel: If chocolate isn’t your thing, salted caramel sauce is excellent here.
- Roll in nuts: Toast your favorite raw nuts for savory flavor or candy nuts for sweet flavor. Crush them in a bag with a rolling pin and roll the bites in the nuts for amazing flavor and texture.
- Dust with flavor: Keep things simple and dust the top of your peanut butter bliss balls with cocoa powder, confectioner’s powder, or edible gold flakes.
Serving and pairing suggestions
- Pack energy bites in your lunch for a healthy, satisfying snack
- Enjoy as a post-workout treat.
- Gobble them up as a guilt-free dessert.
- Pair them with fruit: For a simple and refreshing pairing, macerate your favorite fresh fruits with granulated sugar and citrus zest. Sliced bananas, strawberries, raspberries, or blackberries are wonderful choices here. Top your fruit with whipped yogurt for the perfect nutritious snack duo.
- Serve them as part of a breakfast spread with eggs scrambled with avocado, oatmeal banana breakfast cookies or oat with chia seed, and flavored mimosas.
- Dish ’em up as part of a sweet snack spread with white trash candy, soft oatmeal raisin cookies and baked cinnamon sugar donut holes.
Storing energy bliss bites
How to store bliss balls?
Peanut butter energy balls can be stored in an airtight container on the counter, or in the refrigerator or freezer. The main goal is to prevent moisture from coming into contact with the energy balls to keep them fresh!
Since they are made with shelf-stable ingredients they do not need to be refrigerated and they will keep well at room temperature for up to 3 days.
How long do they keep?
To extend the shelf life of vanilla protein balls, refrigerating is recommended. Bliss balls will dry out if stored at room temperature for too many days. Protein bites stored in an airtight container in the refrigerator will last for up to 1-2 weeks.
Can energy bites be frozen?
Peanut butter energy balls freeze beautifully!
To freeze, place energy balls in an airtight container or freezer-safe resealable bag. Store in the freezer for up to 3 months.
To use, thaw the bites in the refrigerator overnight before enjoying!
Healthy, delicious and packed with nutritious goodies, these Vanilla Peanut Butter Bliss Balls are a snack you can feel good about eating.
Until Thursday friends, cheers – to getting your healthy summer snack on!
XOXO
Cheyanne
Craving MORE? Follow all the deliciousness on Facebook, Pinterest and Instagram!
More healthy recipes for snack time!

The best Vanilla Peanut Butter Bliss Balls recipe plus step-by-step video👇

Vanilla Peanut Butter Bliss Balls
Equipment
- Food Processor
- Mixing Bowl
- Sheet pan
Ingredients
- ¼ Cup Cashews (SEE NOTES)
- 2/3 Cup Hazelnut Meal (SEE NOTES)
- 1/2 Cup Creamy Peanut Butter (SEE NOTES)
- 1/3 Cup Vanilla Protein Powder - plus more for rolling
- ¼ tsp Vanilla Extract
- ¼ Cup + 1 TBS Honey
Instructions
- Line a small baking sheet or plate with parchment paper. Set aside.
- Pulse cashews: In the bowl of a food processor, add the cashews. Pulse until they are finely chopped and resemble coarse ground flour. (SEE NOTES if you don't have a food processor.)
- Add remaining ingredients & pulse: Add the remaining ingredients. Pulse the mixture until it is thoroughly combined and comes together. The mixture should resemble a dough-like paste.
- Roll into balls: Use your hands or an ice cream scoop and portion out about 1 tablespoon of the mixture. Roll into a ball (about 1 to 1 ½-inches) and transfer to the prepared baking sheet. Repeat rolling until all the mixture is used.
- Freeze: Transfer the baking sheet to the freezer and freeze for 20 minutes.
- Serve: Lightly roll the protein bites in more vanilla protein powder. Eat and enjoy!
- Storage: Store bliss balls in an airtight container the refrigerator for up to 1 week or the freezer for up to 3 months.
Video
Notes
- Nuts: If you aren’t a fan of cashews, you can substitute any nut you would like. Hazelnuts, almonds, or peanuts would all be delicious.
- Hazelnut Meal: While the recipe calls for hazelnut meal, I have used almond meal before and it is just as delightful!
- Nut Butter: You can substitute any nut butter for the peanut butter, just make sure it is creamy and the no-stir variety. I used reduced fat peanut butter.
- Vegan-option: If you are vegan, feel free to use maple syrup instead of honey!
- Crush the nuts: Place the nuts in a heavy-duty resealable bag. Place the bag on a hard, flat surface and smooth the nuts out into an even layer. Use a rolling pin, the flat-side of a meat mallet, or another similar object to crush them. It'll take multiple whacks, but use this as an opportunity to get out any pent up aggression. Continue to crush the nuts until they are ground and resemble coarse flour.
- Mix ingredients: Transfer crushed nuts to a medium-sized mixing bowl. Add the hazelnut meal, peanut butter and protein powder. Stir together. Add in the vanilla and honey. Stir again. If mixture is hard to stir, use your hands to mix well.
- Proceed with recipe as directed - rolling mixture into balls and freezing.
Nutrition
Did you make this recipe?
Mention @nospoonnecessary on Instagram and tag it #nospoonnecessary!
©No Spoon Necessary. All images and content are copyright protected. Please do not use any images without prior permission. Please do not publish this recipe without prior consent. If you want to reference this recipe, please do so by linking directly to this post.
Xiwen Fan
These are to die for, Absolutely Exceptional! Would give it more stars out of 5 if it were possible.
The main points would be the consistency and texture of the end result, taste is amazing and everything is nicely proportionate.
If only I could buy these from somewhere I would every day of the week but unfortunately that’s not possible and it makes me very very sad.
Cheyanne
Hi Xiwen,
I’m so thrilled you loved these bliss balls!! Thank you so much for coming back and letting me know how the recipe went over! Cheers!
Kevin
These look like a great snack option for the week!
Mary Ann | The Beach House Kitchen
These look super delicious Chey! The perfect post workout pick me up. Love the new video and photos too! Pinned and adding to my healthy snack menu soon!
Dee
Haven’t tried the recipe because this page is unbearable to use due to so many adds!! Can barely scroll without constantly accidentally ending up on a different page due to all the adds.
Cheyanne Holzworth
Hi Dee,
I’m so sorry for the overwhelming experience with the Ads. While Ads are what allow me to keep this site up and running, they should absolutely never be unbearable – I sincerely apologize for that. I currently have someone looking into this issue. Thank you for bringing it to my attention. I hope you have a wonderful day.
Best,
Cheyanne
Marissa
These are perfect little bites for that afternoon energy lull, Cheyanne! Love how easy to make and versatile they are too!
Ashlyn @ F5 Method
These look delicious Cheyanne! Peanut butter has been my quarantine comfort food so I’m down for any excuse to eat it right now haha!
Mary Ann | The Beach House Kitchen
I remember these little bites Chey! Always great to have a batch on hand for a busy week for that quick little boost of energy! The perfect little on the go snack and pick me up!
Kevin
These look delicious and packed full of protein and energy for a mid-day pick me up! Sign me up to give these a try!
Ben|Havocinthekitchen
Interesting. I usually remember your recipes from the past, but I don’t recall these bites at all. Considering the fact that I did leave a comment last time, there are two possibilities: my memory is getting worse or I blacked out when I was writing the comment. I certainly believe it’s about the second option. You should update this recipe in a couple of years, and we’ll see how it goes with me 🙂
Ashika | Gardening Foodie
WOW these make such an amazingly delicious snack. I love that it is a no bake as well.
Cindy
oh these look delicious. and i love the idea of having energy snacks around with chia seeds. smart choices!
Sues
I seriously need to keep a batch of these at my desk at work!! I’m basically hungry nonstop throughout the day and would love to just pop one of these in my mouth whenever hunger hits! Then my stomach wouldn’t growl so awkwardly in the middle of meetings lol. I love the idea of honey nut vanilla flavor!!
Shashi at Savory Spin
Oooh these soft, yet dense and chewy bodacious bites have me swooning! The texture on these bad boys …or gals, is phenomenal – most definitely melt in MA mouf yumalicious! I am not a huge beach as in beach and sun person – I prefer those rainy, cold beaches on the PNW and even tho it too cold for a teeny weeny bikini – it’s not too cold for me to walk on it with a bowl of these in hand! 🙂
cakespy
I love energy balls like this! They have saved my life many a time when dinner is still hours away. These look incredible!
Rachelle @ b
It’s definitely more of a womp womp bathing suit season over here my friend. I need these protein bites in my life stat. They can keep me out of the Walgreens candy aisle and save me (and my colleagues) safe from burst of hangry if I have these little snacks at my desk!
heather (delicious not gorgeous)
oooh i love how nutty these sound!! and i like the flavor of maple syrup and bet that it would be good in these, so i’d sub in maple syrup for the honey even though i’m not trying to go vegan (;
Andy Gibbs
This seems yummy. I am making a mental note to have these after a workout
stacey @ The Sugar Coated Cotted
I love these! I need all the energy I can get, especially in the afternoon. I might eat the whole bowl though! 🙂 Take care.
Anu – My Ginger Garlic Kitchen
Yay for the summer and the bikini season. I love to make and eat energy bites, and I so want to grab a few to these protein bars through my computer screen. The texture looks just so good, soft and chewy, Cheyanne. The addition of vanilla protein powder sounds fantastic.
annie@ciaochowbambina
We were in Boston this past weekend and I feel like I missed so much(!), like these delectable energy bites, for example! I could definitely use these as I ramp back up to real life! Thanks for sharing, my friend! Pinned! xoxo
Pamela (BrooklynFarmGirl)
They look so good! I love how easy they are to make 🙂
Jennifer @ Seasons and Suppers
I love this idea and the flavours sound absolutely perfect! And no bake is the best on these warm days 🙂
Ashley@CookNourishBliss
Yay for energy bites! I LOVE energy bites of any kind and these are just a callin’ my name! I’m a huge fan of Bob’s products – I usually just use their hemp protein powder but I need to try this one out!
Demeter | Beaming Baker
Oh my goodness!! You know how much I’m excited about this recipe. There are so many reasons, shall I count the ways? 1. It’s no bake. ‘Nuff said. But not bc you know me, chatty as always!! 😉 2. NSN recipe. ‘Nuff said. Oh, alright, more to come!! 3. They look so freaking relish!! 4. No bake bites are the BEST and tastiest way to eat all that you need to keep moving all day long! 5. Okay, fine… this could go on forever… but I’ll just say, I LOVE this, bestie!! Miss ya even more!! Xoxox
Geraldine | Green Valley Kitchen
I never make energy balls, Cheyanne – not sure why – but you’re inspiring me with these. I need all the energy I can get these days – work is crazy busy and I’ve been neglecting my poor blog. And summer is just go, go, go – right. Hope you have a great week!
Ben|Havocinthekitchen
Or these energy balls look delicious. They are basically packed with all my favorite things (Minus protein powder. Just somehow isn’t my favorite thing). And I like that you’re saying these balls will help to see the goals. I’m going to have 15…not 25 if these every day, and let’s see if they are that beneficial for my waistline as you promised:)
Angie@Angie’s Recipes
They must be very delicious with all the nuts and so perfect as a post workout snack!
mira
Yeah, it is bathing suit time, I just went to the pool for the first time today. These protein powders are so good. And I’m glad you made a healthy and delicious snack with them. Pinned to try them.
Mary
I’ve seen a lot of recipes for energy bites but have yet to try to make them myself. Then you come along and post this tasty looking recipe and they seem super hard to pass up. Hurry up summer!!! I’m so ready for a little fun in the sun. Thanks for watching my waist line for me Cheyanne, this is the hardest time of year for me, 🙂
Stephanie@ApplesforCJ
I’m ready for summer Cheyanne even though it already feels like it’s been summer for a while now. Bathing suits not so much! Always a struggle to find the perfect bathing suit. But these no bake energy bites I could definitely get into this summer. Easy, tasty and perfect for snacking on. That protein powder sounds perfect..Will have to check it out. Have a lovely rest of your week 🙂
Gaila
So happy summer is almost here! That means my BDay is also coming! I am celebrating 45 (the big 45) so I am kind of excited! We are also celebrating my parents 50’s wedding anniversary with a cruise from Alaska to Vancouver! should be fun! These balls look like something I want to pack on my summer vacay!
Traci | Vanilla And Bean
I’m more like womp-womp with bathing suit weather… but around here, it never really gets warm enough, so I’m okay I’m not beach body ready! hehe… But that doesn’t stop me from enjoying some good energy bites! I love keeping snacks like this on the ready so I can fill up with good stuff instead of junk – which still doesn’t make me beach body ready lol! These are scrumptious, Chey and you know I’m a fan of Bob’s! Delicious work my dear!
Chris Scheuer
These look wonderful! And what a great way to add lots of protein with the protein powder.
marci
I’m so not ready for bathing suit season so I need to hit the gym HARD (and stop eating fruit crisp with ice cream)! I’m a huge fan of Bob’s products and haven’t tried their new protein powder. These bites are the perfect way to use it and these would be perfect for a post-workout snack! I just love these flavors Cheyanne!
Mary Ann | The Beach House Kitchen
Bathing suit season would be a womp womp for me at the moment Chey! More time at the gym needed! But these bites are a total woot woot! They sound delicious and if there’s anything of Bob’s Red Mill included I know they’ll be great! Have an awesome week!
Kelsie | the itsy-bitsy kitchen
These little bites of heaven look so perfect for a Monday, espesh a Monday right before the official start of bikini season :). (Yeah. Yikes on this end for sure.) They sound so delish and I’m loving all the protein. Definitely trying these babies! Hope you have an awesome Monday, Chey!
Lindsay | With Salt and Pepper
So much yes here Chey!! Loving this recipe after doing a 3 day cleanse…I’m back on track and need a whole pantry stocked full of health to grab. This is on the list!! Pinned! XO
Dawn – Girl Heart Food
No bake for the win today, Chey! This looks so good and I know I would be poppin’ ’em like there’s no tomorrow! However, the thought of bathing suit season scares be just a bit (ok, a lot). I can’t even right now. Good thing these bites are healthy! Love the addition of protein powder in there too (good stuff). I use protein powder in my smoothies in the morning and it really adds a little somethin’ somethin’ 🙂 Cheers to a great week, girl! xo
Gayle @ Pumpkin ‘N Spice
Yay for the start of summer! But I hear you on bikini season! Luckily, we have LOTS of these energy bites to keep us full and healthy. I love making energy bites, especially in the summer, so I’ve got to add these to the list! Such a great flavor, Cheyanne! I love the soft and chewy texture, too. I’ve never tried Bob’s Red Mill protein powder before, so I will check that out. I think I could eat this whole batch in no time! Pinning these babies and can’t wait to try them! Hope your Monday is off to a great start, friend!
Kathryn @ Family Food on the Table
Yay for summer, even if it means constant snacks and the bikini conundrum… I am all about the snack bites – especially when they are this easy and this healthy! Love how much protein gets packed in here! Gotta check out those nutritional boosters And love the vanilla nut flavor you’ve got going here – definitely trying this soon! Have a wonderful week my friend!