This post may include affiliate links. Thank you for your support.
Indulge in flaky, buttery Cream Cheese Danish Pastries with your choice of filling options, like chocolate, nutella, fresh fruit, or lemon curd. Featuring store-bought puff pastry, this danish braid is secretly easy to make, yet so delicious everyone will think they came from a bakery!
Featured comment: This is the bomb! Thank you for sharing this recipe that combines cinnamon, nuts, flaky pastry, creamy filling into bliss!” – Tracey
These cinnamon danish pastries are the perfect easy weekend baking project. Continue to read on for expert tips and detailed step-by-step photos!
Update: This article was originally published in November 2014. I made updates to the post below to include more information about making a cheese cinnamon danish braid at home.
Hi, friends! Today I’m sharing the most delicious way to start, or end(!), your day!
This cream cheese danish with puff pastry recipe is my version of something I (and possibly a lot of you) grew up eating. You remember those iconic blue and white boxes of glazed pastries? Whenever I see a stack of those infamous raspberry danish twists in the grocery store I swear I hear angels sing.
But, you Homemade Danishes may seem intimidating at first glance, but trust me, this recipe is so simple even a beginner baker can master it in a flash. And, do you know what’s so much better a box of store-bought pastries? The taste and smell of freshly baked homemade pastries – ohhh, so good!!
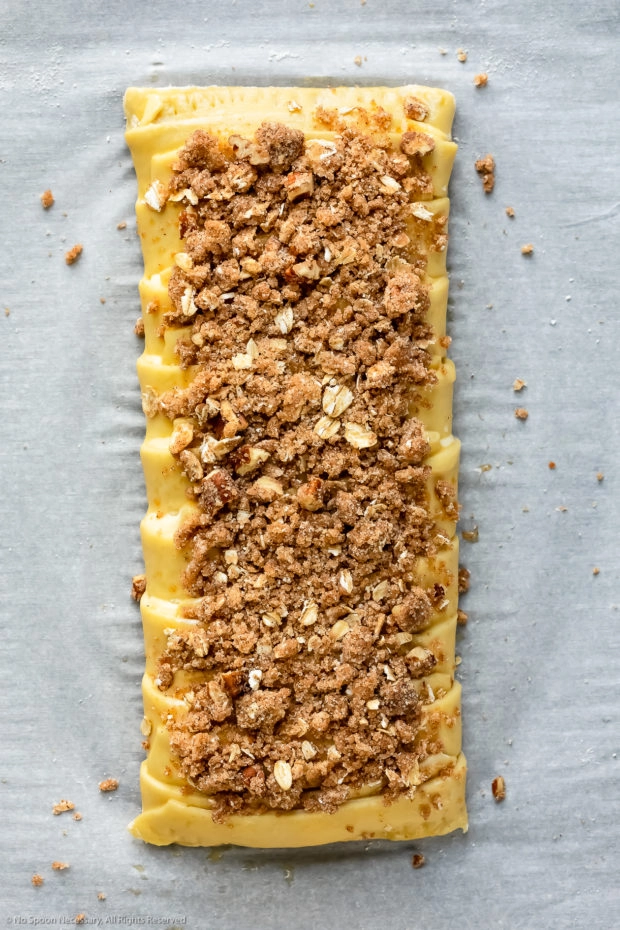
Table of Contents
- About this recipe for cream cheese danish
- What is a danish braid?
- What’s in a cheese danish?
- How to make cream cheese danish with puff pastry
- FAQs: frequently asked questions
- Serving cinnamon danishes
- Storing cheese danish puff pastry
- More sweet treats just like your favorite bakery!
- Cream Cheese Danish Braid
About this recipe for cream cheese danish
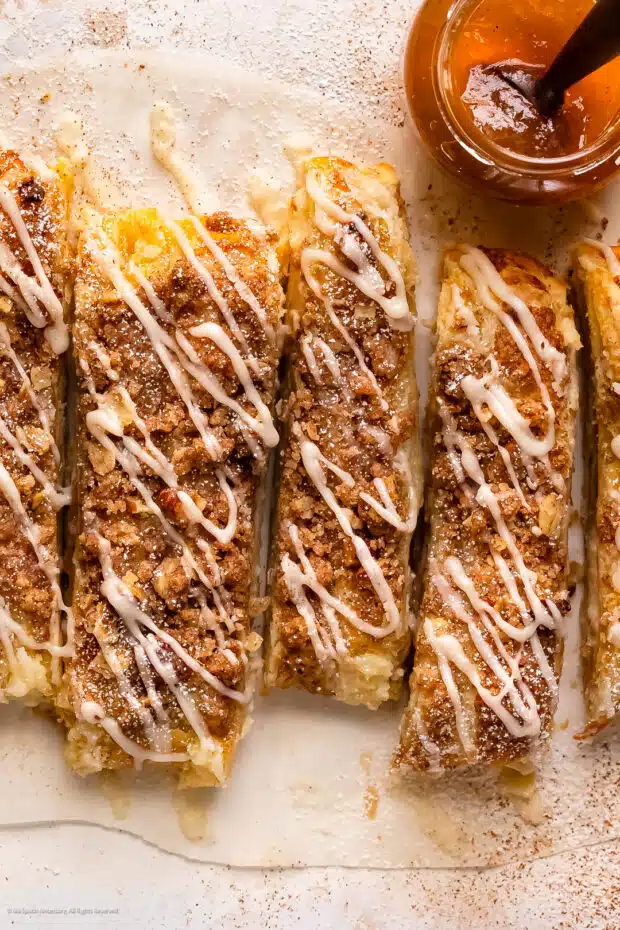
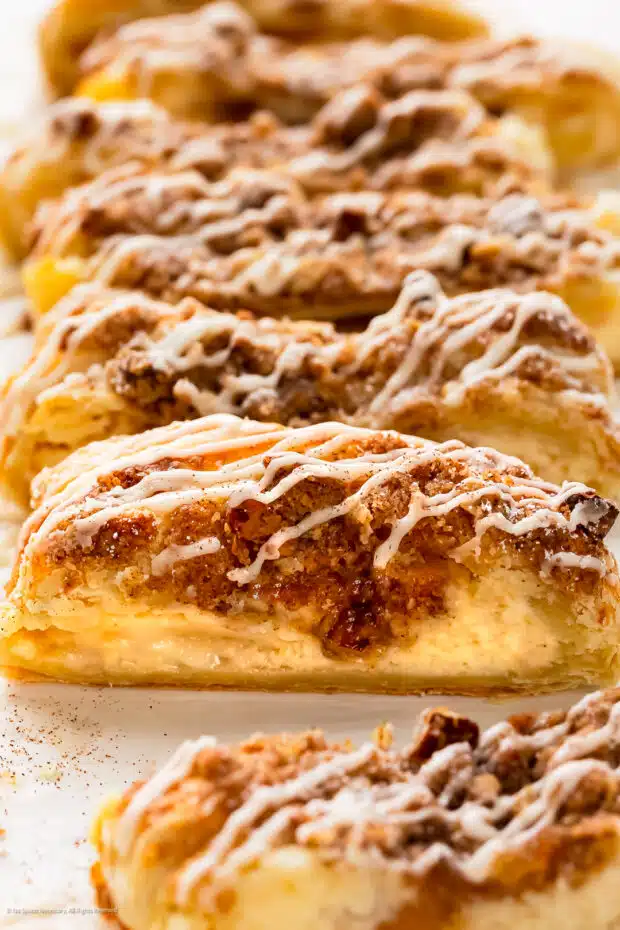
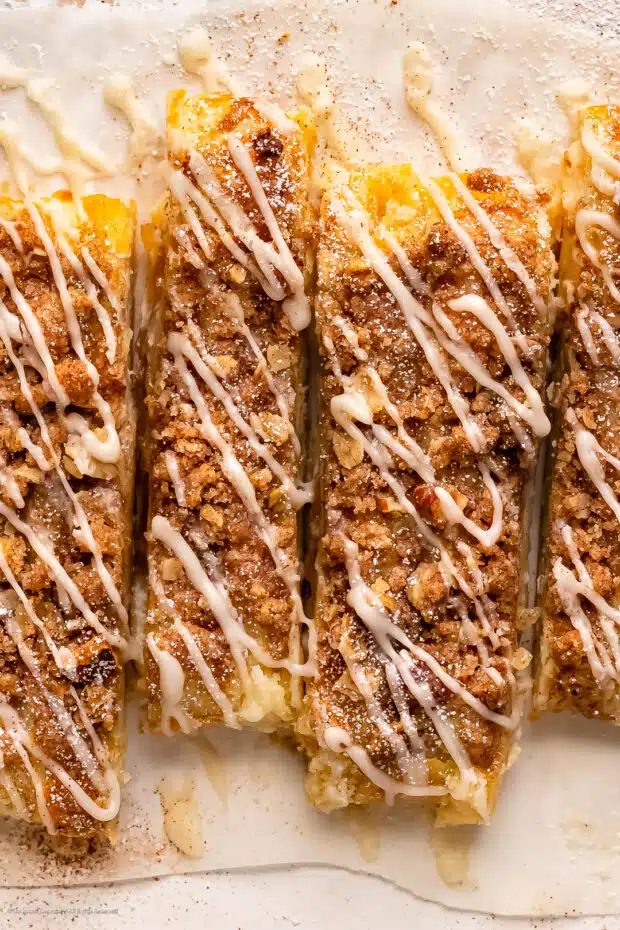
This recipe for cream cheese danish features decadent, rich cream cheese and silky, fruity jam encased in buttery, flaky, pillowy-soft puff pastry. Braided and generously topped with soft crumbles of sweet pecan streusel and lovingly drizzled with a vanilla-kissed glaze. Honestly, this danish is so addictive I’m fairly certain it should be labeled a controlled substance… but, where would the fun in that be?!
But wait, there’s an added bonus, because this cream cheese cinnamon danish recipe is incredibly easy to make!! There’s no laminating dough; endlessly folding, rolling in butter or chilling of dough. No messing with finicky active yeast! Nada! You have absolutely none of the intimidating, time-consuming hard work of making a pastry from scratch and ALL of the reward!!
Literally, the hardest part of this recipe is twiddling your fingers while mentally willing the cinnamon danish to cool down faster after baking. Seriously, ogling the oozy cream cheese filling, then gazing up at the crumbly streusel topping and watching as the glaze slowly drips down the sides – that’s the hard work, friends.
What is a danish braid?
A cheese Danish pastry, also simply referred to as a Danish, is a soft, golden, multilayered, sweetened baker’s confectionery (pastry). Danishes are typically filled with a smooth cream cheese filling; however, they can also incorporate a variety of ingredients, such as cinnamon, jams or preserves, custards, fresh fruit and chocolate.
Danishes can also include various toppings, such as vanilla icing, chocolate glaze, slivered nuts, confectioners’ sugar and/or streusel. Cheese danishes come in numerous shapes, including circles, cylinders, parcels and beautiful braids.
What does a braided danish taste like?
Danish is layered in texture and it tastes like a fluffy croissant stuffed with a luscious, dense custard resembling that of cheesecake. It’s flaky, buttery and pillowy-soft on the outside with a rich and sweet, but cheesy and slightly tangy interior.
What’s in a cheese danish?
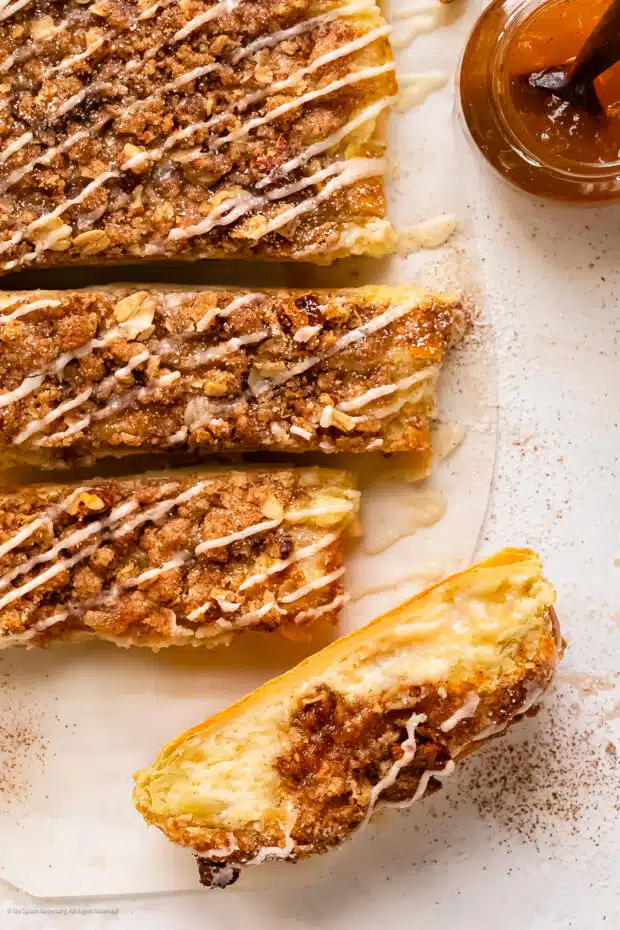
A cheese danish consists of two main components – the pastry dough and the filling. This easy version of the traditional danish pairs store-bought puff pastry with a rich cream cheese filling, fruity jam, crumbly streusel topping and sweet glaze!
What you’ll need for this recipe
- Puff Pastry: Danish dough is typically made from a combination of flour, yeast, milk, eggs and a liberal amount of butter. Instead, this recipe uses one box (2 sheets) of store-bought puff pastry for ease and convenience! Make sure you thaw the puff pastry according to the package instructions.
- Cream Cheese: 10 ounces of cream cheese provides the base for the danish filling. Make sure you use block cream cheese, which makes the filling luxuriously creamy and dense. Tub or whipped cream cheese will result in a grainy, wet filling.
- Eggs: One large egg yolk gives the cheese filling an extra smooth texture and rich taste.
- Sugar: 1/2 Cup of granulated sugar adds the perfect amount of sweetness to the cheese filling.
- Vanilla: Pure vanilla extract provides a subtle vanilla flavor while enhancing all the other flavors in the cheese filling.
- Egg Wash: One large egg whisked with 2 teaspoons of cream (or water) creates an egg wash which will ensure the outside of your danish turns a lovely golden brown color.
- Filling (optional): You can top the cheese filling with any number of fillings – from apple jam or lemon curd to chocolate and fresh fruit! (Scroll down to read about filling options!)
- Streusel (optional): A combination of flour, oats, pecans, sugar, cinnamon and cold butter form a buttery, crunchy, slightly nutty streusel topping.
- Glaze (optional): A sticky, sweet mixture of confectioners’ sugar, heavy cream, vanilla and a pinch of salt make up a delicious vanilla glaze perfect for drizzling over cheese danishes!
If cream cheese is on sale at the store, pick up an extra and put it to good use in these recipes: How to Flavor Cream Cheese, Spicy Cream Cheese Dip, Fried Pickles and Ranch Dip, Bagel Spread, and Philadelphia Cheese Pasta Sauce.
Danish pastry filling ideas
Aside from the light-as-air puff pastry, the best part of a cinnamon cheese danish is the filling! Lightly sweetened, creamy cheese is one of my favorite fillings for homemade pastries. However, I encourage you to make this recipe for cream cheese danish with puff pastry your own! You can swap out the cream cheese for chocolate and exchange the jam for seasonal fruit! Get creative and add your family’s favorite ingredients! Below are a few ideas to get you started!
- Cream Cheese: Cheese filling tastes similar to cheesecake! (Recipe included below.)
- Ricotta: The classic filling for a Danish is cream cheese. However, if you want a more European-style Danish, you can substitute half of the cream cheese for ricotta!
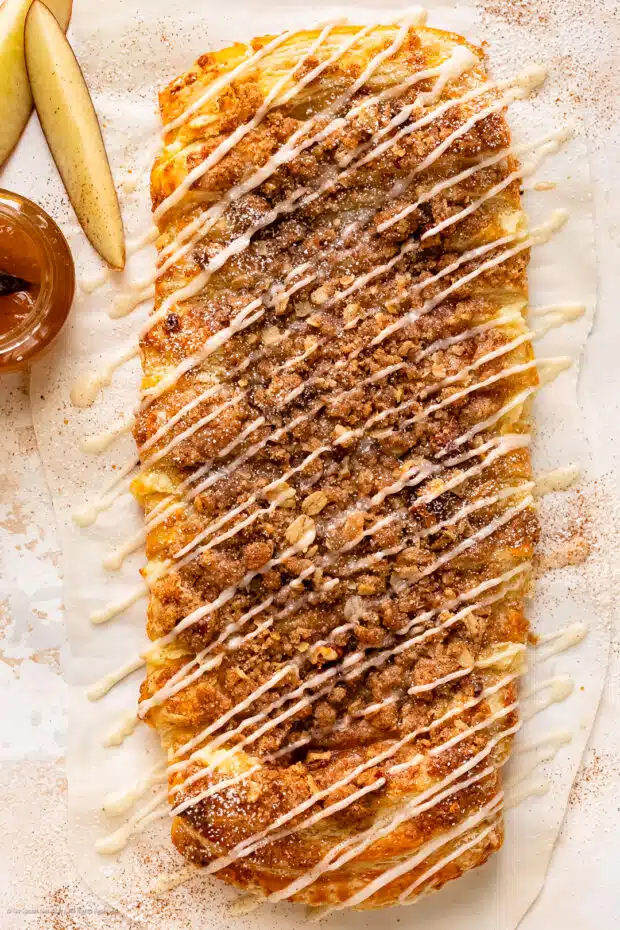
- Fruit Jam or Preserves: Apple cider jam (pictured), raspberry, strawberry, blueberry, grape, orange or cranberry.
- Fresh Fruit: Sliced apples, raspberries, sliced strawberries, blackberries or blueberries.
- Curds: Lemon, mango, passionfruit or pineapple curd.
- Fruit Butters: Pumpkin, apple or blueberry butter.
- Spreads: Nutella, peanut butter or chocolate.
How to make cream cheese danish with puff pastry
This homemade danish recipe is so simple to prepare and made with a box of frozen puff pastry along with simple, easy to find ingredients!
- Prepare the Cheese Filling: Beat cream cheese and an egg yolk together in a mixing bowl. Add the sugar and vanilla. Beat until creamy. Cover and set aside in the refrigerator.
- Prepare the Streusel: In a medium bowl, combine the flour, oats, pecans, both sugars and cinnamon. Mix well. Cut in the butter until the mixture resembles coarse crumbs. Set aside.
- Roll out the Puff Pastry: Place the puff pastry on a clean work surface. Roll the puff pastry out to be 9×11-inches.
-
Preheat oven to 400 degrees F. Whisk together the large egg with the milk to make an egg wash. Set aside.
-
Cut pastry: Transfer the puff pastry dough to a large baking sheet lined with parchment paper. Cut or shape dough as desired. (See below for shaping danishes.)
- Add fillings: Carefully add the cheese filling and top with jam.
- Brush with egg wash: Use a pastry brush to gently brush any exposed dough with egg wash.
- Bake: Bake the danishes until golden brown in color.
-
While the danish is baking, prepare the glaze: Whisk together the powdered sugar, cream, vanilla and salt. Set aside.
-
Cool: Remove the danish from the oven and allow it to cool completely.
- Glaze & Serve: Drizzle the glaze all over the cinnamon cheese danish. Serve and enjoy!
Step-by-step photos: making puff pastry danish recipe
(Don’t forget to scroll down for the detailed instructions in the complete printable recipe at the bottom of the page.)

FAQs: frequently asked questions
How to shape a danish pastry?
Are you feeling fancy? You can easily transform a box of ready-made puff pastry into seven different fun shaped cream cheese cinnamon danishes! Follow the simple instructions below for each danish shape. To make more than one shape, simply divide the filling among the smaller shapes.
- Braid: Danish braids are so much easier than they look; however, they’re a little bit more detail oriented. (I’ve included in-depth instructions and step-by-step photos below!)
- Rounds: Use a 4-inch round cookie cutter and cut circles out of puff pastry. Using a sharp knife, score a small circle about 1/2-inch from the edge of the rounds. Use the tines of a fork to prick all over the inside of the smaller circle. Add the filling to the smaller circle of each round. Brush the edges with egg wash and bake for 15-18 minutes.
Unique danish shapes
For the remaining danish shapes, you will need to roll out the pastry dough and cut it into 4-inch squares.
- Square: Dollop a couple tablespoons of filling into the center of each square. Fold the corners toward the center, over the filling, but don’t allow the corners to actually touch – they should rest with a bit of space between all the edges and corners. brush the pastry with egg wash. Bake 15-18 minutes
- Edged Square: Use a sharp knife to score a small square about 1/4-inch border around the edges of the squares. Use the tines of a fork to prick all over the inside of the smaller square. Add the filling to the smaller square. Brush the edges with egg wash and bake for 15-18 minutes.
- Octagon: Fold the corners of each square over by 1-inch to form an octagon shape. Spoon a bit of the filling into the center of each pastry. Brush all of the exposed edges of the pastry with egg wash. Bake for 16-18 minutes.
- Cylinder: Brush two corners of each square with egg wash. Gently spoon a generous dollop of filling into the middle of each square. Next, fold the two brushed corners over the filling into the center, overlapping the corners. Pinch together to seal. Brush the top and all exposed edges with egg wash. Bake for 15-18 minutes
- Parcel: Brush the corners of each square with egg wash. Gently spoon a generous dollop of filling into the middle of each square. Next, fold all four corners up and over the filling, into the center to create a parcel shape. Pinch together. Brush the top with egg wash and bake for 15-18 minutes
How to braid danish dough?
A danish pastry braid is not quite the same thing as a braided bread dough. In fact, it’s much easier to do! Instead of literally braiding dough, a single rectangular slab of pastry dough is cut and folded to resemble a braid.
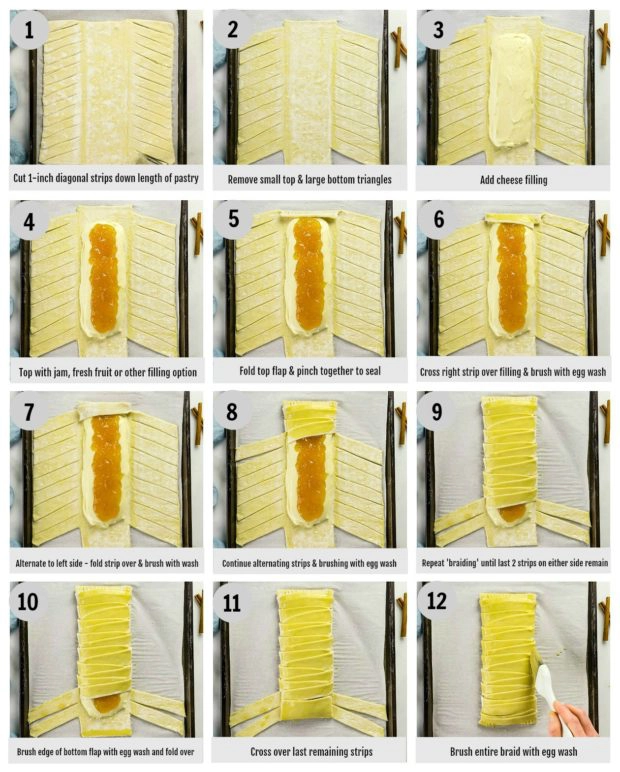
How to easily braid a danish
- Roll-out dough: Roll out the dough into a rectangle.
- Slice strips: Use a sharp knife to slice the outer thirds of the dough into 1-inch strips at a diagonal angle.
- Remove notches: Use a knife to remove the 2 triangle segments from the top and bottom of the dough.
- Add filling: Spread the filling into the middle third of the dough.
- Fold top flap: Gently fold the top flap over the filling. Pinch the dough together to seal the top end.
- Start braiding: Fold the left strip up and over the filling. Brush the outside of the strip with egg wash.
- Repeat: Cross the right strip up and over the left strip. Brush the outside of the strip with egg wash.
- Continue to braid: Repeat folding, alternating strips up and over the filling, and brushing the outside of the strip with egg wash before folding over the opposite side. Stop braiding when you have two strips remaining on each side.
- Fold bottom flap: Brush the bottom edge of the bottom flap with egg wash. Gently fold the bottom flap over the filling.
- Finish braid: Fold the remaining strips over the bottom flap, alternating sides, and brushing the outside with egg wash as your fold. Pinch the end of the dough together to seal the bottom end.
- Egg wash: Brush any exposed puff pastry with egg wash.
Step-by-step photos: braiding cheese danish
Serving cinnamon danishes
Puff pastry danishes are a brunch and dessert fan favorite, especially around the holidays. Easy to prepare, yet elegant, flakey, butter, and oozing with rich cream cheese, what’s not to love, right? Danish puffs pair great with all your favorite sweet or savory breakfast recipes and all sorts of desserts, like this Christmas recipe for white trash. Or they make the perfect sweet ending to your next family dinner. Below are some serving ideas to help inspire:
Serving danishes for brunch
- Coffee, Tea, Hot Chocolate: A classic breakfast pairing includes coffee, teas, and hot cocoa! If serving guests, consider flavored coffees, such as vanilla and cinnamon. And for tea, try Earl Grey, chamomile, or apple cinnamon. And if you’re looking for rich, warm drinks, this slow cooker hot chocolate and hot white chocolate are where it’s at.
- Breakfast Cocktails: If you’re serving danish puffs for brunch, I recommend making pitchers of Mimosas and Bloody Mary’s for the over 21 guests.
- Fresh Fruit: Fresh fruits are a light and healthy pairing option for cheese danishes. The acidity of fruits help cut through the richness of the cream cheese. Try macerating fresh fruit for the best flavor and serve it over whipped yogurt for a simple breakfast parfait.
- Breakfast Meats: If you’re looking for a decadent pairing option, try this candied bacon recipe. Otherwise, classic breakfast meats, like sausage links and patties, crispy bacon, and canadian ham all work great with pastries.
- Eggs: Add healthy protein to your breakfast or brunch spread by serving scrambled avocado eggs with toast or egg muffins breakfast on the side.
- Salmon: Prefer seafood to eggs? Try this cured salmon gravlax recipe that’s sure to impress!
- Brunch Casseroles: If you need a filling breakfast idea, you can’t go wrong with cheesy sausage egg casseroles and piping hot breakfast bakes, like this easy cinnamon french toast, pumpkin french toast, or strawberry strata.
Danish as dessert
If you don’t love sweets in the morning, I get it! Luckily, cinnamon danishes make the perfect sweet ending to family and holiday dinners! Below are a few of my favorite entrees to serve with these puff pastry danishes:
- Eye of Round Roast Beef
- Herb Crusted Standing Prime Rib Roast
- Roulade of Turkey with Stuffing
- Perfectly Slow Cooked Steaks
Storing cheese danish puff pastry
How to store puff pastry cream cheese danish
Store leftover cheese cinnamon danish in an airtight container at room temperature for up to 1 day. To extend the shelf life, store danishes in an airtight container in the refrigerator for up to 5 days.
Making cheese pastries ahead of time
This cheese danish recipe is incredibly easy to prepare ahead of time, making it perfect for an easy weekend breakfast or holiday brunch spread!
To make danishes ahead and refrigerating
- Assemble the danish: Prepare the cream cheese filling and assemble the danishes as directed in the recipe below – stopping before you brush the outside of pastry with egg wash.
- Wrap: Cover the entire baking sheet with plastic wrap.
- Store: Transfer the baking sheet to the refrigerator and store for up to one day. (Alternatively, you can prep and freeze pastries! See below.)
- Bake: When ready to bake, remove the baking sheet from the refrigerator. Prepare the streusel topping. Brush the Danish with egg wash and sprinkle with streusel. Bake according to recipe instructions.
Make danishes ahead and freezing
- Assemble the danish: Prepare the cream cheese filling and assemble the danishes as directed in the recipe below – stop before you brush the outside of the pastry with egg wash.
- Wrap: Cover the entire baking sheet with plastic wrap.
- Flash Freeze: Place the entire baking sheet in the freezer. Flash freeze until danish is completely frozen, at least 3 hours.
- Store: Remove the danish from the baking sheet. Loosely wrap the pastry in parchment paper. Wrap it again with plastic wrap and store in a freezer-safe resealable bag. Store in freezer for up to 4 weeks.
- Bake: Preheat oven to 400 degrees Fahrenheit. Place frozen danish(es) on a parchment paper-lined baking sheet. Brush with egg wash and sprinkle with streusel. Bake for 30-35 minutes, or until pastry is golden brown.
Can I freeze a cinnamon danish?
Absolutely! I love having cream cheese danish pastries on hand in the freezer for quick and easy breakfasts on the go!
To freeze baked cinnamon pastries:
- Cool: Allow pastries to cool completely to room temperature.
- Wrap: Wrap the Danishes tightly in plastic wrap and place it in a freezer-safe resealable bag.
- Store: Store in the freezer for up to 6 weeks.
When ready to enjoy, thaw the pastries in the refrigerator overnight. Reheat in a 325-degree oven for 8-12 minutes, or until warm throughout.
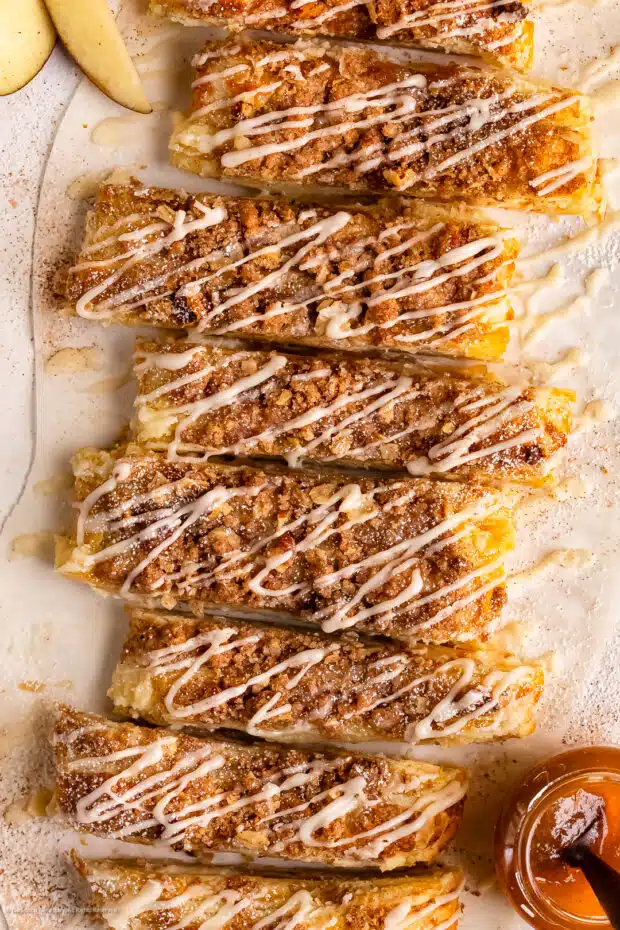
This flaky cream cheese danish is rich, absolutely delicious and guaranteed to be a crowd pleaser! You can serve it for family breakfasts, or as part of your holiday brunch spread! No matter how you serve this danish braid, definitely make two of them! Trust me, you will want to hoard one all to yourself!
Until next time, friends, cheers!
Cheyanne
Craving MORE? Follow all the deliciousness on Facebook, Pinterest and Instagram!
More sweet treats just like your favorite bakery!
If you love this cream cheese cinnamon danish, try one of these delicious recipes next:
The best cream cheese puff pastry danish recipe👇
Cream Cheese Danish Braid
Equipment
- 3 Mixing Bowls (for mixing)
- 1 stand mixer or hand held mixer (for the cream cheese filling)
- 1 Rolling Pin (to roll out the puff pastry)
- 1 Large Baking Sheet (for baking cheese danishes)
Ingredients
For the puff pastry dough
- 1 Box Puff Pastry – thawed according to package instructions (2 sheets)
- 1 Large Egg (for egg wash)
- 2 tsp Cream, Milk, or Water (for egg wash)
For the fillings
- 10 ounces Cream Cheese – softened to room temperature
- 1/2 cup Granulated Sugar
- 1 large Egg Yolk
- 1 1/2 tsp Pure Vanilla Extract
- 2/3 Cup Jam or Preserves - DIVIDED
For the streusel topping
- 2 TBSP EACH: All-Purpose Flour & Rolled Oats
- 2 TBSP Pecans – coarsely chopped
- 2 TBSP EACH: Granulated & Brown Sugar
- 1 tsp Ground Cinnamon
- 2 TBSP Unsalted Butter – cold & cubed
For the glaze topping
- 1 cup Powdered Sugar
- 4 TBSP Heavy Cream - or more as needed
- 1/2 tsp Pure Vanilla Extract
- 1 pinch Kosher Salt
Instructions
- Make the Cream Cheese Filling: In the bowl of a stand mixer fitted with the paddle attachment or using a medium bowl and a handheld mixer, beat the cream cheese and egg yolk together on medium speed for 2-3 minutes, or until smooth. Then add the sugar and extract to the bowl. Continue to beat on medium until the cream cheese is super creamy and combined. Cover the bowl with plastic wrap and set it aside in the refrigerator.
- Make the Streusel Topping: In a medium bowl, combine the flour, oats, pecans, both sugars and cinnamon. Use a whisk or fork to stir the ingredients well. Then, add the cold, cubed butter to the bowl. Grab a pastry cutter or fork and use it to cut the butter into the flour mixture until it resembles coarse crumbs. Cover the streusel and place the topping in the refrigerator until ready to use.
- Roll out the Puff Pastry: Lightly flour a clean work surface. Then, place the thawed puff pastry onto the floured surface. Use your rolling pin to roll the puff pastry out lengthwise by an extra 2-inches. You want the pastry to be about 9-inches by 11-inches.Whisk a large egg with the heavy cream, milk, or water to make an egg wash. Then, set it aside.
- Preheat oven to 400 degrees F.
- Cut Pastry: Transfer the rolled-out puff pastry to a large baking sheet lined with parchment paper. Using a sharp paring knife or a pizza cutter, make 1-inch diagonal cuts down both long sides of the pastry, leaving the center third on the pastry uncut. Once you've made all the cuts along the side of the pastry, use your knife or pizza cutter to cut a triangle out of the bottom of the left side of dough, removing and discarding the little triangle of dough. Repeat with the bottom right side. (Note: See visual below or see detailed photos in the post.)
- Add Fillings: Carefully spread half of the cheese filling in an even layer, about 2-3 inches wide, down the center of the puff pastry – leave a 1-inch border along the top and bottom of the dough. Next, spoon 1/3 cup of the jam on top of the cream cheese filling.
- Braid the Danish: Fold the top flap of puff pastry up and over the filling, then gently pinch to seal closed. Use a pastry brush to gently brush the top flap with egg wash. Now you're going to start folding the strips up and over the filling, alternating between and overlapping the left strip with the right strip. Every time you pull a strip of pastry up and over the other side, gently brush the outside of the strip with egg wash. (Why? This seals the strips together!) Before you cross over the last two strips, fold in the bottom flap over the filling and brush with egg wash, then cross the last two strips over top to enclose the Danish. Pinch the ends of the Danish to seal.
- Brush with egg wash: Use a pastry brush to gently brush any bare, exposed edges and sides of the Danish braid with egg wash.
- Top with Streusel: Generously sprinkle the streusel topping all over the danish. Gently press the streusel into the egg wash.
- Bake: Transfer the baking sheet to the oven. Bake, rotating pan halfway through baking, for 20-25 minutes or until the top is golden brown in color. (Tip: The pastry will puff up quite a bit during baking, but it will settle down as it cools.)
- While the danish is baking, prepare the glaze: In a medium bowl, whisk together the powdered sugar, cream, vanilla and salt. Add more cream, one tablespoon at a time, until desired consistency is achieved. (Tip: Don’t add too much cream or the glaze will be drippy and won’t set up properly!)
- Cool: Remove the danish from the oven and allow it to cool on the pan for 10 minutes. Pick the danish up by lifting the sides of the parchment paper and transfer the danish to a clean work surface or wire rack. Allow the danish to cool completely.
- Glaze and Serve: Once the danish is completely cooled, drizzle it all over with the glaze. Cut the danish into individual pieces. Serve and enjoy!
Notes
- To make one danish braid (instead of two): If you want to halve the recipe, simply cut all the ingredient measurements in half. (You can use the slider bar at the top of the recipe card to adjust the servings to 6 – this will halve the measurements for you!)
- Tips for success:
- Don’t overstuff the puff pastry dough!
- Make sure you leave a boarder at the top and bottom!
- When alternating strips of puff pastry dough, do NOT pull on them - just gently fold them across the filling.
- Use the egg wash to prevent the puff pastry from bursting open when baking
- Leftovers: Store danish in an airtight container at room temperature for 1 day. To extend shelf life, store in the refrigerator for up to 5 days.
- Freezing: Alternatively, you can freeze Danishes for up to 6 weeks. Thaw before serving.
Nutrition
Did you make this recipe?
Mention @nospoonnecessary on Instagram and tag it #nospoonnecessary!
©No Spoon Necessary. All images and content under copyright protection. Please do not use any images without prior permission. Kindly do not publish this recipe without prior consent. To reference this danish recipe, please link directly to this post.
Kelly | Foodtasia
Totally swooning over this danish, Chey! Just imagining the looks on my kids faces finding this for breakfast one morning! They would go bonkers! The step by step photos are super helpful!
Dennis
This looked so delicious I couldn’t wait to try it! It honestly tastes better than it looks – Thank you for sharing!
Marissa
Hello holiday breakfast! This cheese danish looks crazy delicious, Cheyanne! Pinned to my holiday recipe board – thank you!
Mary Ann | The Beach House Kitchen
I fondly remember this one Chey! It’s so incredibly delish. You know I LOVE I’m all over that streusel topping too! Perfect for a fall weekend brunch at the beach. Pinned!
cheri
I’m more of a savory gal myself but Entenmann’s baked goodies will always have a place in my heart. But this was so much better and more delicious! WHO KNEW!?
Jill Van Vlack
When I saw this recipe just now on Pinterest, I thought, wow that looks good, but it must be complicated. I clicked to your blog and saw that you use frozen puff pastry which eliminates a majority of the work, I was excited and need to try this! Def something to offer at Thanksgiving or anytime during apple season
Tracey
This is the bomb! Thank you for sharing this recipe that combines cinnamon, nuts, flaky pastry, creamy filling into bliss! It did take over an hour to prepare all the components and make (not the advertised 15 minutes). Question: Apple filling directions say combine sugarS but ingredients list only brown sugar there. Typo or missing sugar? My modifications: I used both sheets of phyllo from the box and made 2 strudels, but kept all other amounts the same. It looked like too much cream cheese mix and too little apple filling but it turned out great in the end. Used walnuts instead of pecans, and used FOUR tablespoons. Added a splash of bourbon and some raisins to apple filling. DEFINITELY use parchment to bake on–it oozes and burns a little. Plenty sweet without the glaze. This recipe is a keeper! Thanks Cheyanne!
Cheyanne Bany
First of all, Tracey, thank you so much for trying this Danish Bread! And thank you for the feed back!! The sugar(s) in the directions is indeed a typo – thank you for pointing that out! As far as prep time – I define that as time to “prep” the ingredients. I can TOTALLY see how that would be misleading and I am going to add in an “assembly” time to the recipe. And the parchment paper, is a huge YES! Maybe I should write in there that preparing the sheet pan with parchment isn’t a suggestion.. it’s a necessity! 😉 I’m so thrilled you liked the danish! You totally made my day with your sweet and honest comments! Thanks again, Tracey! Cheers!
Cheryl@neurotic baker
Thanks for the shout out! I’m so lucky to have discovered your blog. You recipes sound great and your photos are amazing! I’m going to try this the danish bread for Christmas 🙂
Cheyanne Bany
Cheryl, Thank you so much for stopping by and the very kind words! It was my pleasure to give you a shout out, as I have followed your blog for quite some time. All of your photos are extremely drool-worthy 🙂 Cheers!!
Karrie
OMG Cheyanne, this recipe looks divine! I grew up on Entenmann’s baked goods but haven’t had them in many, many years. Love this great homemade alternative. Thanks for posting it 🙂
Cheyanne Bany
Karrie, My pleasure! That box of baked goods brings back such wonderful (and fattening) memories 🙂 Hope you enjoy it! Cheers!!
dina
This was so delicious! Well loved by everyone!
Cheyanne Bany
Thank you Dina! It tastes better than it looks! 🙂
Cheyanne Bany
Thank you Dina! They are very comforting! And thank you for stopping back by my blog!! 🙂 xoxo