This post may include affiliate links. Thank you for your support.
This Cake Bites recipe is so easy and fool-proof! Featuring “doctored” cake mix, a tub of frosting and candy melts, this fuss-free celebratory dessert recipe requires just 20 minutes of hands-on prep and there’s no special equipment or molds needed! These cake balls are buttery, rich and ultra-moist with a decadent chocolate candy shell! Plus, they’re totally customizable (use your favorite cake flavor, frosting and colors!)!
This recipe for cake balls is perfect for both novices and pros alike. Read on for tips on making and decorating cake balls. Plus, learn how to easily doctor a box of cake mix and get all the tricks for making the entire process stress-free. This simple, step-by-step recipe tutorial for cake balls will transform you into a cake bite master in no time!
Update: This post was originally published in February 2022. I made updates to include more information about making frosting bites with a box of cake mix at home.
Hi, friends! I hope you are in the mood for a sweet treat, because today I’m sharing a super-simple recipe for cake balls! This easy recipe (it’s more like a totally customizable, step-by-step, choose your own bite-size cake adventure guide!) uses a simple trick to create cake pops that come out perfect every single time! These mini cake pops without a stick are the perfect treat for every occasion – from birthdays and holiday parties to potlucks, bake sales, and more!
Table of Contents
- About this step-by-step tutorial for cake bites
- What are cakes bites?
- What are cake bites made of?
- Cake mix or homemade cake for a cake bite?
- How to make cake balls
- Kitchen tools you will need
- Step-by-step photos: Making cake ball recipes
- Expert tips for making the best cake bites
- 1. Set aside plenty of time!
- 2. Doctor your cake mix!
- 3. Remove edges!
- 4. Fine crumbs!
- 5. Just enough frosting!
- 6. Use a scoop!
- 7. Chill!
- 8. Use candy melts, wafers, or bark!
- 9. Thin the chocolate!
- 10. Use a tall, wide cup or glass for dipping!
- 11. Not too hot!
- 12. Cake pop decorating – just a few at a time!
- 13. Gently dip and tap to remove excess candy coating!
- 14. Work with one color at a time!
- 15. Add decorations to wet coating!
- How to decorate cake balls?
- FAQs: cake ball recipes
- Serving cake ball bites
- Storing easy cake balls
- More recipes using a box of cake mix!
- Cake Bites (Customizable + Step-by-Step Guide!)
About this step-by-step tutorial for cake bites
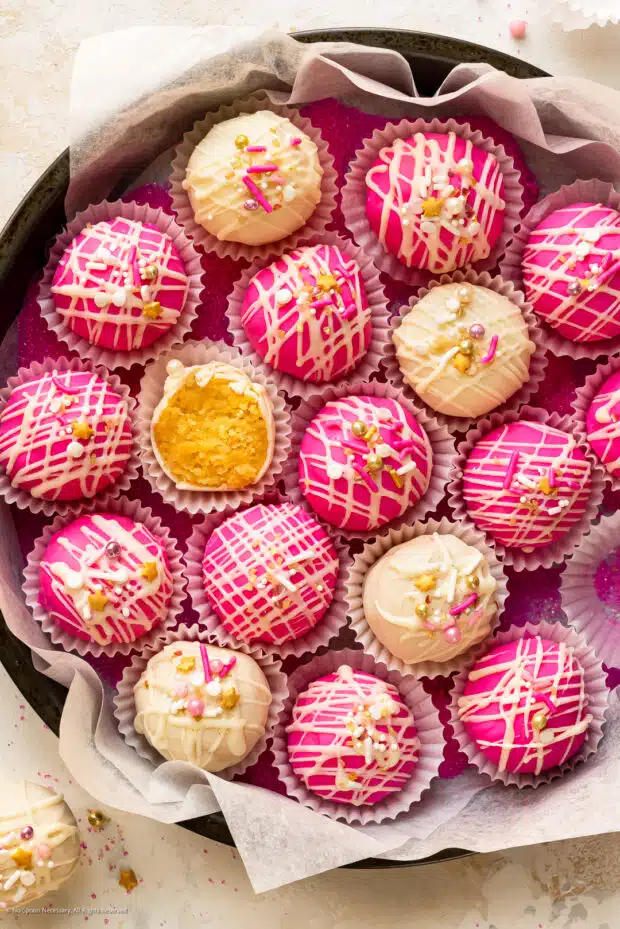
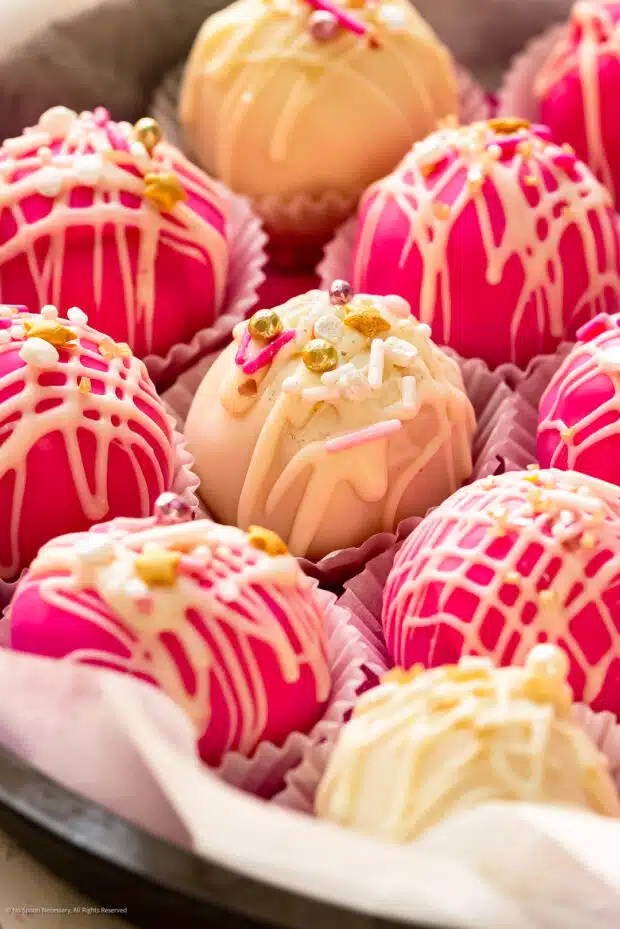
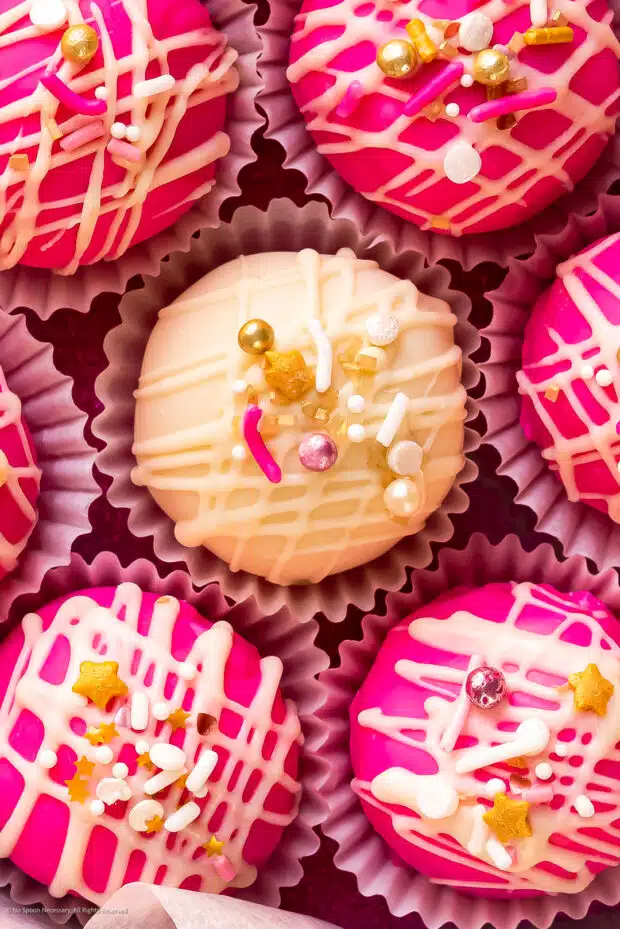
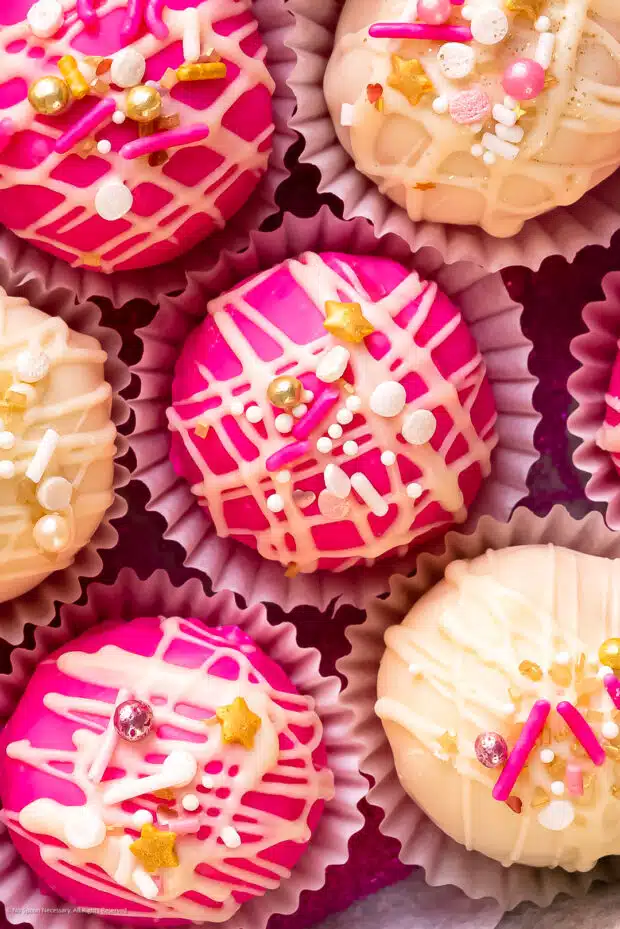
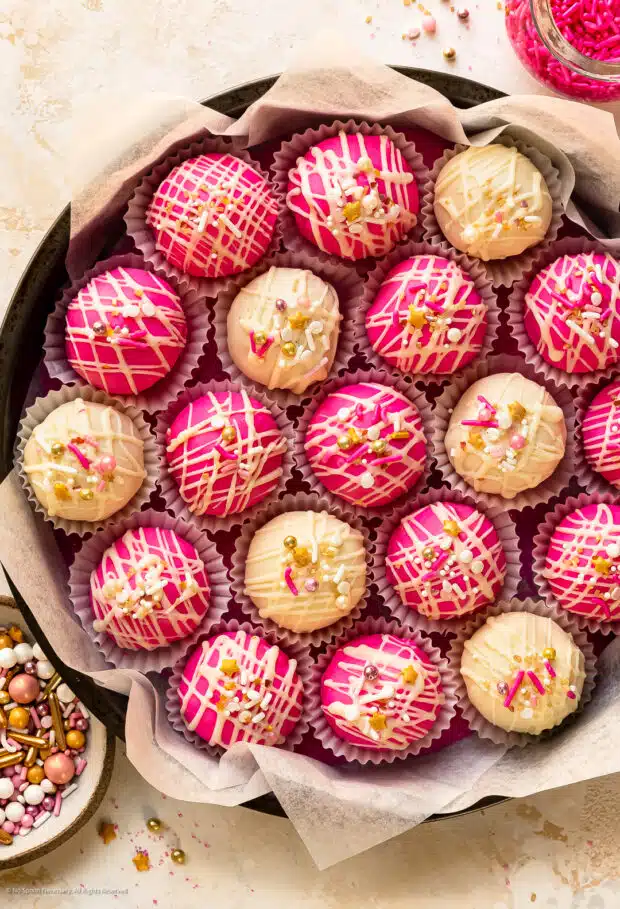
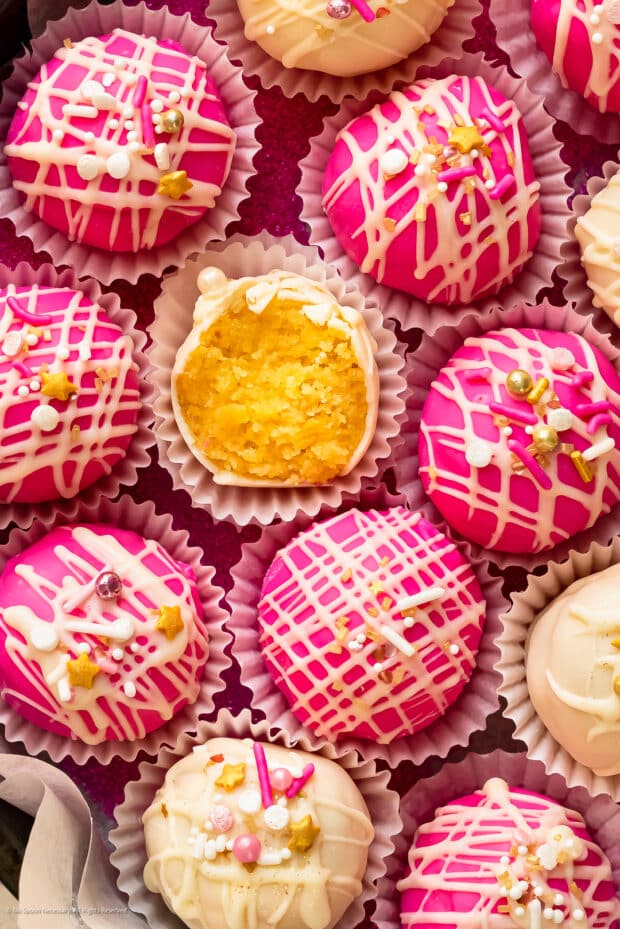
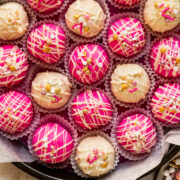
If you are a dessert lover, I’m sure you’re already closely acquainted with the most adorable baked treats in all the land – cake bites, also known as frosting bites or cake bombs. But, just in case you aren’t familiar with these festively fun treats, they’re basically miniature cakes or cupcakes, with extra-frosting and a chocolate shell! Featuring moist, buttery crumbled cake and rich, creamy frosting all wrapped up in a shatteringly thin, colorful candy shell!
Decorate the cake balls with colorful sprinkles and you’ve got cake bites! Or pop them on a stick for homemade cake pops! Either which way, everyone goes crazy for these charming, bite-size morsels of cake!
Okay, so what’s so special about this dessert recipe?! EVERYTHING! This cake ball recipe uses a simple secret trick which ensures soft, buttery, ultra-moist cake pops (with the perfect candy shell) every single time! Whether you are a beginner looking for tips on making cake pops, or a novice seeking tricks to making the process frustration-free, this simple guide covers everything!
Why this cake balls recipe works
- Easy-to-Find Ingredients! All you need is a few easy-to-find ingredients, such as a sour cream, and pantry staples for this cake balls recipe.
- Stress-Free Process! It’s a fact that making frosting bites are an entire process; however, this simple, easy-to-follow guide makes it stress-free! Using convenient, store-bought items saves you time and energy. Don’t worry, doctoring the cake mix will make it taste just like homemade!!
- Basic Kitchen Equipment: You don’t need any special equipment or molds for this easy cake bite recipe!
- Moist (NOT dry!): Doctoring a simple box of cake mix results in cake balls that are super-moist and dense, perfect for dipping in chocolate and decorating!
- Customizable! Think of this post as more of a guide or tutorial (versus a “recipe”) to creating your perfect cake pops! This is your adventure – use store-bought cake mix and a tub of frosting to keep things easy and stress-free! Or make everything from scratch if you need a therapeutic baking project! As for flavors, keep things classic with vanilla cake and buttercream frosting! Or get crazy and use a combination of homemade white wedding cake with homemade champagne frosting! Bonus points – don’t forget to grab all of your favorite colors of candy melts and sprinkles for decorating!
- Pro Tips and Tricks: I’ve included plenty of tips, along with common problems and solutions, to help you along the way!
- Saves Money! Here’s the math confirming that it’s much cheaper to DIY! This recipe yields 36 cake bites or pops. The cost of a cake pop at Starbucks is $1.95 (plus tax!); therefore, it would cost $70.20 (plus tax!) to purchase all of these cuties. Including the fun sprinkles and the vibrant candy melts, I spent $28.45 on all the supplies for this recipe! Now that’s some serious savings!
- Perfect Size! Who doesn’t love a miniature dessert – they’re the perfect bite-size indulgent treat!
- Any Occasion! These minis are a hit EVERYWHERE! From birthday parties and baby showers, to bake sales, potlucks and MORE! Simply serve up these adorable little copycat cakes at your next special occasion for the win (FTW)!

What are cakes bites?
A cake bite, also known as cake ball or frosting bite, is a bite-size dessert resembling a truffle ball. These mini confections are made up of a mixture of cake crumbs and frosting, which are formed into small spheres, and covered in a candy coating. Essentially, they’re akin to tiny, extra-frosted, candy-coated cupcakes – lollipop stick optional. There are endless variations and flavor combinations, from Chocolate and Oreo to Funfetti and Vanilla cake bites!
This homemade cake pop recipe totally simplifies the process! By doctoring a simple box of cake mix and using a convenient tub of your favorite frosting, you get all the rich, buttery flavor and moist texture of cake pops made completely from scratch – with just a fraction of the effort or hassle!
What’s the difference between cake balls, cake bites and cake pops?
The terms cake ball, cake bite and cake pop are often used interchangeably (I do so here); however, there is technically one key difference between all three:
- Cake Ball: Also known as a naked cake pop! Technically, a cake ball is the shaped and formed cake mixture, before it’s candy-coated!
- Cake Bite: A cake bite is simply a decorated cake ball, or you can think of it as a cake pop minus the stick!
- Cake Pop: A cake pop is a just a cake bite, served up lollipop-style!
Who invented the cake pop?
It’s a common misconception that the popular coffee-house, Starbucks, invented the cake pop; however, it is in fact Angie Dudley, also known as Bakerella, who first introduced cake pops to the world! In 2008, Dudley started a mini-baking-revolution by posting her cake-on-a-stick creation on her blog! It didn’t take long for her bite-size morsels of cake to go viral, triggering both Starbucks and the Babycakes (a cake-pop maker) to jump on the cake pop bandwagon!
What are cake bites made of?
These mini cakes are incredibly simple to make at home – requiring just a few kitchen and pantry staples, such as store-bought cake mix, a tub of frosting, eggs and oil! Below are all the ingredients you need to make this easy cake bite recipe! (Scroll down for substitutions and variations!)
Ingredients in this recipe for cake balls
- Cake Mix: You need one (15.25-ounce) box of cake mix for this recipe. You can use any flavor you love! (See below for yummy cake pop flavors!)
- Pudding Mix: Doctoring cake mix starts with one 3.4-ounce box of instant pudding. You can use any flavor you like in this cake bite recipe – just make sure it’s instant!
- Eggs: Three large eggs bind all the ingredients together and provide the cake structure!
- Oil: Vegetable oil adds moisture and helps give the cake body!
- Sour Cream: The secret ingredient to doctoring a box of cake! Sour cream adds tons of creamy moisture and a touch of tangy flavor! Please use full-fat sour cream for the best results!
- Extract: You can use any flavor of extract you love, just make sure the label reads “pure” for the best flavor! (Artificial extracts can give off a funky aftertaste.)
- Frosting: You will need 1 cup of frosting for this recipe. You can use a store-bought tub or make it from scratch! Please use (or make!) any flavor you love!
- Candy Melts: I recommend using candy melts or Ghirardelli melting wafers for dipping your cake balls. Both options are readily available at most grocery stores or craft stores, such as Michaels! (See below for tips on smoothly melting chocolate!)
- Cake Decorations: Colorful sprinkles, jimmies and other edible, decorative nonpareils are a fun way to add your personal touch to homemade cake bites!
Substitutions
- Cake from scratch: Instead of doctoring a box of cake mix with pudding, eggs, oil, sour cream, and extract, you can bake a cake from scratch. The cake needs to be 9×13 for the full recipe (you can easily halve it).
- Greek Yogurt: You can easily swap out the sour cream for full-fat Greek yogurt if you prefer.
Variations
From festive Funfetti Cake Pops to decadent Red Velvet Cake Pops and Easter-appropriate Carrot Cake Pops, the sky is the limit when it comes to making fun cake pop flavors. Below are some of my favorite cake ball ideas:
12 Delicious Ideas for Cake Pops
- Vanilla Cake Pops: Vanilla Cake Mix + Buttercream Frosting (shown here)
- Cake Batter Bites: Funfetti Cake Mix + Sprinkle Frosting
- Chocolate Cake Bite: Chocolate Cake Mix + Fudge Frosting
- Oreo Bites: Chocolate Cake Mix + Buttercream Frosting + 3 TBS finely crushed Oreos
- Red Velvet Pop: Red Velvet Cake Mix + Cream Cheese Frosting
- German Chocolate Cake: German Chocolate Cake Mix + Coconut Pecan Frosting.
- Chocolate Peanut Butter Cake Pop: Devil’s Food Cake Mix + add 3/4 cup creamy peanut butter to cake & peanut butter frosting.
- Salted Caramel Cake Bites: Yellow Cake Mix + Caramel Buttercream OR Caramel Cake Mix + Chocolate frosting
- Butter Pecan Bites: Butter Pecan Cake Mix + Vanilla Buttercream Frosting
- Strawberry Cake Pops: Strawberry Cake Mix + Cream Cheese Frosting
- Lemon Pops: Lemon cake mix + combination of Buttercream & Cream Cheese Frosting
- Carrot Cake Pops: Spiced Carrot Cake Mix + Cream Cheese Frosting
Expert Tips: For this cake bites recipe, I recommend using box cake mixes with the words “moist” or “supreme” on the label. Also, don’t forget you, can customize your cake truffle balls even more by using your favorite instant pudding flavor and candy melt color(s)! Be sure to use “regular” (not sugar-free) instant pudding for the best results!
Cake mix or homemade cake for a cake bite?
You can use either a store-bought cake mix or your favorite sheet cake recipe to prepare this cake balls easy recipe.
I’m a firm believer that there is a time and place for everything! While I mostly bake from scratch, I also have zero issues using a box of cake mix if it can help save time, as long as it doesn’t sacrifice on flavor! And such is the case with cake pops! Once you crumble the cake, mix it with frosting, form balls and dip them in chocolate, you seriously can’t tell the difference in taste – AS LONG AS you doctor up your cake mix! (See below for doctoring store-bought cake mixes!)
Tip: When using store-bought cake mixes, make sure your mix doesn’t contain any large textured ingredients, such as coconut flakes in the box of German cake. The large clumps will prevent you from forming and rolling smooth cake balls!
How to make a box cake mix taste better
A simple box of cake mix has all the makings for a delicious cake – it just needs a little doctoring or TLC! Doctoring cake mix is an easy way to make store-bought cake mix taste extra special, with that from-scratch flavor!! To doctor cake mix all you need to do is ignore the back of the box and add a few simple ingredients! Easy-peasy! The additional “secret ingredients”, such as instant pudding mix, sour cream, pure vanilla extract, and an additional egg, gives a box mix that extra-moist, flavorful, almost-from-scratch flavor!
How to make cake balls
Making cake pops without a stick is an easy process! However, unfortunately it’s also a slightly tedious one involving a lot of repetition.
Most recipes, including this one, make cake pops by mixing cake crumbs with frosting and forming the mixture into golf ball-sized spheres. The cake balls are then stuck on the end of a lollipop stick and set in the refrigerator to chill. After chilling, the balls are dipped into chocolate and decorated with sprinkles. Voilà! As if by magic – homemade cake pops!
So, are you wondering what makes THIS recipe any different from all the rest? This one teeny-tiny, but also massive detail makes all the difference in the world! It’s the contrast between dry, chalk-y cake pops and these buttery, perfectly-moist ones: doctoring the cake mix! This one simple tweak makes these little cake bites taste totally homemade! Step aside Starbucks – there’s a new cake-pop-making-barista in town!
Kitchen tools you will need
The process of making cake bites can be a slightly tedious one! However, this simple recipe guide helps streamline the process, making it quicker and easier! Plus, there’s no special kitchen equipment or gadgets, such as cake pop molds, required! Below is a list of kitchen supplies that will help make the process as smooth as possible!
What you absolutely need
- 9×13-inch Baking Pan: You will need a pan to bake the cake!
- Cookie Scoop: A 1 to 2-tablespoon size cookie scoop makes quick work out of portioning out the cake truffle balls!
- Liquid Measuring Cup: You will need a tall, deep and wide glass for dipping! I like to use a 2-cup glass liquid measure.
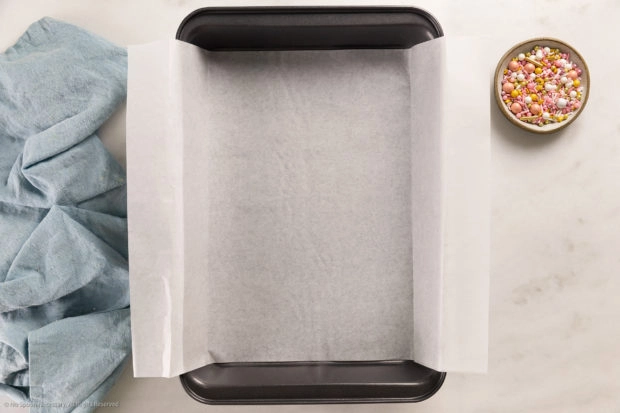
- Parchment Paper: Lining your baking pan with parchment will help make removing the cake from the pan a much easier process!
- Cake Decorations: Fun decorations, such as sprinkles, nonpareils and jimmies!
- Craft Sticks (for cake pops only!)
- Craft Foam (for cake pops only!)
Optional, but helpful tools
- Resealable bag or Piping bag: To make quick work of drizzling a contrasting color over your mini cake bites, I recommend using a piping bag or a resealable bag with the tip cut off. However, you can also simply use a fork if you prefer!!
- EZ Thins Dipping Aid: This specialty dipping aid will help you thin out your candy melts. However, I use shortening or coconut oil and it works just fine!!
- Ceramic Candy Melting Bowls or Pots: Candy melting pots or bowls make easy work of melting candy, plus is keeps it warm!
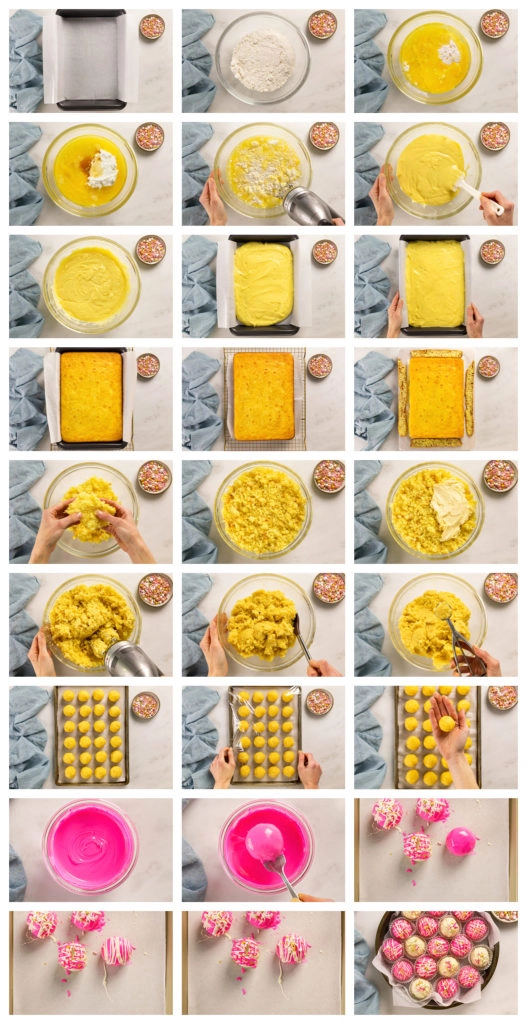
Step-by-step photos: Making cake ball recipes
Below you can find a photo collage showing you exactly how to make a cake ball, step by step! You can find the full, detailed cake bites recipe in the printable card at the bottom of this post!
Expert tips for making the best cake bites
The 15 simple, yet effective pro-tips below will help you master cake pop making in no time!
1. Set aside plenty of time!
Unfortunately, while making cake bites is an easy process, it’s also a time-consuming one! There is no getting around it, these mini cakes take time – it’s a process of baking a cake, cooling, crumbling, rolling and decorating. For the sake of your sanity, I recommend planning to make your cake bites over the course of two days! Take the first day to bake the cake and allow it to cool completely. Then, use the second day to shape and decorate the cake pops! If you can do any of the process in advance, do it! Tip: Once the cake is cool, cover it tightly with plastic wrap to prevent it from drying out!
2. Doctor your cake mix!
For the easiest process and best results, make sure you doctor your cake mix! Preparing the cake mix according to the back of the box usually yields a cake with a light and fluffy crumb, which tends to fall apart versus stick together. However, doctoring your cake mix results in moister, denser cake crumbs, typical of homemade cake batter!
3. Remove edges!
To ensure your cake balls hold together, make sure you trim the cake and remove the darker brown edges and bottom! Those darker edges are drier in texture, which can cause the cake pops to fall apart and crumble – so, be sure to discard them! (This is your sign and excuse to nibble on those excess cake crumbs – trust me, it makes the rolling, dipping and decorating process more fun.)
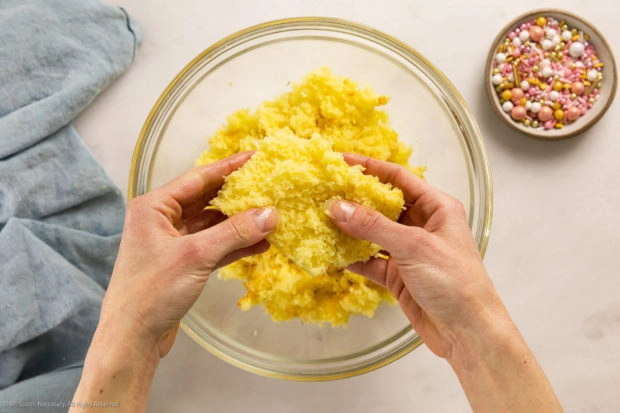
4. Fine crumbs!
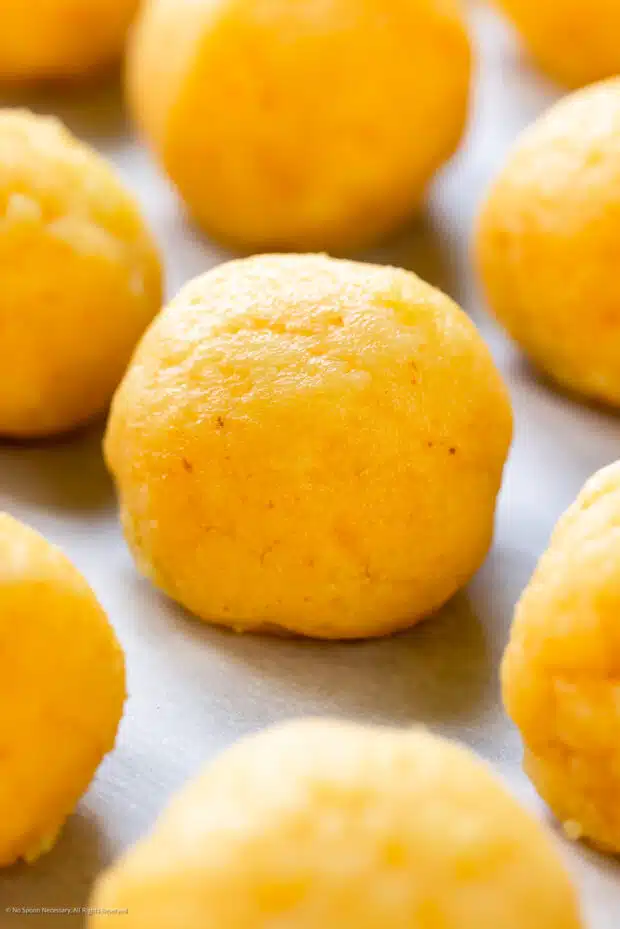
You need to crumble the cake until it resembles fine crumbs! This will ensure your cake balls roll out smooth and hold together!
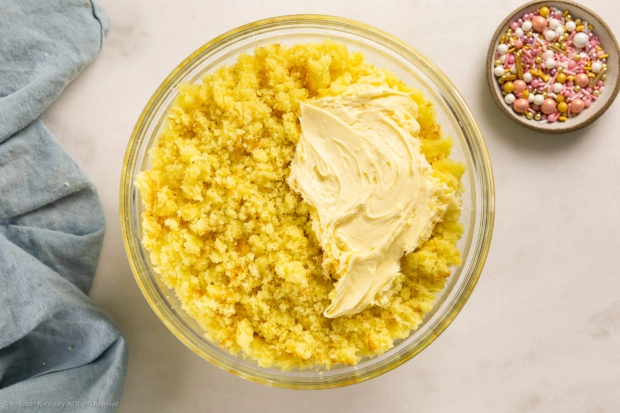
5. Just enough frosting!
When you mix the cake crumbs with the frosting, you want to form a soft, slightly moist dough that just holds together. The dough shouldn’t feel wet, sticky, or dry! If the dough is dry, mix in more frosting one tablespoon at a time.
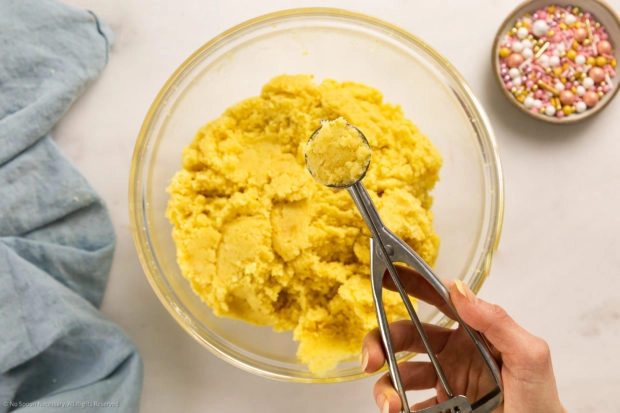
6. Use a scoop!
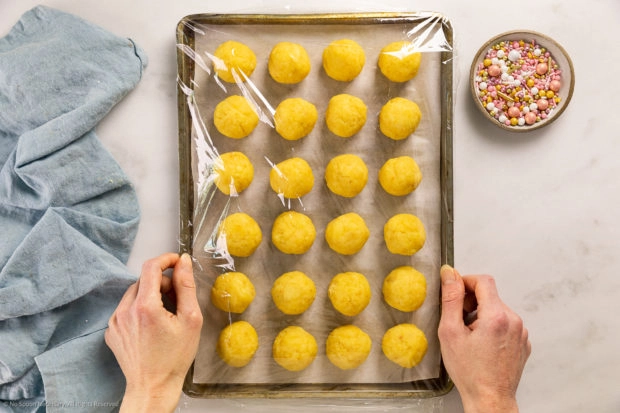
A cookie or ice cream scoop makes quick and easy work out of scooping and measuring cake balls! Plus, using a scoop ensures all the balls are roughly uniform in size. Tip: If you like to be precise (I do!), use a scoop to roughly portion out the cake balls and transfer them to a kitchen scale – each ball should be approximately 30 grams each.
7. Chill!
You must fully chill this recipe for cake balls before dipping them in candy melts or chocolate! Chilling helps firm up the cake balls, making them much easier to work with. (However, please note, you also don’t want the cake balls too cold, or the melted chocolate will glide right off the cake balls!)
8. Use candy melts, wafers, or bark!
For the easiest dipping experience, I recommend using candy melts, melting wafers or almond bark!
9. Thin the chocolate!
For the smoothest cake bites, I recommend thinning your candy melts, wafers, or bark with a teaspoon of shortening or coconut oil! Thinning the chocolate (just slightly!) makes it SO much easier to work with – the balls don’t get stuck in the chocolate and the coating is perfectly smooth with no unpleasant clumps!
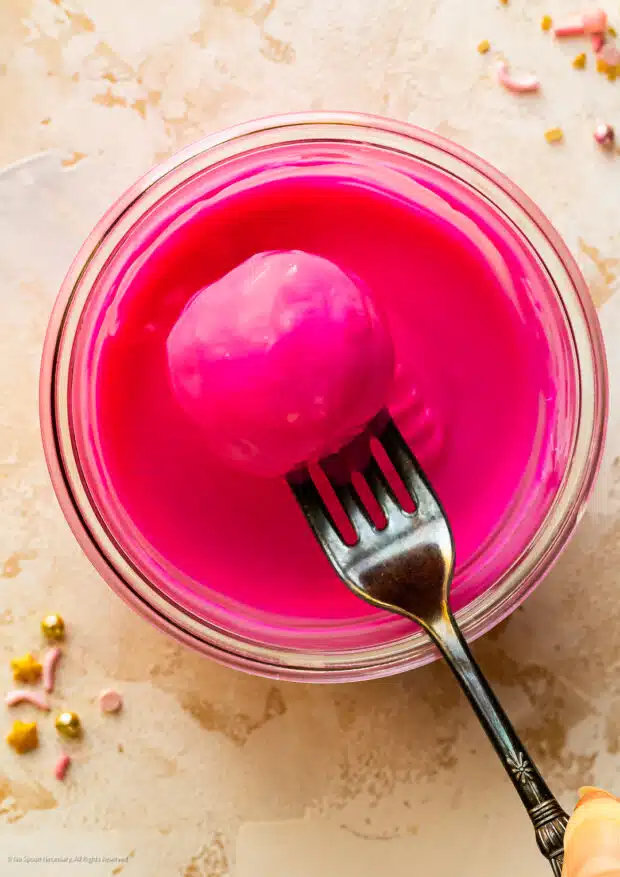
10. Use a tall, wide cup or glass for dipping!
I recommend using a tall, deep glass to dip the cake bites into the candy coating – this way the balls can be completely submerged. I find it easiest to melt the candy in a glass liquid measuring cup using the microwave.
11. Not too hot!
Make sure your melted candy isn’t too hot – it should be slightly warm, but not too hot! If the candy coating is too hot it will melt your cake balls! Tip: The candy coating needs to be warm, but not hot, throughout the entire dipping process!
12. Cake pop decorating – just a few at a time!
When you are ready to decorate, work with just a few at a time! Since the balls need to be cold while you are dipping them into the melted candy, I recommend working with 4 to 6 balls at a time. Keep the remaining cake balls cold in the refrigerator!
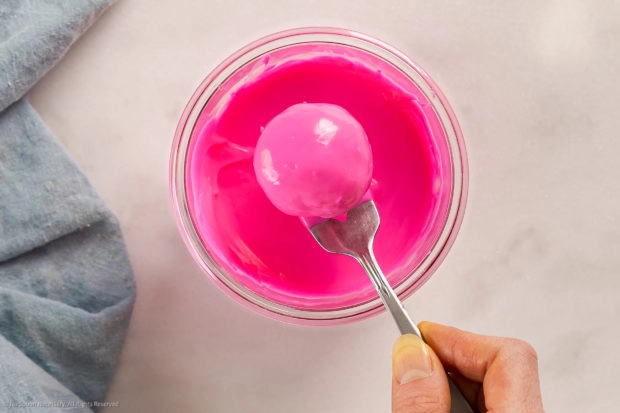
13. Gently dip and tap to remove excess candy coating!
To candy-coat, place one cake ball onto a fork and dip it into the candy. If your cake ball isn’t completely submerged, use a small spoon to lift the melted candy over the top ball. After dipping the cake ball, lightly tap the fork or your wrist (for cake pops) against the side of the glass or bowl to remove any excess coating. This is important or the excess will pool at the bottom of the cake bite as it sets! However, you don’t need to go crazy tapping off the excess, or the candy will harden, and the cake ball will stick to your fork! (Yes, I did that- learn from me!)
14. Work with one color at a time!
I love drizzling my cake bites with a different color candy melt for a pop of fun! However, if you want to use two colors on your cake balls or pops, I recommend working with one color at a time. For example, dip all the cake balls into one color and then go back and use the other color. The process is messy and slightly stressful when you try to keep two colors perfectly melted!
15. Add decorations to wet coating!
Make sure you work quickly when decorating this cake bites recipe. The candy coating must be wet for any of the edible decorations (sprinkles, jimmies, etc.) to stick!
How to decorate cake balls?
You can decorate this recipe for cake balls any way your heart desires! You can keep things simple and dip your balls in melted white chocolate or get creative and use vibrant colored candy melts and various sizes of sprinkles and jimmies! Below are a few creative ideas for decorating your cake pops!
11 cake pop decorating ideas!
- Birthday: For celebration pops, be sure to use Funfetti cake mix and plenty of multicolor sprinkles.
- Wedding: Add some edible flare to your party. Match the candy melt to your wedding color and dip them in edible gold dust – Très chic!
- Baby Shower: You can easily change up the color scheme to accommodate a boy’s or girl’s shower. Try decorating your cake balls with tiny white bows or dainty non-perils.
- Football Party: Shape your balls into footballs, dip them into chocolate baking melts and draw on the details with white candy melts.
- Starbuck’s: To copycat Starbuck’s cake pops, coat your cake balls in light pink candy melts and white sprinkles.! (For the cake portion, use white cake mix, French vanilla pudding mix and buttercream frosting.)
- Valentine’s Day: Make chocolate covered strawberry pops. Use strawberry cake mix, along with chocolate candy melts, and decorate with pink heart-shape sprinkles.
- Easter: Keep things simple by decorating your cake pop to resemble an Easter egg. Or take things to the next level and make baby chicks using yellow candy melts for the cake pop, candy for the eyes and orange melts for drawing on details.
- July 4th : Use a combination of red, white and blue candy melts in cake balls recipes.
- Halloween: Use different colors of candy melts (orange, green + white), along with mini candy eyes and black candy melts (for facial expressions and details), to create Pumpkins, Frankenstein, and Ghosts.
- Thanksgiving: Transform this recipe for cake balls into cute little turkeys by using brown candy melts, candy eyes and candy corns to form the crest and beak.
- Christmas: Create Rudolph by using pretzels for the ears and candy for the eyes. Don’t forget to use a small red circular candy for his nose (I use an M&M).
Tip: If you are looking for elaborate cake pop shapes, I recommend heading over to the Bakerella website! She is the G.O.A.T when it comes to shaping and decorating cake pops!! Seriously, she has everything from Unicorn and Yoda cake pops to Puppy and Pikachu pops – you must check them out!!
FAQs: cake ball recipes
How to make cake pops?
It’s so easy to transform this cake bites recipe into cake pops – all you need are lollipop sticks or craft sticks!
To turn cake balls into cake pops
- Prepare cake balls according to recipe instructions. Bake and crumble the cake; scoop and roll the mixture into balls; then chill.
- Melt candy coating. Heat the candy melts using the microwave or a double boiler.
- Dip lollipop sticks. Dip the tip of a lollipop stick or craft stick into the melted candy and then immediately into the cake ball, gently pushing the stick until it is about halfway through the ball. Repeat with all lollipop sticks and cake balls. (Once the candy melt sets, it acts like a glue, which will help keep the cake ball attached to the stick! Tip: Cake balls need to remain cold. Therefore, I usually only work with six to eight balls at a time – leaving the remaining balls in the refrigerator.
- Chill: Turn the cake pop upright and place the sticks (upright!) into a cake pop stand or a piece of craft foam. Transfer to the refrigerator for 10 minutes or set aside on the counter until set.
- Dip: Working with one cake pop at a time, hold on to the end of the stick and gently dip the cake pops into the remaining melted candy.
- Tap off excess: Remove the cake pop from the melted candy by gently pulling straight up – don’t stir or twirl the cake pop in the coating! Tap your wrist gently on the side of the glass to help remove excess coating from the cake pop.
- Decorate: Immediately (while the coating is still wet!) cover the cake pop with sprinkles or your cake decorations of choice!
- Let set: Transfer your beautiful cake balls to a cake pop stand or a piece of craft foam. Place the homemade cake ball bites in the refrigerator for 10-15 minutes to set. Once dry, enjoy!
How to get a smooth cake ball?
- Roll again before dipping. Just before dipping the frosting bites into chocolate, use your hands to gently re-roll the cake balls. Re-rolling will smooth out the sides and help make the cake balls more secure!
- Use candy melts, wafers, or bark! For the best results use candy melts, melting wafers or almond bark! These ingredients were MADE for melting and dipping!
- Thin the coating! Thin your candy melts with a teaspoon of shortening or coconut oil to create the perfect consistency! If the candy coating is too thick it WILL get clumpy!
- Dip, don’t swirl! Gently dip the cake ball into the chocolate – do not stir it! If you twirl or swirl the ball in the chocolate it will look misshapen, and not smoothly circular! (Basically, don’t get fancy – keep it simple!)
- Remove excess coating! After dipping, gently tap your fork (or wrist if you are holding a stick!) against the side of the bowl or glass to remove all excess candy – this will help create the perfect layer of smooth chocolate coating!
- Keep candy coating warm! Make sure you keep your candy coating warm (but not hot!) throughout the entire decorating process! Warm, thin coating is the key to perfectly smooth pops!
- Tip: If you enjoy making this recipe for cake balls, you may want to consider looking into a chocolate melting pot or heating pad. Either of those kitchen gadgets will keep your chocolate warm, making the entire process smoother.
Can I use chocolate chips for dipping?
You can use any type of chocolate baking chips (such as white or milk) instead of candy melts for dipping cake balls, bites, and pops However, melted chocolate chips are much thicker in consistency than candy melts, melting wafers and almond bark. Therefore, you will need to thin out the chocolate baking chips by stirring a tablespoon of shortening into the melted chocolate.
Why are my cake pops cracking?
If the coating on your cake pops is cracking, there are two reasons why:
- Candy melts are too hot! As I mention above in the tips and tricks for making perfect cake pops, your candy melts need to be warm, but not too hot! If your coating is too hot it can either melt the cake balls or cause the coating to crack. Since your cake balls need to be COLD before dipping if the candy coating is too hot the extreme and sudden temperature change will crack the coating!
- Naked cake balls are too cold! You want the bare cake balls to be cold before dipping for the best results; however, they should not be frozen! Just like if your candy melts are too hot, if your cake balls are too cold the drastic temperature change will cause cracking!
Do cakes pops need to be refrigerated?
You do not need to store this recipe for cake bites in the refrigerator. However, if you added a perishable filling, such as fruit or custard, to the cake balls you will need to store them in the refrigerator.
Can I make this recipe for cake balls in advance?
You can start making this cake bite recipe as far as one month in advance! You can store both bare cake balls and fully decorated cake pops for up to a month in the freezer! (See below for how to properly store “naked” cake balls and decorated cake pops!)
Serving cake ball bites
Cake balls are best when you serve them at room temperature.
Are you wondering what to serve with these individual balls of cake? The better questions is – what CAN’T you serve? Below are some ideas to get your creative juices flowing:
- Fresh Fruits: Fruit salads or macerated fruit makes an easy and healthy pairing option for cake.
- Ice Creams: A cone or bowl of your favorite ice cream works great here. Don’t forget the sprinkles, hot fudge or chocolate sauce, and/or caramel or butterscotch sauce.
- Nuts: A big bowl of your favorite savory, crunchy roasted nuts or candied nuts contrast sweet and tender cake perfectly.
- More Cake: If you are throwing a party, consider offering a different flavor of cake, like Chocolate Cake in a Mug, Birthday Strawberry Cake, Velvet Skillet Cake, Chocolatey Coffee Cake, Strawberry Sundaes with Shortcake, or this Easy Pumpkin Cake.
- Holiday Sweets: If you’re serving these confetti bites of cake as part of a dessert board for the holidays, try pairing them with dessert chex mix or peppermint bark with pretzels. And don’t forget the festive drinks! These Christmas cookie martinis, hot cocoa with white chocolate or hot cocoa with dark and milk chocolate are perfect here.
Storing easy cake balls
This recipe for frosting bites yields 36 balls, so chances are pretty good that you are going to want to store some of them! Luckily, these adorable little bites are easy to store!
Below is everything you need to know about properly storing this recipe for cake bites and pops, including short-term and long-term storage options!
How to store: before & after dipping
There are two stages where you can store this easy recipe for cake balls – either before or after dipping them into the candy coating! Below are instructions for both!
Storing “naked” cake balls (before dipping)
If you would like to store your cake balls “naked” (plain cake balls before dipping!), then you have two options!
- Refrigerator: Layer the bare cake balls between sheets of parchment or wax paper in an airtight container. Cover to lock in freshness. Store in the refrigerator for up to one week.
- Freezer: Layer the bare cake balls between sheets of parchment or wax paper in an airtight container. Cover to lock in freshness. Store in the freezer for up to one month.
- To use: Thaw the balls in the refrigerator before dipping them in candy coating!
Storing cake bites and pops (after dipping)
If you would like to store this cake bites recipe (or pops!) after they’ve been dipped and decorated, then you have three options:
- Room Temperature (ideal): Line an airtight container with paper towels. Place the cake bites on the towel in a single layer if possible. If not, use a sheet of paper towels to layer between the bites. Cover the container to lock in freshness and store at room temperature for up to 5 days. Tip: Keep the container of cake bites in a cool, dark place (such as the pantry or a kitchen cabinet) to prevent the sunlight from melting your pops!
- Refrigerator (longer storage): Place the cake bites into an airtight container – using parchment paper between layers if necessary. Store in the refrigerator for up to 2 weeks. Tip: When you are ready to eat your mini dessert, let the bites sit at room temperature for 30 minutes first! This will remove any harsh chill!
- Freezer (long term storage): Transfer your mini desserts to a freezer-safe resealable bag. Use your hand to smooth out and remove excess air in the bag before sealing. Store in the freezer for up to 1 month.
- To use: Thaw the pops in the refrigerator overnight before enjoying! Tip: Please see the tip directly above – under “refrigerator”!
Tip for storing this cake bites recipe: Before storing your beautifully decorated pops, please be sure you allow the coating to dry and set completely first!
More recipes using a box of cake mix!
Do you want to whip up more tasty treats with a simple box of cake? Try these favorites:
Craving MORE? Follow all the deliciousness on Facebook, Pinterest and Instagram!
How to make the best cakes bites at home👇
Cake Bites (Customizable + Step-by-Step Guide!)
Equipment
- 1 9x13-inch Baking Pan
- 1 Large Mixing Bowl
- 1 Hand-held or Stand Mixer
- 1 Cookie Scoop - optional but helpful!
- Parchment or Wax Paper
- 1 Tall, Wide Glass or Bowl - for dipping! (I use a 2-Cup Glass Measure)
Ingredients
- 1 (15.25-ounce) Box Cake Mix – any flavor!
- 1 (3.4-ounce) Box Instant Pudding Mix – any flavor!
- 3 large Eggs – lightly beaten
- ¾ Cup Vegetable Oil
- ¾ Cup Sour Cream or Greek Yogurt
- ½ Cup Water
- 1 tsp Pure Vanilla Extract – or any flavor of pure extract!
- 1 Cup Frosting (Tub or Homemade!) + more as needed, any flavor that you love!
- 1 pound Vanilla- or Chocolate Candy Melts - DIVIDED (SEE NOTES)
- Sprinkles or Jimmies – to taste
Instructions
- Preheat Oven: Preheat oven to 350 degrees. Line a 9x13-inch baking pan with parchment paper.

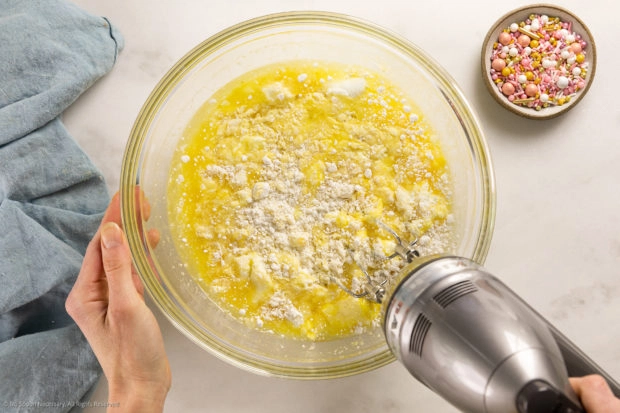
- Doctor Cake Mix: In a large bowl with a hand-held mixer, or the bowl of a stand mixer with the paddle attachment, beat together the cake mix, pudding mix, eggs, oil, sour cream, water, and vanilla. Beat on medium for 1 minute. Stop and scrape the bottom and sides of the bowl with a rubber spatula. Continue to beat for 1 additional minute, or until well combined.
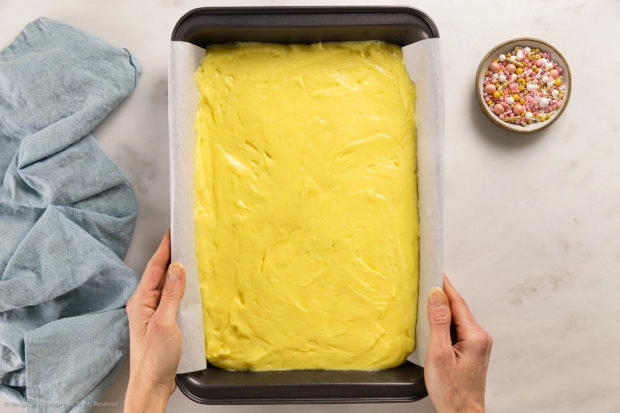
- Bake: Transfer the cake batter to the baking pan. Bake for 28-34 minutes, or until a toothpick inserted into the center of the cake comes out clean. Do NOT over-bake! (Tip: If the top of your cake starts to brown too quickly towards the end of baking, lightly tent the top with aluminum foil.)
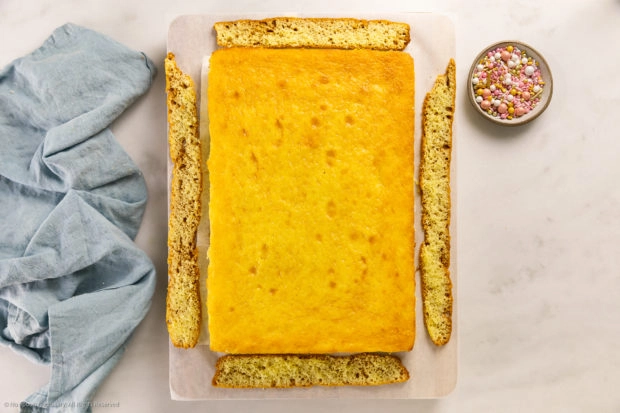
- Cool: Remove cake from oven and place the pan on a wire rack. Let the cake cool in the pan for 10 minutes. Lift up on the edges of the parchment paper and remove the cake from the pan. Transfer to the wire rack and set aside to let it cool completely.
- Trim: Using a sharp paring knife, LIGHTLY trim off the darker brown sides, edges, and bottom of the cake. Discard the dark edges (or eat them!)!
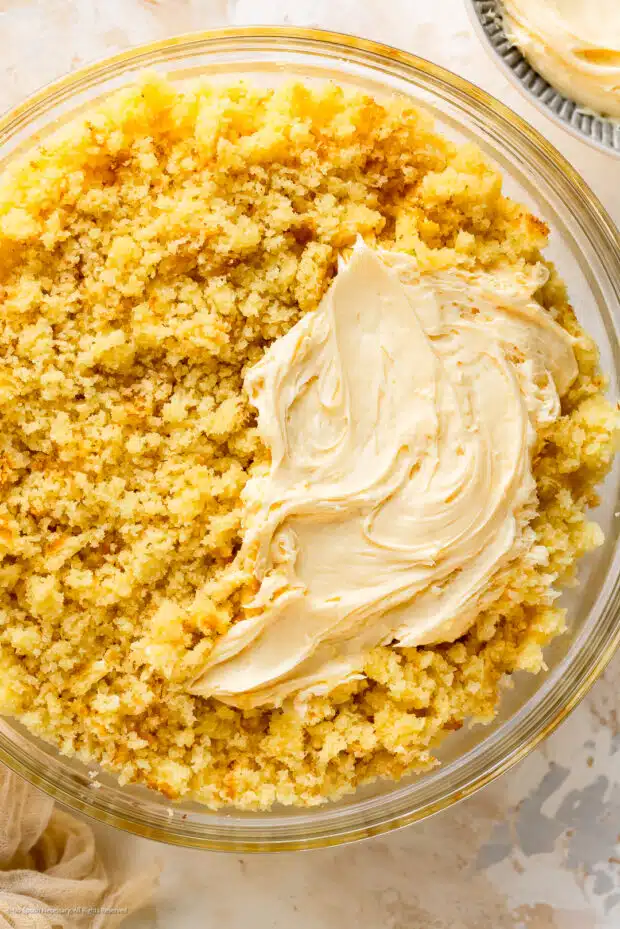
- Crumble: Use your hands to crumble the cake into a large mixing bowl – crumbling the cake until the cake resembles fine crumbs. (Tip: If you want to make quick work of this, you can use the food processor. Make sure you process in small batches and keep a close eye on it!)
- Add Frosting: Add the frosting to the bowl. Use an electric mixer or a spoon and beat on low (or stir) until everything is combined. The mixture should be soft and slightly moist!
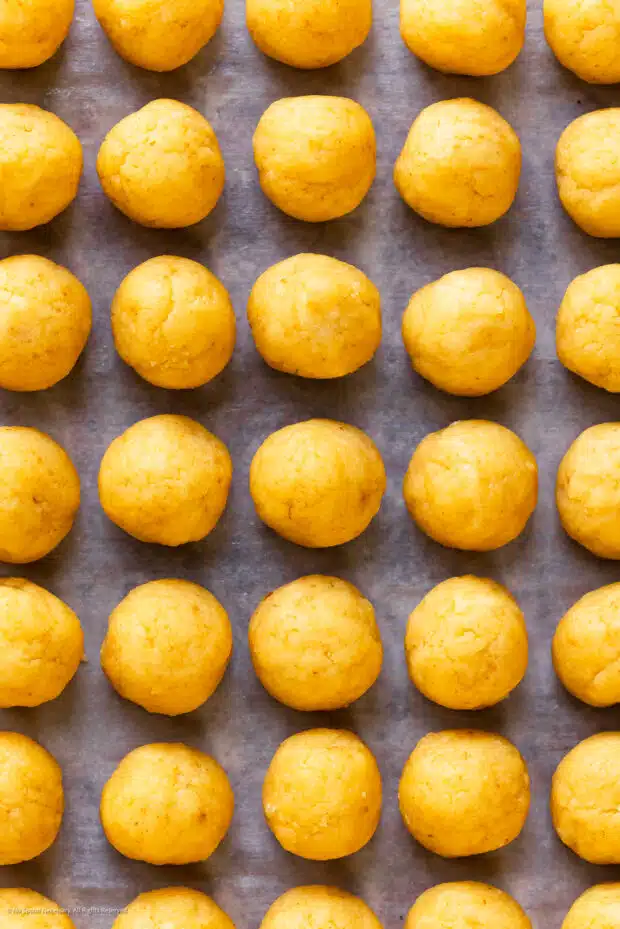
- Roll: Line a large baking pan or tray with parchment or wax paper and set aside. Using a small (1 or 2-tablespoon) ice cream or scoop melon baller, portion and shape into heaping 1-inch balls (about 29 grams each). Place each ball onto the prepared pan.
- Chill or Freeze: Transfer the cake balls to the freezer and freeze for 1 hour, or transfer to the refrigerator and chill for at least 2 hours.
- Melt Chocolate: Place 12 ounces of the candy melts or chocolate into a microwave-safe tall, deep, and wide bowl (I use a 2-cup liquid measure) and melt according to package directions. (Tip 1: Thin with 1 teaspoon of shortening or coconut oil for the best consistency!! Tip 2: The melted candy or chocolate needs to be hot, but not too hot or it will melt your cake ball!)
- Dip in Chocolate: Working with 4 to 6 balls at a time (keep the rest in the refrigerator), place a ball on a fork and lower the ball into the bowl of melted candy coating, covering the ball completely with chocolate. Make sure you gently tap the side of the fork or your wrist to the side of the bowl after dipping to remove all excess chocolate coating. Once coated, place the cake ball on the parchment paper-lined pan. Repeat with all the remaining cake balls.
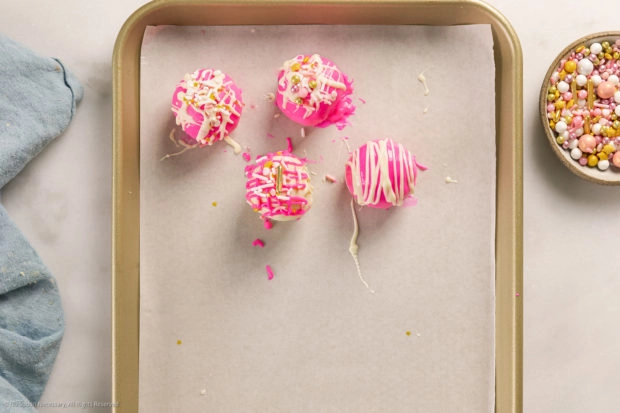
- Decorate: Melt the remaining chocolate and pour it into a small resealable bag. Use scissors to snip off a tiny edge to create a piping bag. Drizzle the melted chocolate in a back-and-forth zig-zag pattern across the tops of the cake balls. Sprinkle jimmies or sprinkles over the chocolate while the chocolate is still warm!
- Set and Enjoy: Set the cake bites aside in the refrigerator or let stand at room temperature to allow the candy coating to completely set. Enjoy!


Notes
- Customizing your Cake Balls: Please see below for customizing your Cake Bites!
- Cake Mix: You can use any flavor cake mix you love -OR- you can bake your favorite sheet cake recipe!
- Frosting: Same thing goes for the frosting! You can purchase a tub of whatever flavor you love -OR- you can whip up your favorite homemade frosting!
- Pudding: As for the pudding mix, you can use whatever flavor you like; however, it must be instant and for the best taste I recommend using Full Fat.
- Extract: You can use any flavor of extract you love. I recommend using PURE extract for the best taste! You can simply use pure vanilla extract if you like that classic sheet cake flavor!!
- Tips and Tricks: I have sprinkled a few crucial tips throughout the recipe instructions to help guide you! However, for the FULL tutorial, common questions and answers, plus tons of cake pop flavor ideas, please see the written post above!
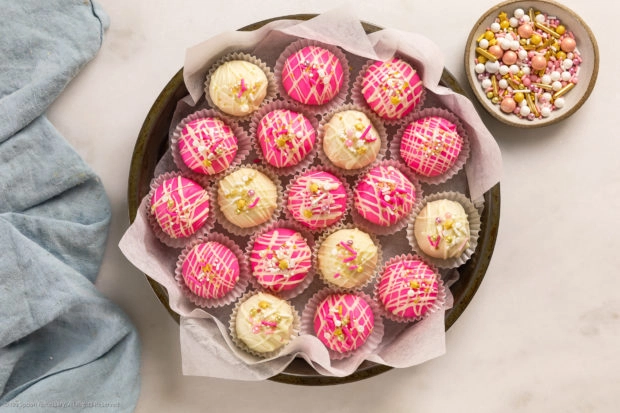
- Cake Bite Flavor Shown Here: White Cake Mix + French Vanilla Pudding Mix + Buttercream Frosting w/ Hot Pink Candy Melts and Ghirardelli White Melting Wafers.
Nutrition
Did you make this recipe?
Mention @nospoonnecessary on Instagram and tag it #nospoonnecessary!
©No Spoon Necessary. All images and content are copyright protected. Please do not use any images without prior permission. Please do not republish this recipe without prior consent. If you want to reference this recipe, please do so by linking directly to this post.
Raleigh Excavating
I recently followed this straightforward step-by-step guide and made a batch for my sister’s baby shower – they were a huge hit! The doctored cake mix with sour cream made the cake bites ultra-moist, and the candy shell added the perfect crunch. I blended vanilla and chocolate flavors and used pastel-colored candy melts to match the shower theme. The best part? They were so simple to make and looked stunning on the dessert table!
LeeAnn
These are the best! I have made them multiple times and they are always a hit! Thanks for all your tips to make them so good!
MaryAnn | The Beach House Kitchen
I want the whole tin Chey! I LOVE cake bites. They’re such a special treat and these are decorated just perfectly for Valentine’s Day!! I would definitely have a problem sharing!! Lol!
Marissa
These cake bites are so pretty, Cheyanne! Perfect edible gift to share with friends and sweethearts.
angiesrecipes
These are absolutely adorable and I just love how colourful they look too!