This post may include affiliate links. Thank you for your support.
Learn how to make this classic healthy falafel recipe! Crispy on the outside and bursting with herbaceous fresh flavor, these healthy chickpea patties can be baked or lightly pan-fried! They are perfect as a snack, stuffed into pita bread for lunch, or served with slaw for a light, healthy dinner! (healthy, vegetarian, vegan)
Update: This post was originally published in January 2015. I’ve updated the post below to include more information about healthy homemade falafels. Plus, I added step by step photos and a recipe video to show you how easy this recipe is to make!
Hey, friends! Today we are talking about the joys of crispy, homemade falafel with canned chickpeas!
Have you ever wanted to make falafels at home, but you’ve been too scared? Well, have no fear, because this healthy falafel recipe is insanely easy to prepare! The falafel mix requires very minimal prep work and come together in a matter of minutes!! Plus, NO large (scary) pot of hot, bubbling oil is required!
This falafel with canned chickpeas is simply made with fresh herbs, crisp vegetables, pantry staples, and a can of cooked chickpeas! And, they can be baked or lightly pan-fried so the falafel calories can be kept low.
We will answer all your burning questions like “Is falafel healthy” and “Can you bake falafels?”
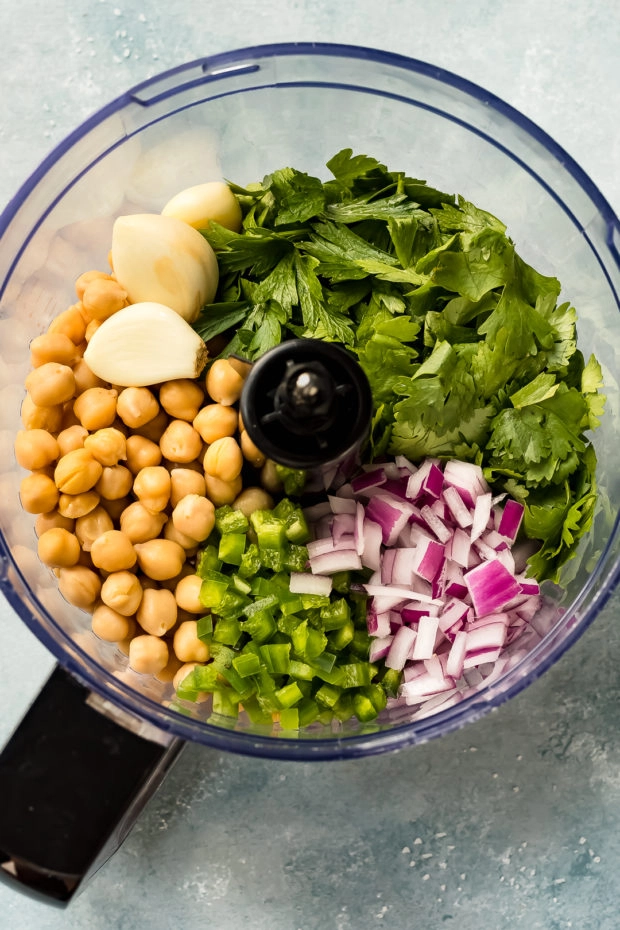
Table of Contents
- About This Easy Healthy Falafel Recipe
- Why you’ll love falafel with canned chickpeas
- What are falafels?
- Ingredients needed for chickpea fritters
- How to make falafel with canned chickpeas
- Tricks for the best chickpea fritters:
- Frequently Asked Questions
- Serving Suggestions
- Storage
- More chickpea recipes!
- More healthy snack recipes!
- Healthy Crispy Falafels
About This Easy Healthy Falafel Recipe
Seriously, this crispy falafel with canned chickpeas recipe is beyond fantastic, friends. I’ve been eating them for lunch and dinner for the past three days in a row, and honestly, I’m showing no signs of slowing down!
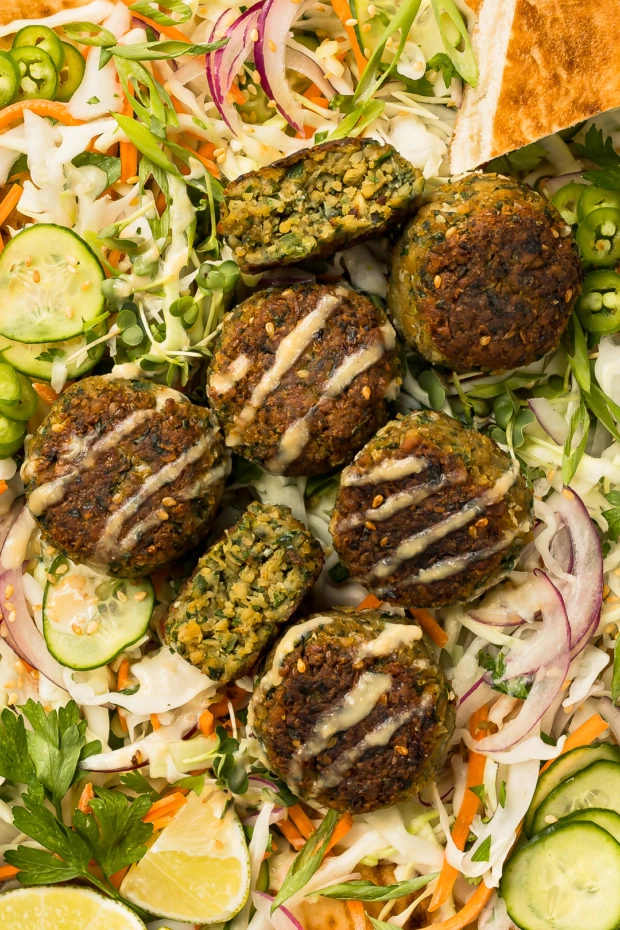
These falafels are bursting with fresh, herbaceous flavor and have the perfect amount of bright, savory taste. They are golden brown and crispy on the outside with a creamy, melt-in-your-mouth tender interior.
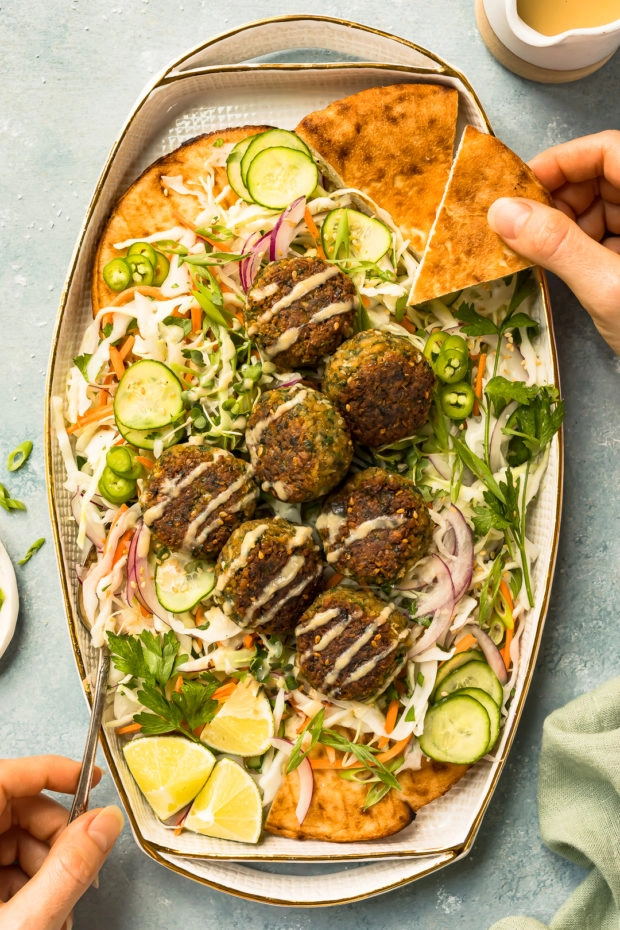
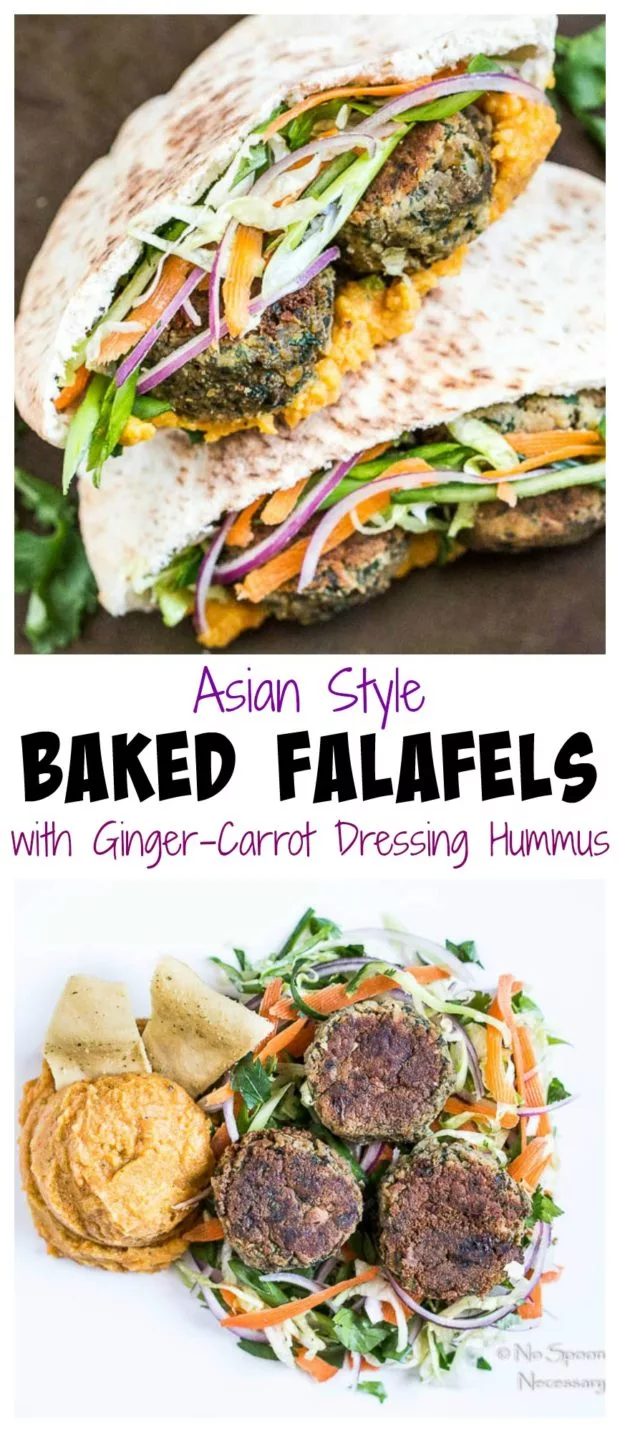
Never one for being traditional, I decided to forgo the classic Mediterranean way of preparing and serving these chickpea fritters. Instead, I opted for Asian-inspired flavors: sesame seeds, cilantro, and ginger! The result is a homemade falafel that packs both flavor and texture! Served on a quick Asian slaw with a miso tahini sauce for dipping or drizzling, these falafels are going to be your new favorite lunch, snack, or light dinner!
Why you’ll love falafel with canned chickpeas
- Simple! This easy falafel recipe comes together quickly and is great as a main dish or appetizer.
- Low Calorie! Filled with plant based proteins, the falafel calories are minimal. Plus, baking them keeps the calories low too!
- Crispy! These are the BEST crispy falafel with canned chickpeas ever. The crunchy exteriors please your pallet and give you a burst of flavor. The insides are deliciously tender too.
What are falafels?
Falafels are a Middle Eastern dish made up of chickpeas, or other pulses such as fava beans, plus flavorful spices and fresh herbs. The chickpea mixture is then mashed, formed into balls (or fritters), and usually deep-fried.
This healthy falafel recipe is my version of the traditional street food and adds jalapeno, sesame seeds, and ginger to the mix for a spicier, aromatic falafel with more texture and flavor.
As well, this recipe utilizes drained, canned chickpeas so the falafels are faster and more fuss-free preparation!
Ingredients needed for chickpea fritters
The exact ingredients in falafels can greatly vary from recipe to recipe. There are numerous variations and a plethora of ways to make chickpea fritters.
This easy recipe is made with the following:
- Chickpeas: Chickpeas are the base of the recipe. I use canned chickpeas (rinsed and drained) to save time. However, you can use dried chickpeas, just make sure to soak and cook them first.
- Fresh Herbs: Fresh cilantro and parsley give the falafels a bright, herbaceous taste and a beautiful green hue!
- Onion: I use red onion for a milder flavor. However, you can substitute yellow onions for a more pungent flavor, white onion for a sharper flavor, or sweet onion for a subtly sweet flavor.
- Jalapeno: Seeded and ribbed jalapeno provides a slightly smoky flavor with a touch of spicy heat.
- Garlic: Minced fresh garlic provides a subtle aromatic flavor. If you love the taste of fresh garlic, feel free to add more to the recipe. Alternatively, if you aren’t a huge fan, cut back to only 1 or 2 cloves.
- Flour: I use chickpea flour, but you can use all purpose, white whole wheat, or even gluten-free flour if desired!
- Baking Soda: Baking soda is a raising agent which helps make the falafel fluffy on the inside.
- Lime: Both lime juice and zest add a punch of zippy taste and rounds out the flavors in this healthy falafel recipe! Plus, the lime juice helps activate the baking soda (listed above).
- Seasonings: Cumin, cayenne, ginger, sea salt and ground pepper provide tons of flavor.
- Sesame Seeds: These are entirely optional, but they give the falafel balls a touch of nutty flavor.
Healthy Falafel Recipe Variations
This recipe is extremely forgiving and can be easily adapted! Feel free to get creative and swap out ingredients to use what you have on hand or try flavor combinations your family loves!
- Use different legumes: If you aren’t a fan of chickpeas, you can make falafels with other pulses! Try using lentils, white beans, black beans, or even fava beans!
- Add vegetables: While I use onion and jalapeno, you can add just about any fresh vegetable you like or have on hand. However, I do not recommend juicy vegetables such as tomatoes or cucumbers. If you start adding juicy vegetables with a high water content you will need to add more flour to balance out the moisture.
- Use different herbs: I know not everyone is a fan of fresh cilantro. Try swapping out the cilantro for a bit of fresh mint and scallions. Or, you can make the falafels with a combination of both flat-leaf and curly-leaf parsley!
- Swap out spices: Ground spices are a great way to play around with the flavor! You can try adding ground coriander, turmeric, cardamom, chili powder, or even cinnamon!
How to make falafel with canned chickpeas
You can make the best crispy homemade falafels with this quick and simple recipe! Pair them with refreshing slaw and creamy miso tahini for a delicious easy meal!
(Scroll down for the detailed measurements and instructions in the printable recipe card at the bottom of the page.)
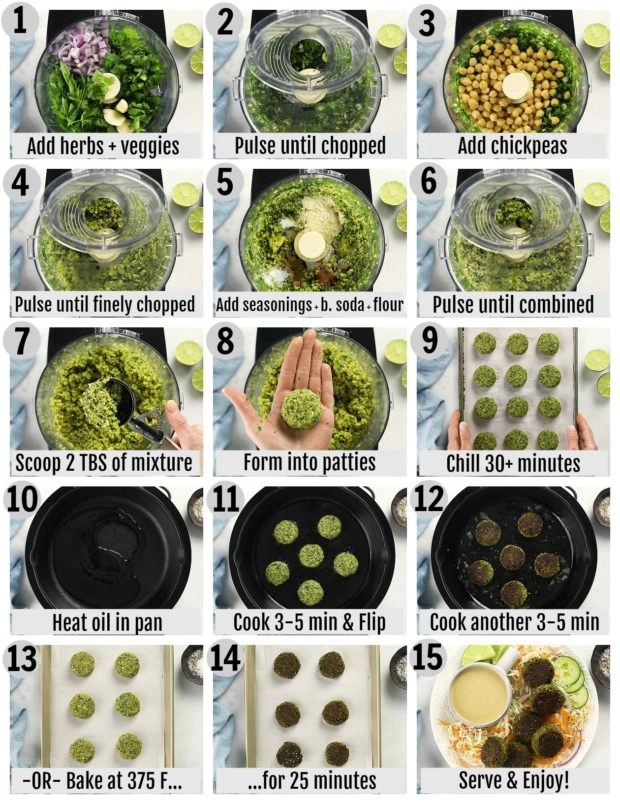
- Line a small sheet pan with parchment paper and set it aside.
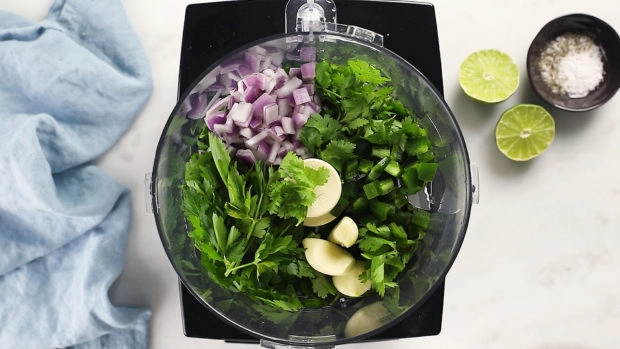
- Make the falafel mixture: In the bowl of a food processor add red onion, garlic, jalapeno, parsley, and cilantro. Pulse until chopped and combined, about 12-15 pulses. Add the chickpeas and pulse again until finely chopped.
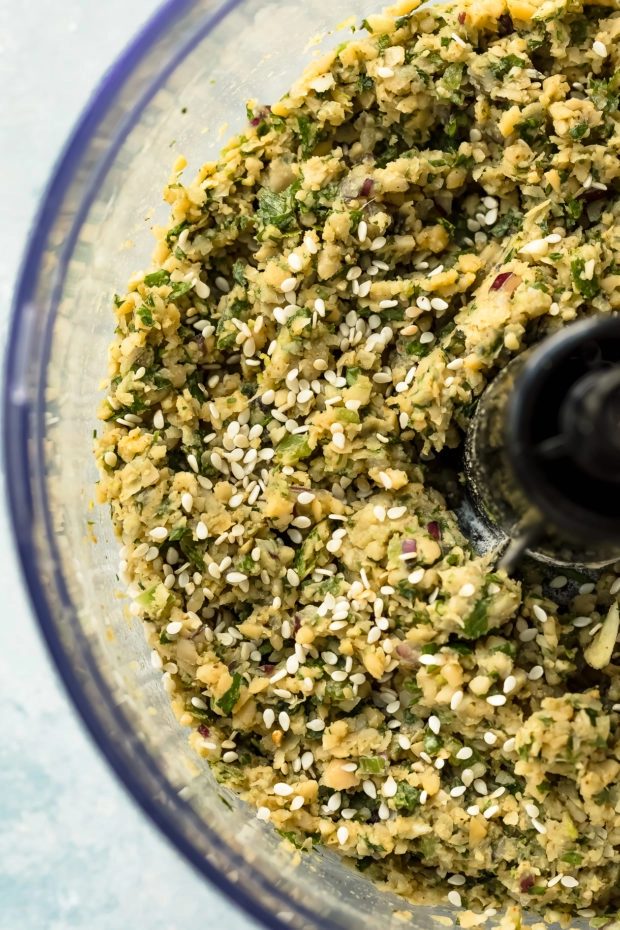
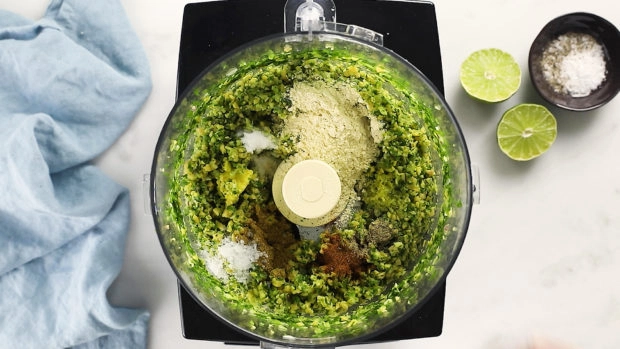
- Add in the cumin, cayenne, ginger, baking soda, 2 TBS of chickpea flour*, lime zest, juice, salt, and pepper. Pulse until combined, but NOT smooth, stopping to scrape down sides as necessary. (You want texture and for the mixture to be slightly chunky and thick). Stir in the sesame seeds. Taste and adjust for seasoning.
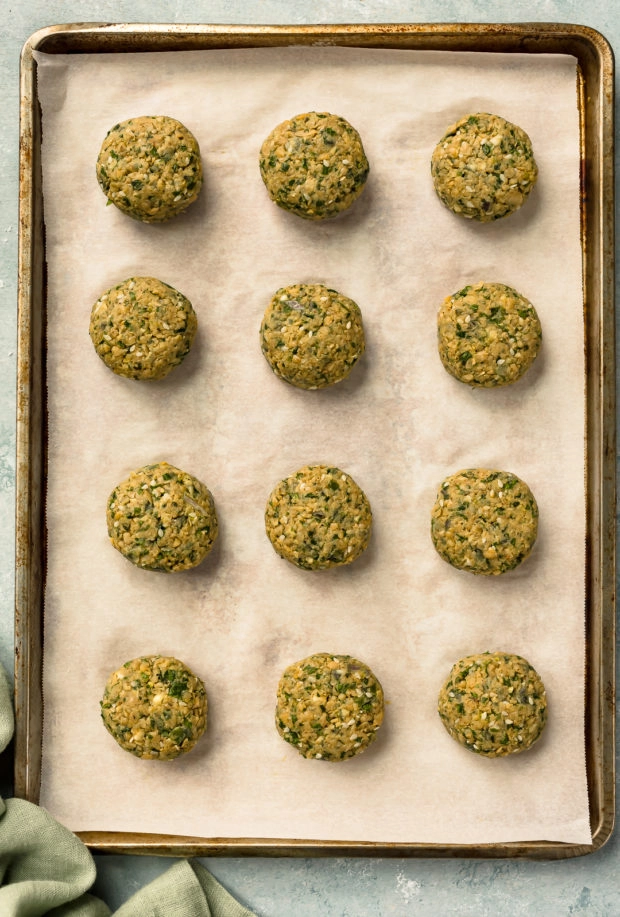
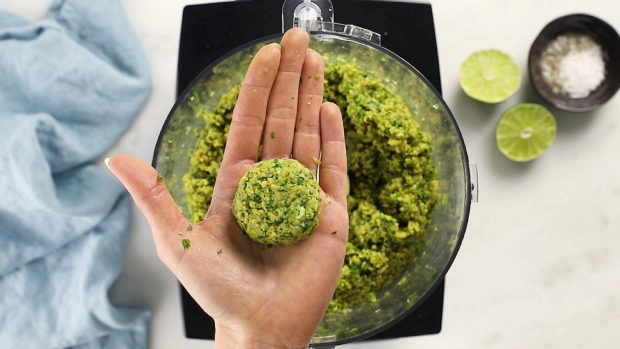
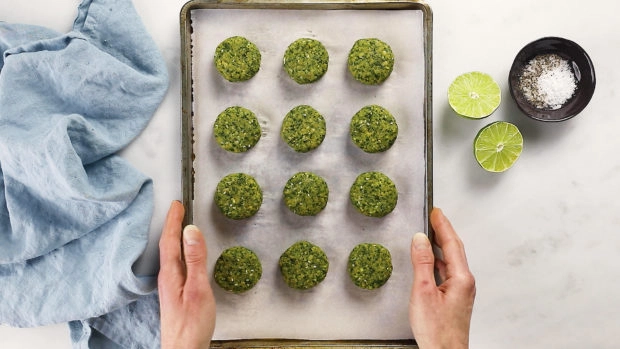
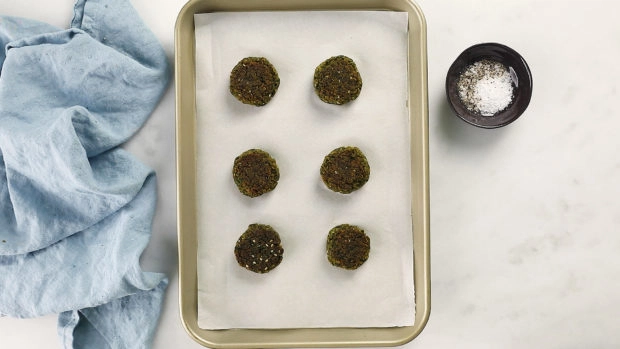
- Form the falafels: Using your hands, roll and form the mixture into falafel balls, about 2 tablespoons of mixture for each, for a total of 12 balls. Place the formed falafels onto the prepared sheet pan and place them in the refrigerator for at least 30 minutes to firm (you can let these sit overnight, just cover lightly with plastic wrap).
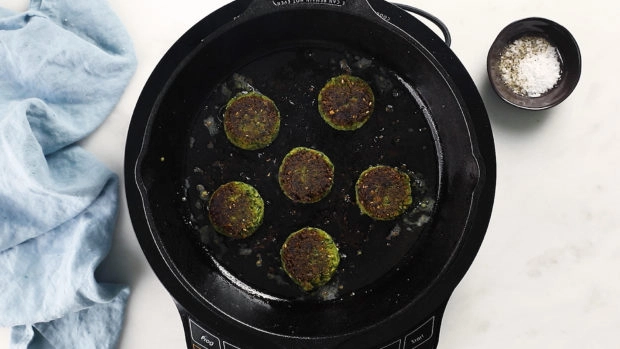
Pan-Fry Falafels
To PAN-FRY falafels: Heat 2 tablespoons of olive oil in a large cast iron skillet over medium-high heat. Reduce the heat to medium and add the falafels. Cook until golden brown, about 3-5 minutes. Add the remaining tablespoon of oil to the pan if the pan seems dry and flip the falafels. Cook on the other side until golden, an additional 3-5 minutes. Remove to paper towel lined plate. Let rest 5 minutes before serving.
Bake Falafels
Preheat the oven to 375 degrees F. Line a baking sheet with aluminum foil. Spray foil with non-stick cooking spray. Add falafels to the baking sheet and spray the tops with non-stick cooking spray. Bake falafels for 25-28 minutes, or until golden brown, flipping once halfway through bake time.
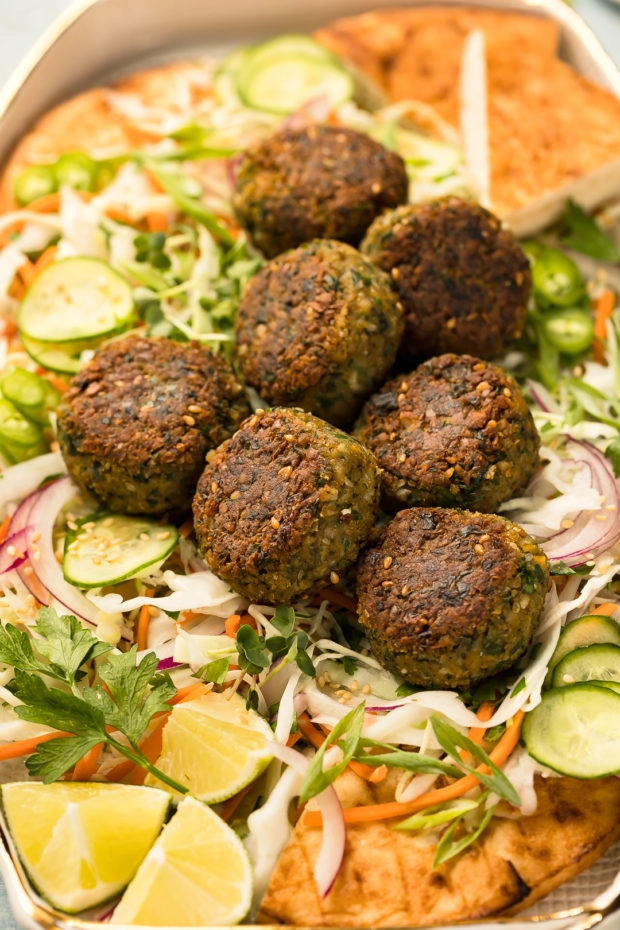
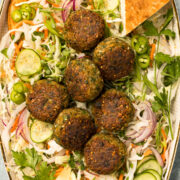
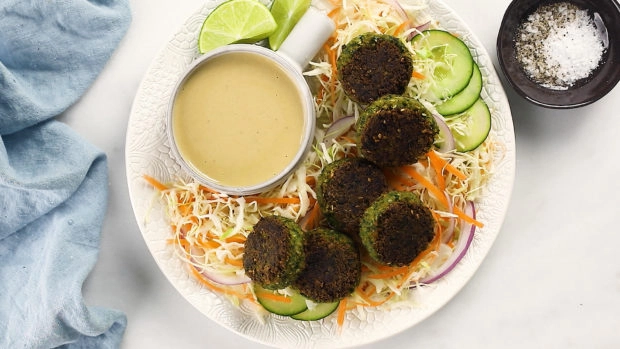
Serve the falafels warm on top of slaw and drizzle with miso tahini. Enjoy!
How to make falafels step by step photos:
Tricks for the best chickpea fritters:
- There is no need to finely dice any of the ingredients. Just give them a rough, coarse chop and let the food processor do the rest of the work for you! However, if you do not own a food processor, you will need to finely chop all the falafel ingredients and then stir them together.
- Swap the cilantro. If you are not a fan of cilantro, simply nix it and increase the amount of parsley to 3/4 cup.
- Switch the flour. While the recipe calls for chickpea flour, you can absolutely use all purpose or gluten free flour instead. The amount of flour needed in the falafels will depend on the consistency of your mixture. Start with 2 tablespoons of flour, and if the mixture is too wet, add more flour 1 teaspoon at a time. You want the mixture to hold together, but not be overly moist. To test it, simply take a small ball of the falafel mixture in your hand and press it together to see if it sticks. (I usually end up using about 2 tablespoons + 1 teaspoon in my mixture).
- Don’t forget to refrigerate! Make sure you transfer the formed falafels to the refrigerator for at least 30 minutes before pan frying. Refrigerating the falafels helps firm up the mixture. If you are in no hurry, you can allow the falafels to sit in the refrigerator, covered with plastic wrap, overnight.
Frequently Asked Questions
Can the falafel mix be made in advance?
Absolutely! In fact, preparing the mixture ahead allows the flavors to develop and helps the falafel balls stay together!
You can make the mixture up to 3 days in advance. Transfer the mixture to an airtight container and store it in the refrigerator for up to 3 days, or until ready to use.
Can you bake falafels?
Yes! You can absolutely bake falafels!
The recipe below includes instructions for both shallow pan-frying and baking falafels!!
Please note, that traditional falafels are deep fried, which results in a crispy exterior all the way around. Pan-frying the falafel in a couple of tablespoons of oil (versus a vat of oil) is a healthier alternative. Pan-frying results in a falafel with a crispy top and bottom exterior. If you bake the falafels, they will not be as crispy as the two previous cooking methods, however, they will still be delicious!!
Is falafel healthy?
This falafel with canned chickpeas recipe is healthy! Made with fresh and healthy ingredients, it’s a recipe you can feel good about serving to your family.
Falafel calories
The falafel calories are around 32 calories per serving. The actual number of calories can vary depending on the ingredients you use and the variations in brands. Either way, it’s a healthy dish that happens to taste terrific too.
Keep in mind that other recipes are deep fried and that can increase the calories a fair amount. So take that into consideration when cooking homemade falafel.
Serving Suggestions
Falafel balls are traditionally served as a sandwich. Typically, they are wrapped in a pita or a flatbread and filled with shredded lettuce, diced tomatoes and some sort of sauce.
This simple recipe is super forgiving, adaptable, and versatile! You can serve these crispy, tender delicious chickpea fritters plain, dress them up with a tahini drizzle, stuff them in a pita or stack them high on a salad! No matter how you decide to serve them, these falafels will become a go-to recipe both you and your family will love!!
- Mezze Platter: You can serve falafels plain as part of an assortment of appetizers, known as a mezze. Try serving tzatziki, baba ganoush or hummus on the side. (See below for more pairing options.)
- Sandwich or Wrap: Serve falafels the classic way, stuffed in a pita. Or, opt for a healthier option and wrap falafels in bibb lettuce. Don’t forget to pile on the fresh veggies and drizzle them with plenty of tahini!
- Salad: Crispy falafels make a delicious addition to salads and slaws!
- Bowls: Add falafels to the top of grain or rice bowls for added protein and flavor!
I served my crispy falafels with a simple fresh slaw salad and miso-tahini sauce for dipping or drizzling. However, falafel balls pair well with a wide variety of dishes! Try mixing and matching to create an epic spread packed with tons of flavors and textures!
What to serve with chickpea fritters:
- Pita Bread
- Hummus
- Tzatziki
- Baba Ganoush
- Ginger Carrot Dip
- Marinated Feta
- Fresh, Seasonal Vegetables
- Slaw (recipe included below)
- Green Salad
- Cucumber Avocado Salad
- Tomato Salad
- Pickled Vegetables
- Couscous
- Orzo Salad
- Greek Chicken Bowl
- Sauces: hot sauce, tahini, fresh lemon or lime juice
Storage
How long do they keep?
Cooked falafels taste best when freshly cooked. However, leftover falafel balls are perfect for easy lunches or snacks on the go! Cooked falafels should be stored in an airtight container or zip-closure bag in the refrigerator. Properly stored, they will last for up to 5 days.
Can you freeze them?
Yes! Cooked falafels can be frozen and are excellent to have on hand for a quick meal!
To freeze, simply cook the falafels according to the recipe instructions below. After cooking, allow them to cool in the refrigerator completely. Once cool, transfer them to freezer safe zip-closure bag in a single layer and store in the freezer for up to 3 months. Alternatively, you can store them in an airtight container, just make sure you place a piece of wax paper in-between the falafels to prevent sticking.
Thaw falafel balls overnight in the refrigerator. Alternatively, they can be reheated from frozen. (Directions below)
To reheat, wrap falafels gently in foil. Bake in an oven preheated to 350°F until they are warm throughout, about 15 minutes if defrosted, or 30 minutes if frozen. Make sure you turn the falafel balls halfway through cooking time, regardless if they were frozen or not.
I pinkie-promise you are going to absolutely love this easy Healthy Falafel Recipe! Grab your food processor get ready to transform canned chickpeas into something truly delicious!!
Until next time, friends, cheers – to homemade street food with a tasty twist!
Cheyanne
Craving MORE? Follow all the deliciousness on Facebook, Pinterest and Instagram!
More chickpea recipes!
If you love these healthy falafels, try one of these delicious recipes with garbanzo beans next!
- Crispy Honey Roasted Chickpeas
- Mediterranean Chickpea Salad
- Easy Chickpea Soup
- Chickpea Piccata Recipe
More healthy snack recipes!
How to make the best Falafels at home with canned chickpeas with recipe video👇
Healthy Crispy Falafels
Equipment
- Food Processor
- Large Skillet or Baking Sheet
Ingredients
- 1/4 small Red Onion – peeled & roughly chopped
- 3 cloves Garlic - smashed & peeled
- 1 Jalapeno - seeded & coarsely chopped
- ½ Cup fresh Parsley leaves - tightly packed
- ¼ Cup fresh Cilantro leaves - tightly packed (SEE NOTES)
- 1 (15 oz.) can Chickpeas – drained and rinsed
- 1 tsp Cumin
- ½ tsp Cayenne
- 1/2 tsp Fresh Ginger - grated
- ½ tsp Baking Soda
- 2-3 TBS Chickpea Flour - (or All-Purpose or Gluten-Free flour)
- 1/2 Lime zest + 1 tsp Juice
- 1 tsp Coarse Sea Salt (or Flakey Sea Salt)
- 1/4 tsp Fresh Ground Black Pepper
- 1 1/2 tsp Sesame Seeds (raw, un-toasted)
- 2-3 TBS Neutral Oil - FOR PAN-FRYING
For Serving: Slaw (recipe below), Pita Bread, Sliced Jalapenos, Microgreens, Lime Wedges
Miso Tahini Sauce (recipe below)
Instructions
- Line a small sheet pan with parchment paper and set aside.
- Make the falafel mixture: In the bowl of a food processor add: red onion, garlic, jalapeno, parsley and cilantro. Pulse until chopped and combined, about 12-15 pulses. Add the chickpeas and pulse again until finely chopped.

- Add seasonings: Add in the cumin, cayenne, ginger, baking soda, 2 TBS of chickpea flour*, lime zest, juice, salt and pepper. Pulse until combined, but NOT smooth, stopping to scrape down sides as necessary. (You want texture and for the mixture to be slightly chunky and thick). Stir in the sesame seeds. Taste and adjust for seasoning.
- Form the falafels: Using your hands, roll and form the mixture into falafel balls, about 2 tablespoons of mixture for each, for a total of 12 balls.
- Chill: Place the formed falafels onto prepared sheet pan and place in the refrigerator for at least 30 minutes to firm (you can let these sit overnight, just cover lightly with plastic wrap).
- To PAN-FRY falafels: Heat 2 tablespoons of olive oil in a large cast iron skillet over medium-high heat. Reduce the heat to medium and add the falafels. Cook until golden brown, about 3-5 minutes. Add the remaining tablespoon of oil to the pan if the pan seems dry and flip the falafels. Cook on the other side until golden, an additional 3-5 minutes. Remove to paper towel lined plate. Let rest 5 minutes before serving.
- To BAKE falafels: Preheat oven to 375 degrees F. Line a baking sheet with aluminum foil. Spray foil with non-stick cooking spray. Add falafels to the baking sheet and spray the tops with non-stick cooking spray. Bake falafels for 25-28 minutes, or until golden brown, flipping once halfway through bake time.
- To serve: Serve the falafels warm on top of slaw and drizzle with miso tahini. Enjoy!
Video
Notes
- Prepping Veggies: There is no need to finely dice any of the ingredients. Just give them a rough, coarse chop and let the food processor do the rest of the work for you! However, if you do not own a food processor, you will need to finely chop all the falafel ingredients and then stir them together.
- Cilantro: If you are not a fan of cilantro, simply nix it and increase the amount of parsley 3/4 cup.
- Chickpea Flour: While the recipe calls for chickpea flour, you can absolutely use all purpose of gluten free flour instead. The amount of flour needed in the falafels will depend on the consistency of your mixture. Start with 2 tablespoons of flour, and if mixture is too wet, add more flour 1 teaspoon at a time. You want the mixture to hold together, but not be overly moist. To test it, simply take a small ball of the falafel mixture in your hand and press it together to see if it sticks. (I usually end up using about 2 tablespoons + 1 teaspoon in my mixture).
- Chill Falafels: Make sure you transfer the formed falafels to the refrigerator for at least 30 minutes, especially before pan frying! Refrigerating the falafels helps firm up the mixture. You can store the prepared falafels in the refrigerator, covered with plastic wrap, up to overnight.
Nutrition
Did you make this recipe?
Mention @nospoonnecessary on Instagram and tag it #nospoonnecessary!
©No Spoon Necessary. All images and content are copyright protected. Please do not use any images without prior permission. If you want to republish this recipe please do not list instructions, instead link directly back to this post.
MaryAnn | The Beach House Kitchen
I absolutely LOVE falafel Chey! Nice and healthy and so satisfying. Great updated photos and video Chey!
Mary Ann | The Beach House Kitchen
One of my healthy favorites Chey! So much flavor and so incredibly healthy and tasty. Love the new video and photos! Pinned!
Kelsie | the itsy-bitsy kitchen
Oh my gosh I LOVE falafel! And it’s been way too long since I’ve made it. I’m definitely starting with this recipe. I can’t wait! Have a great week, Chey!
Kevin
Your updated photos are amazing! I want to try this asap!
Mimi
These are fabulous! Love the twist on the ingredients!
Geraldine | Green Valley Kitchen
Yes, please, Cheyanne – I love this. I’m a big falafel fan (even though I don’t have one on the blog!) and get falafel’s usually once a week for lunch. Now, I need to make this recipe! And the asian slaw is calling to me too. I love slaw and I love the miso tahini dressing! Delicious!
Christina
Dang girl, I love me some falafel and your recipe looks out of this dang world! I can’t wait to try it!
Marissa
Drooling over this Asian twist on falafel, Cheyanne! And how beautiful is it arranged on that tray! Keith is allergic to chickpeas (super bummer, right?) – do you think that cannellini beans cooked from dry beans so they have more texture than canned would work here?
Mary Ann | The Beach House Kitchen
I LOVE falafel Chey! I tried it for the first time a year or two ago and fell in love! Love the Asian twist you’ve got here! That slaw sounds delicious. On my list!!
annie@ciaochowbambina
I seem to be craving falafel all the time lately! I can’t believe you shared this! I LOVE IT! Pinned!
Kelsie | the itsy-bitsy kitchen
That is truly horrific. Rosemary (for some reason) gives me migraines so I would have run screaming from that kitchen. Kudos to you for sticking it out! I’m soooo glad you republished this one because I missed it the first time around and I LOVE falafel. This is definitely a must-try! Have a great weekend, girlie!
Adam
This recipe is going to have to happen soon my house, MUST!
Cheyanne Bany
Adam, Hope you do try it! They are seriously yummy!!